I am a firm believer in children knowing how to take care of themselves, the home, and to appreciate the simple things in life. That being said, my 5 year old wants to get a new 20 dollar game for her leapfrog tablet. One of those games that she will be SO EXCITED to have.. for about an hour. With school sign ups just around the corner, and the cost of school supplies and clothes, I find it REALLY hard to spend 20 dollars on a game that will be forgotten within 24 hours of purchasing.
So I made a deal. I told my daughter I would let her buy the game with her own money.. that she earns doing chores.
One of those chores is “helping” me with the dishes.
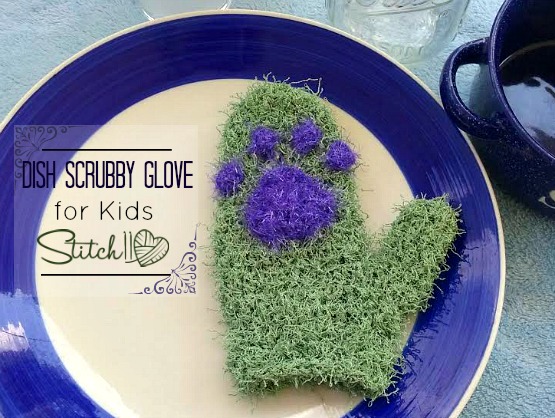
My daughter already knew I had the Red Heart Scrubby and Scrubby Sparkle yarns… she suggested I make her a “Cat Paw Print Glove” (because she is convinced that she is really a cat) to help her wash dishes.
How could I say “no” to this?
Not only will she be learning that things are worth more than just money (also worth our time), but she is learning how to do the dishes, count, and appreciate her own hard work!
I feel like this is a win for everyone! I hope you and your children enjoy this fun free kitty dishcloth glove too!
Supplies
Red Heart Scrubby (Green Tea)
Red Heart Scrubby Sparkle (Grape Raisin)
5.5 mm Crochet Hook
Yarn Needle
Stitches
Magic Circle
SC – Single Crochet
HDC – Half Double Crochet
HDC DEC – Half Double Crochet Decrease
FPSC – Front Post Single Crochet
This is my first experience working with Red Heart Scrubby Yarn. As most of us know, using fluffy yarns or yarns with strings hanging off can be tricky, especially when first starting on the project. For me, the only hard part was the first round. After this, it's MUCH easier to see and know where to put my stitches. If you are nervous, don't be!!! This yarn is so perfect for dishcloths!!!
Get Started! Using the Red Heart Scrubby Yarn.
Round 1: Magic Circle. 8 HDC into magic circle. Pull ring tight. Join to first HDC.
Round 2: CH 1. 2 HDC into first HDC. 1 HDC into the next HDC. *2 HDC into next HDC. 1 HDC into the next HDC. Repeat from * 2 more times. Join to first HDC. (12 HDC total)
Round 3: CH 1. 2 HDC into the first HDC. 1 HDC into each of the next 2 HDC. *2 HDC into next HDC. 1 HDC into each of the next 2 HDC. Repeat from * 2 more times. Join to first HDC. (16 total HDC)
Round 4-7: CH 1. 1 HDC into each HDC around. Join to first HDC.
Round 8: CH 1. 2 HDC into the first stitch. 1 HDC into each of the next 15 stitches. Join to first HDC (17 total HDC)
Round 9: CH 1. 2 HDC into the first stitch. 1 HDC into each of the next 7 stitches. 2 HDC into the next stitch. 1 HDC into each of the next 8 stitches. Join to first HDC. (19 total HDC)
Round 10: CH 1. 1 HDC into each HDC. Join to the first HDC.
*Note* for children older than 7, you may want to repeat round 10 a few more times.
Next we will be making the thumb covering. But first, lets finish off and weave in our ends. After we make the thumb, we will continue crocheting around this piece with the thumb yarn end. This will make the finger covering, and thumb covering become one piece/mitten.
*Note* Do not think you are the hulk and break this yarn with your bare hands! This yarn is STRONG! Use scissors! 🙂
The Thumb of your Glove
Round 1: Magic Circle, 7 HDC into magic circle. Pull ring tight. Join to first HDC.
Round 2-5: CH 1. 1 HDC into each of the 7 stitches. Join to first HDC.
Round 6: Holding your thumb piece next to the rest or your glove, crochet 1 HDC into each of the 19 stitches. (you are using the yarn end from your thumb piece) Do NOT crochet into the thumb piece. Slip stitch into the starting stitch of the thumb piece.
Now you have one piece instead of two.
Round 7: CH 1. HDC into each of the 7 stitches from the thumb (do not join) HDC into each of the 19 stitches from the original piece. Join to first HDC. (26 total HDC)
Round 8: CH 1. HDC into the first stitch. HDC DEC 2 times. 1 HDC into each of the next 2 stitches. HDC DEC. HDC into each of the next 7 stitches. HDC DEC. HDC into next stitch. HDC DEC. HDC into each of the last 5 stitches. Join to first HDC. (21 total stitches)
Round 9-10: CH 1. 1 HDC into each stitch around. Join to first HDC (21 total HDC)
Round 11: CH 1. SC into each stitch around. Join to first SC. (For longer hands, you may want to repeat this round)
Round 12: CH 1. FPSC into each stitch around. Join to first FPSC
Now for the Paw Prints using Red Heart Scrubby Sparkle
The Red Heart Scrubby Sparkle yarn was a pretty fun experience for me. The center of the yarn almost feels like a thin elastic cord. It was REALLY easy to see my stitches and know where to slide the hook. If you have never used the Red Heart Scrubby Sparkle, I suggest you try it out!
Stitches
SC – Single Crochet
HDC – Half Double Crochet
DC – Double Crochet
Magic Circle
Make 4 Finger Prints
Round 1: Magic circle, 5 SC inside magic circle. Join to first SC and pull circle tight. Finish off leaving long end for attaching. Weave in your starting tail.
Make 1 Palm Print
Round 1: Magic circle. 9 SC inside magic circle. Join to first SC and pull ring tight.
Round 2: Ch 1, **SC and HDC into the next stitch. 2 DC into the next stitch. HDC and SC into the next stitch. Repeat from ** 2 more times.
Finish off leaving tail for attaching. Weave in your starting tail.
Attach the paw print to the glove.

This is just so cute! I imagine that this would also be a good glove to use in the shower to lather up with, right? I’d love to try this out for my kids! Thanks so much! 🙂 Lisa