If you follow my blog, you already know that I bought a new/used vehicle. I recently wrote out a free console cover crochet pattern.
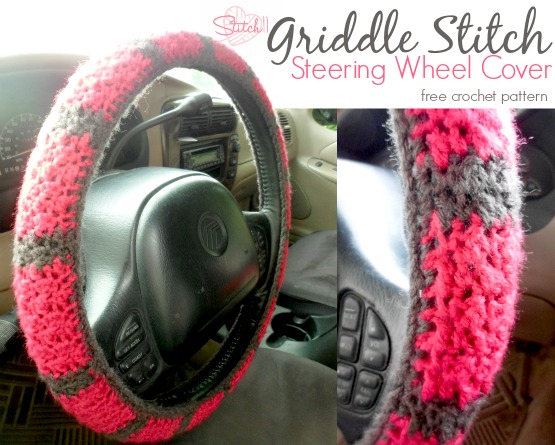
Now it is time to cover the cut up steering wheel!
I did a quick search for free patterns but to my surprise, there really are not any to choose from. So here I am, with my yarn, hook, and the Moogly Griddle Stitch Tutorial pulled up. If you are not familiar with this stitch, go ahead and check it out before starting. (Yes, I write the posts as I crochet the item) 🙂
First thing is first, measure your steering wheel. I just took a piece of yarn and wrapped it around the outside of the wheel which measures out to be about 47 inches. Then measure how wide around the wheel is, mine is around 4 inches.
The trick to making your cover, is to make it so it has to stretch as big as you can stretch it to be the length you need. Don't worry, you will be able to get it onto the wheel easier than it seems. Your goal is to make it so it is stretched so tight, that it doesn't want to move once you put it on. I was intimidated by this idea.. but once I made it, I realize it is so much easier and more secure than I imagined beforehand.
So now that I know it is around 4 inches, I will make a band that stretches to be about 4 inches wide. And then I will crochet in length that the steering wheel is round. I will share my pattern with you, just remember to make your own measurements just in case yours needs to be a few inches different than mine. Mine will fit to stretch into place.
Free Steering Wheel Cover Crochet Pattern
Supplies
Med/WW yarn (I used two colors of I Love This Yarn)
F/5-3.75 mm crochet hook
Yarn needle
Stitches
CH- Chain
SC- Single Crochet
DC- Double Crochet
Row 1: CH 12, skip 3 CH (counts as first DC) SC into next CH. **DC into next CH. SC into next CH. Repeat from ** across. (10)
Row 2-6: CH 3(Counts as first DC) SC into the next stitch. **DC into the next stitch. SC into the next stitch. Repeat from ** across. (10)
Drop your original color of yarn.Do not finish off. Attach contrasting color. You will pick up your original yarn after the next two rows.
Row 7-8: CH 3(Counts as first DC) SC into the next stitch. **DC into the next stitch. SC into the next stitch. Repeat from ** across. (10)
Finish off. Pick up your original color yarn. Slip stitch up the side of the last two rows so that you are starting in the same place you finished off the contrasting yarn.
Row 9-14: CH 3(Counts as first DC) SC into the next stitch. **DC into the next stitch. SC into the next stitch. Repeat from ** across. (10)
Drop your original color of yarn.Do not finish off. Attach contrasting color. You will pick up your original yarn after the next two rows.
Row 15-16: CH 3(Counts as first DC) SC into the next stitch. **DC into the next stitch. SC into the next stitch. Repeat from ** across. (10)
Finish off. Pick up your original color yarn. Slip stitch up the side of the last two rows so that you are starting in the same place you finished off the contrasting yarn.
Repeat rows 9-16 twelve more times.
Edging and Joining
Step 1: CH 1. Turn and work up the side of the steering wheel cover. 1 SC into the side of each SC and 1 SC into the side of each CH 3.
Step 2: CH 1, Turn and work back down this same side. SC into the first stitch. SC DEC. **SC into the next stitch. SC DEC. Repeat from ** across.
Step 3: Repeat steps 1-2 but on the other side of the steering wheel cover.
Step 4. Finish off leaving long tail for joining the ends. Join the ends and stretch around the steering wheel. It will be a good secure and snug fit.


Thank you so much for this amazing pattern! I’ve been wanting to crochet a steering wheel cover for a while now and haven’t gotten around to looking for a pattern. Finding your site on Pinterest saved me a lot of searching! Thanks again!
Thank you so much for sharing this pattern. I have an old SUV that I don’t want to part with but it needs some sprucing up. I thought about yarn bombing it. You’ve given me a start. I can’t thank you enough.
I am so excited about this pattern… I am going to make this as soon as I get my car in a few weeks…. thank u so much!!!!
I have been wanting to make one of these for a long time, but just could not figure it out. Thanks.
I plan to use cotton yarn as I’m in Arizona and the wheels get HOT. Also, for more ease I will use variegated colors. Love the pattern! Thanks!!
How do we adjust the pattern for different sizes?mine is 1/2 inch smaller around and 3/4 inch longer than your measurements
You probably wouldn’t need to make any adjustments 🙂
Nice! Yours looks great
Hey, this is marrie, i saw your li9nk on mogglyblog.com and i was very excited to see your hardwork! i really loved your work! Thanks alot! And let me inform u that from tday, i gotta check your website, DAILY 😉
Just made this and love it!!! Thank you for a wonderful pattern that a novice like me could follow 🙂 If I can figure out how, I will post a pic.
I wanna see!! Come message me on my Facebook page 😀 https://www.facebook.com/stitch11page
Could you do a video on this pattern? I do so much better following someone who is making it so I can see what it’s supposed to look like! Yours is beautiful!
Hi Kathryn. I hope to some day do videos but as of right now I do not have the appropriate supplies to even attempt them.
I just saw a lady sharing your beautiful pattern as her own creation I have a couple screenshot photos showing this. I’m not sure how to share the photos with you here.
You can contact me through my Facebook easily. https://www.facebook.com/stitch11page
I happened across your pattern on pinterest and just made it!!!! I absolutely LOVE it!!! Thankfully my steering wheel dimentions were identical to yours so I was able to follow the pattern verbatim, and it is PERFECT!!! Thank you so much!!!
I just wanted to say that I am thankful that you posted this, I came acrossed it and automatically knew it was my next project!
You should do a video tutorial for it since there isn’t one out there yet, I would love to see it.
I’m excited to make this, but in your border you said SC DEC… what is that?
Thanks!
Hi Connie! It is the single crochet decrease. I have a video linked in the stitches used list. Or you can google the term to find other video tutorials for the stitch. 🙂
Hi Connie! It is the single crochet decrease. I have a video linked in the stitches used list. Or you can google the term to find other video tutorials for the stitch. 🙂
I just made this pattern in cotton because I live in Arizona and needed to keep it as cool as possible and it turned out awesome! I even made a cover for the gear shift which gets screaming hot. I worried about using cotton because it doesn’t stretch the same but it worked perfectly! Thanks for the pattern!!!
I love this pattern so much I actually would like to make a gear shift cover to match. Would you happen to have a pattern for that?
I don’t.. but I believe I have seen some online in the past.
when you have (10) at the end of each row instruction, does that mean repeat 10 times, or..? Sorry, I’m a rookie, but I want to make this for my roommate!
It means 10 stitches. 🙂
I just finished my steering wheel cover using your pattern. I love it! Thank you so much for sharing it. I couldn’t wait till morning to put it on the steering wheel. Here it is 1:30 am and I was out in the cold garage finishing the attaching of the ends, and admiring my work. 🙂
Hi there,
I am new to crocheting and where it says do rows 9-16 12 more times does that mean each row 12 times? Hopes this makes sense lol.
Thanks,
Shauna
Yes, you will crochet those rows 12 more times.
Can you be more clear on how to measure the steering wheel dimensions. Sorry I couldn’t get it as am a beginner. Ur work looks great and I wanna try:)
Nice! Just one question. In the Edging, what does DEC stand for, if you don’t mind me asking? I can’t figure this out.
Thanks
I scrolled up and found the answer to my question. Never mind
I made one of these for my daughter. She absolutely loved it! She showed it off and I’m now making one for one of her friends. He practically begged me he liked it so much! Thank you for posting this pattern!!
Loved it. So simple to make. Made mine with variegated yarn and turned out beautiful. Thank you for the share
Thank you! It took a while and I have one more adjustment to make but it looks so much better than the worn out steering wheel did!
What does DEC mean? I’m not a professional crocheter. I found that it comes apart at a couple of places where I changed colours since the finishing off doesnt hold.
Oh, I got it now. I looked up DEC.
Do you turn your eork at end of each row to start back?
yes.
Hi! I love your pattern. My husband thinks this will slip on the wheel. I am makiing one for my mother. She lives in cold country.
What does DEC stand for?
decrease. 🙂 if you dont know the DEC stitches, there are a lot of tutorials available online.
Hey I haven’t tried to make it yet I plan on making this for my mother’s truck. If I give you credit can I sell the finished project to my customers online? If not that’s okay I don’t mind at all. Just wanted to know.