If you're up for the challenge of multiple yarn changes, read on. This pattern is great for using up all your oddball yarns and adding a unique-looking blanket to your stash. Scroll down for the free pattern, or get the ad-free printable PDF pattern here.
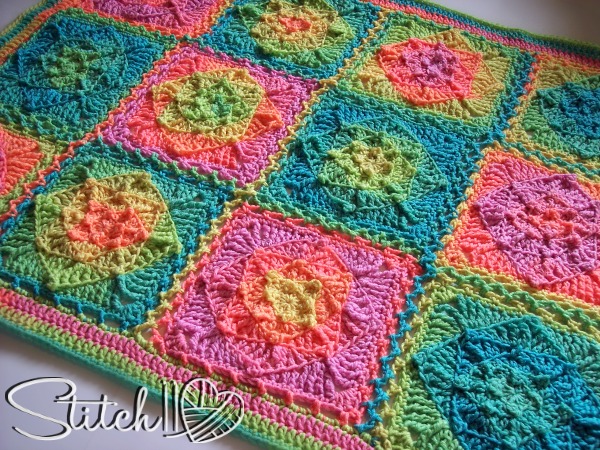
This Retro Illusion Baby Blanket is so fun to crochet, and this pattern makes it so much easier.
The original version of this crochet pattern called the Optical Illusion Baby Blanket used individual skeins of different colors of yarn leading to LOTS of color changes and ends to weave in.
The colors in this blanket may make it seems like it's hard to crochet but let me help you breakdown the skills that you need to complete these types of patterns. In my Crochet (& Knit) Essential Skills class I go over techniques like how to make granny squares, changing colors, weaving in ends and so much more. This collection of 72 crochet (& knit) videos will teach you everything you need to know. Check it out free for 2 days here.

This revamped version uses a multicolored yarn to make the color changes happen with ease.
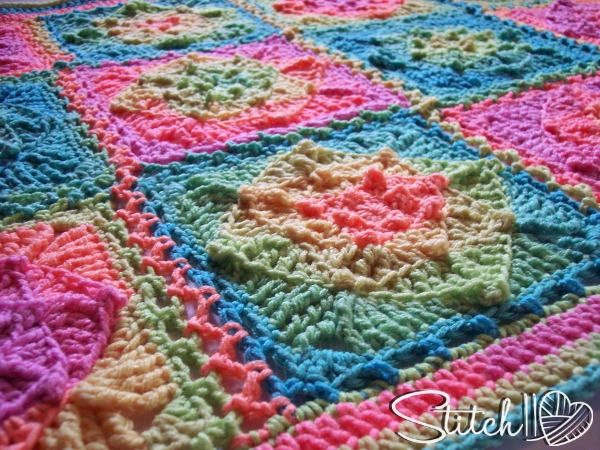
The entire process of making this blanket was exciting. The color changes are different and unique with each square, preventing me from getting jaded.
If you enjoy projects that are done in pieces and seamed together, you may really enjoy my Crochet Anything with Hexagons class. Hexagons look complicated but the technique is really pretty easy and once you understand it, you can use hexagons to make all kinds of projects including blankets similar to this one our my favorite amigurumi animals!
Get the ad-free printable PDF pattern here
Skill Level: Easy
Materials:
Yarn: 700 yds self-striping, worsted weight yarn
Hook: US size I/9 (5.5mm) crochet hook or size needed to match gauge
Notions:
– Yarn Needle
– Scissors
Pattern uses US crochet terms
ABBREVIATIONS DESCRIPTION ch Chain dc Double crochet dtr Double treble crochet hdc Half double crochet rnd Round RS Right side(s) sc Single crochet sk Skip sl st Slip stitch tr Treble crochet trtr Treble treble crochet
Size: 32” x 25”.
Special Stitch:
Gauge:
Each square measures 7” x 7”.
Special Stitch:
Picot: Ch 3, sl st in first ch. When working the next row, make sure picots are pushed to the RS of the square. Picots are not included in the stitch counts.
Get the ad-free printable PDF pattern here
Pattern
Make a magic circle
Rnd 1: Ch 3 (counts as dc throughout), (2 dc, picot) in circle, [3 dc, picot] 3 times in circle, tighten circle, join with sl st to first st. (12 dc)
Work in back loops only for rnds 2-6.
Rnd 2: Ch 1, sc in first st, (hdc, dc, picot, dc, hdc) in next st, sc in next st, sk next picot and push it to the front, [sc in next st, (hdc, dc, picot, dc, hdc) in next st, sc in next st, sk next picot and push it to the front] 3 times, join with sl st to first st. (8 sc, 8 hdc, 8 dc)
Sk first st, sl st in each of next 2 sts, sk next picot and push it to the front, sl st in next st.
Rnd 3: Ch 1, sc in first dc, hdc in next hdc, (dc, tr, picot) in next sc, (tr, dc) in next sc, hdc in next hdc, sc in next dc, sk next picot and push it to the front, [sc in next dc, hdc in next hdc, (dc, tr, picot) in next sc, (tr, dc) in next sc, hdc in next hdc, sc in next dc, sk next picot and push it to the front] 3 times, join with sl st to first st. (8 sc, 8 hdc, 8 dc, 8 tr)
Setup for next rnd: Sk first st, sl st in each of next 3 sts, sk next picot and push it to the front, sl st in next st.
Rnd 4: Ch 1, sc in first tr, hdc in next dc, dc in next hdc, (tr, dtr, picot) in next sc, (dtr, tr) in next sc, dc in next hdc, hdc in next dc, sc in next tr, sk next picot and push it to the front, [sc in next tr, hdc in next dc, dc in next hdc, (tr, dtr, picot) in next sc, (dtr, tr) in next sc, dc in next hdc, hdc in next dc, sc in next tr, sk next picot and push it to the front] 3 times, join with sl st to first st. (8 sc, 8 hdc, 8 dc, 8 tr, 8 dtr)
Setup for next rnd: Sk first st, sl st in each of next 4 sts, sk next picot and push it to the front, sl st in next st.
Rnd 5: Ch 1, sc in first dtr, hdc in next tr, dc in next dc, tr in next hdc, (dtr, trtr, picot) in next sc, (trtr, dtr) in next sc, tr in next hdc, dc in next dc, hdc in next tr, sc in next dtr, sk next picot and push it to the front, [sc in next dtr, hdc in next tr, dc in next dc, tr in next hdc, (dtr, trtr, picot) in next sc, (trtr, dtr) in next sc, tr in next hdc, dc in next dc, hdc in next tr, sc in next dtr, sk next picot and push it to the front] 3 times, join with sl st to first st. (8 sc, 8 hdc, 8 dc, 8 tr, 8 dtr, 8 trtr)

Setup for next rnd: Sk first st, sl st in each of next 5 sts, sk next picot and push it to the front, sl st in next st.
Rnd 6: Ch 1, sc in first trtr, hdc in next dtr, dc in next tr, dc in next dc, tr in next hdc, (dtr, 2 trtr) in next sc, ch 2, (2 trtr, dtr) in next sc, tr in next hdc, dc in next dc, dc in next tr, hdc in next dtr, sc in next trtr, sk next picot and push it to the front, [sc in next trtr, hdc in next dtr, dc in next tr, dc in next dc, tr in next hdc, (dtr, 2 trtr) in next sc, ch 2, (2 trtr, dtr) in next sc, tr in next hdc, dc in next dc, dc in next tr, hdc in next dtr, sc in next trtr, sk next picot and push it to the front] 3 times, join with sl st to first st. (8 sc, 8 hdc, 16 dc, 8 tr, 8 dtr, 16 trtr, 4 ch-2 sps)
Work in both loops as normal for rnd 7 and Borders.
Rnd 7: Ch 1, [sc in each st across to next ch-2 sp, (hdc, dc, tr, dc, hdc) in ch-2 sp] 4 times, sc in each remaining st across, join with sl st to first st. (64 sc, 8 hdc, 8 dc, 4 tr)
Do not fasten off.
Square Border
Sl st in next st, ch 1, sc in same st, [ch 3, sk next 2 sts, sc in next st] twice, ch 3, sk next 2 sts, (sc, ch 3, sc) in next tr (corner), *[ch 3, sk next 2 sts, sc in next st] 6 times, ch 3, sk next 2 sts, (sc, ch 3, sc) in next tr (corner), repeat from * twice more, [ch 3, sk next 2 sts, sc in next st] 3 times, ch 3, sk last 3 sts, join with sl st to first st. (32 sc, 32 ch-3 sps)
Assembly:
Lay 2 squares side by side, with right sides up.
Join yarn with sl st in any corner ch-3 sp on first square.
Ch 2, sl st in matching corner sp on 2nd square.
[Ch 2, sl st in next ch-3 sp on first square, ch 2, sl st in next ch-3 sp on second square] across. Without breaking the yarn, continue in this manner across 3 more pairs of squares to make the first vertical seam. Fasten off.
Repeat this process to join the remaining 4 squares with the second vertical seam. Work the horizontal seams between squares in the same way. When you get to the corners where the seams overlap, slip stitch into the same slip stitches that you made when working the vertical seams.
Blanket Border:
Join yarn with sl st in any non-corner ch-3 sp around edge of blanket.
Rnd 1: Ch 1, 3 sc in same ch-3 sp, [(sk all sc, 3 sc in each ch-3 sp and 3 sc in each seam) across to corner ch-3 sp, (sc, ch-2, sc) in corner ch-3 sp] 4 times, sk all sc, 3 sc in each ch-3 sp across, join with sl st to first st. (416 sc, 8 ch-2 sps)
Rnd 2: Ch 3 (counts as dc), [dc in each sc across to ch-2 sp, (dc, ch 2, dc) in ch-2 sp] 4 times, dc in each remaining sc, join with sl st to first st. (424 dc, 8 ch-2 sps)
Rnd 3: Ch 3 (counts as dc), [dc in each dc, across to ch-2 sp, (2 dc, ch 2, 2 dc) in ch-2 sp] 4 times, dc in each remaining dc, join with sl st to first st. (440 dc, 8 ch-2 sps)
Rnd 4: Ch 1, [sc in each dc across to ch-2 sp, 3 sc in ch-2 sp] 4 times, sc in each remaining dc, join with sl st to first st. (464 sc)
Fasten off; weave in all ends.
Get the ad-free printable PDF pattern here
If you enjoyed these great stitch patterns and looking to add a new repertoire of stitches to your knowledge base, check out the Ultimate Crochet Stitch Library.
Looking for more great crochet projects, check out our other great patterns here: 30+ Easy Crochet Baby Blanket Patterns, 30+ Dinosaur Crochet Patterns

I have been looking for a challenging Baby Blanket pattern. I will let you know how it goes in a couple of weeks.
I wish this wasn’t too pretty to be a boy’s blanket!!!
1. make it in red and black and say they are explosions, not flowers
2. colors & flowers & butterflies don’t make people gay
well said!
Just use a different colored yarn 🙂
all colors are for all people.
Can I print out this pattern. It’s beautiful!
What self-striping yarn did you use for this example? Red Heart Stripes “Retro”?
Thanks.