I was given the challenge to create the perfect hooded toddler poncho. After searching online for WEEKS and not having much luck finding a hooded crochet poncho.. I knew I was left with no choice but to write one out.
Luckily, the person who wanted the poncho guided me with the wonderul directions of this poncho while still giving me creative freedom.
I am beyond pleased with the outcome! I am also so very happy to share the pattern with you, for free!
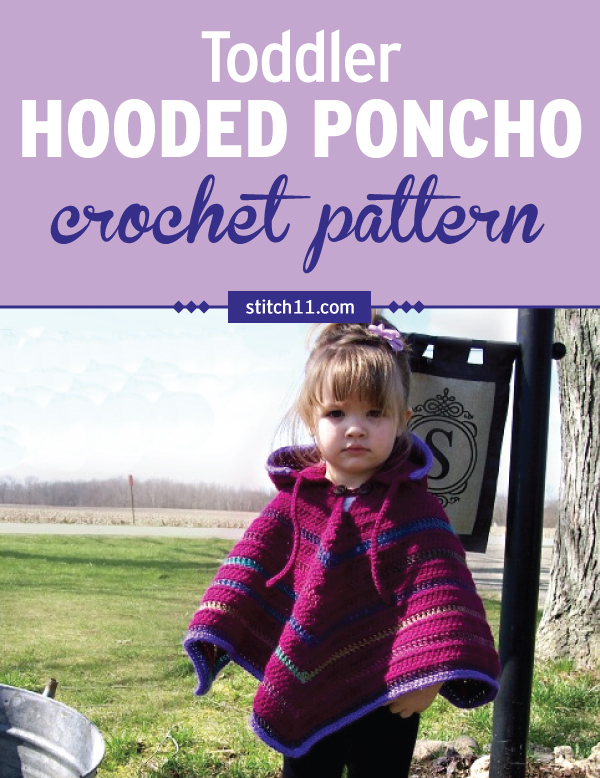
Toddler Hooded Poncho Crochet Pattern
Supplies
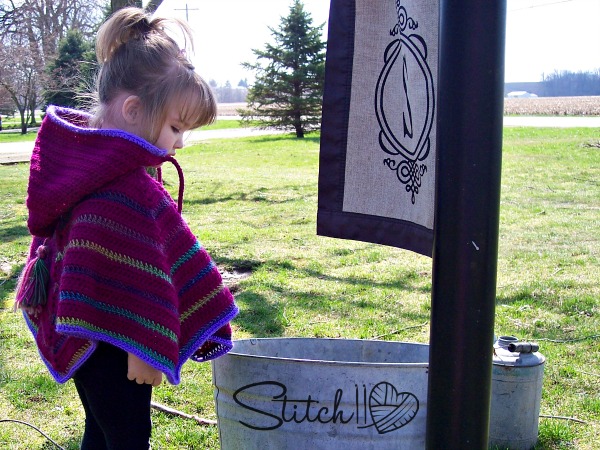
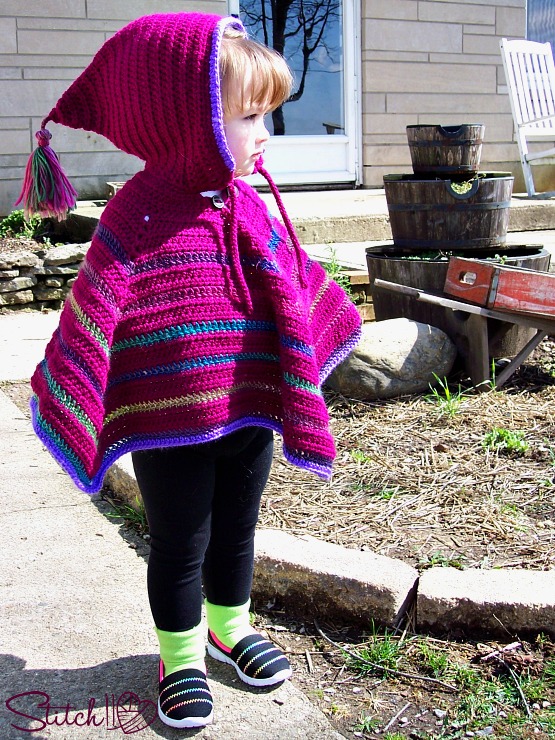
For the most of the pattern you will be using Red Heart With Love. I used “Boysenberry” aka Maroon. (about 1.5 skeins)
For the highlight in front of the hood and the trim of the poncho, I used purple Caron Simply Soft . (1/4 skein)
For the contrast stripes I used Red Heart Boutique “Unforgettable”. (1 skein)
You will need a 5 mm crochet hook.
You will need a yarn needle
*Optional* – 2 buttons
Stitches
Magic Circle
CH – Chain
SC – Single Crochet
HDC – Half Double Crochet
DC – Double Crochet
Hood
Round 1: Magic Circle. CH 1. 5 HDC. Join to first HDC. Pull magic circle tight. Turn. (5 HDC)
Round 2: CH 1. 1 HDC into each HDC. Join to first HDC. Turn. (5 HDC)
Round 3: CH 1. 2 HDC into each HDC. Join to first HDC. Turn. (10 HDC)
Round 4: CH 1. 1 HDC into each HDC. Join to first HDC. Turn. (10 HDC)
Round 5: CH 1. 2 HDC into first HDC. 1 HDC into next HDC. *2 HDC into next HDC. 1 HDC into next HDC. Repeat from * around. Join to first HDC. Turn. (15 HDC)
Round 6: CH 1. 1 HDC into each HDC around. Join to first HDC. Turn (15 HDC)
Round 7: CH 1. 2 HDC into first HDC. 1 HDC into each of the next 2 HDC. * 2 HDC into next HDC. 1 HDC into each of the next 2 HDC. Repeat from * around. Join to first HDC. Turn. (20 HDC)
Round 8: CH 1. 1 HDC into each HDC around. Join to first HDC. Turn.20 HDC)
Round 9: CH 1. 2 HDC into first HDC. 1 HDC into each of the next 3 HDC. * 2 HDC into next HDC. 1 HDC into each of the next 3 HDC. Repeat from * around. Join to first HDC. Turn. (25 HDC)
Round 10: CH 1. 1 HDC into each HDC around. Join to first HDC. Turn. (25 HDC)
Round 11: CH 1. 2 HDC into first HDC. 1 HDC into each of the next 4 HDC. * 2 HDC into next HDC. 1 HDC into each of the next 4 HDC. Repeat from * around. Join to first HDC. Turn. (30 HDC)
Round 12: CH 1. 2 HDC into first HDC. 1 HDC into each of the next 5 HDC. * 2 HDC into next HDC. 1 HDC into each of the next 5 HDC. Repeat from * around. Join to first HDC. Turn. (35 HDC)
Round 13: CH 1. 1 HDC into each HDC around. Join to first HDC. Turn. (35 HDC)
Round 14: CH 1. 2 HDC into first HDC. 1 HDC into each of the next 6 HDC. * 2 HDC into next HDC. 1 HDC into each of the next 6 HDC. Repeat from * around. Join to first HDC. Turn. (40 HDC)
Round 15: CH 1. 2 HDC into first HDC. 1 HDC into each of the next 7 HDC. * 2 HDC into next HDC. 1 HDC into each of the next 7 HDC. Repeat from * around. Join to first HDC. Turn. (45 HDC)
Round 16: CH 1. 1 HDC into each HDC around. Join to first HDC. Turn. (45 HDC)
Round 17: CH 1. 2 HDC into first HDC. 1 HDC into each of the next 8 HDC. * 2 HDC into next HDC. 1 HDC into each of the next 8 HDC. Repeat from * around. Join to first HDC. Turn. (50 HDC)
Round 18: CH 1. 2 HDC into first HDC. 1 HDC into each of the next 9 HDC. * 2 HDC into next HDC. 1 HDC into each of the next 9 HDC. Repeat from * around. Join to first HDC. Turn. (55 HDC)
Round 19: CH 1. 1 HDC into each HDC around. DO NOT JOIN. Turn. (55 HDC)
Round 20: CH 1. 2 HDC into the first stitch. 1 HDC into the next 10 HDC. *2 HDC into next stitch. 1 HDC into next 10 HDC. Repeat from * around. Turn. (60 HDC)
Round 21: CH 1. 2 HDC into the first stitch. 1 HDC into the next 11 HDC. *2 HDC into next stitch. 1 HDC into next 11 HDC. Repeat from * around. Turn. (65 HDC)
Round 22-28: CH 1. 1 HDC into each HDC around. Turn. (65 HDC)
Round 29-30: CH 2. 1 DC into each of the first 5 stitches. HDC into next 55 stitches. DC into last 5 stitches. Turn. (65 stitches)
Round 31: CH 2. 1 DC into first 10 stitches. HDC into next 45 stitches. DC in last 10 stitches. Turn. (65 stitches)
Round 32: CH 1. 1 SC into the next 64 stitches. 2 SC into the next stitch.
Turn (rotate your piece), working up the side of the stitches of the neck of the hood.
You will put 3 SC over each side of the next 3 DC. 2 SC over each side of the next 22 HDC. Put 3 SC over each side of the next 3 DC. 1 SC into the starting stitch. Join to first SC. (129 stitches)
Round 33: CH 1. SC into next 64 stitches. 2 SC into each of the next 3 stitches. 1 SC into next 13 stitches. 1 HDC into each of the next 34 stitches. 1 SC into each of the next 13 stitches. 2 SC into each of the next 2 stitches. 1 SC into starting stitch. (135 stitches)
Finish off and attach highlighting color.
Hood Edge and Highlight
Row 1: CH 1, SC into same stitch and next 64 stitches. Turn. (65 SC)
Row 2: Skip first stitch. SC into next 63 stitches. Turn. (63 SC)
Row 3: Crocheting over the last 2 rows, this row will be worked into stitches from round 33, bunching the last 2 rows inside the stitches. (63 SC)
Finish off. Count 12 stitches to the left. Attach your main color.
Neck of Poncho
Row 1: CH 1. 2 HDC into first stitch. 1 HDC into next 46 stitches. 2 HDC into next stitch. Turn. (50 HDC)
Row 2: CH 2. *2 DC into first stitch. DC into next stitch. 2 HDC into next stitch. HDC into each of the next 44 stitches. 2 HDC into next stitch. DC into next stitch. 2 DC into last stitch. Turn (54)
Row 3: CH 2. *3 HDC into first stitch. HDC into next 52 stitches. 3 HDC into last stitch. Turn (58)
Row 4: CH 2. * 2 DC into first stitch. DC in next stitch. 2 HDC into next stitch. HDC into each of the next 4 stitches. 2 HDC into the next stitch. HDC into each of the next 42 stitches. 2 HDC into next stitch. HDC into each of the next 4 stitches. 2 HDC into next stitch DC into next stitch. 2 DC into last stitch.CH 4 join to the top of the first DC from row 4. Turn. (68 stitches including the chains.)
Poncho
Round 1: CH 1, 1 HDC into the first CH. 2 HDC into the next chain. CH 2. 2 HDC into the next CH. 1 HDC into next CH. 1 HDC into next 14 stitches. *2 HDC into next stitch. CH 2. 2 HDC into next stitch. 1 HDC into next 15 stitches. Repeat from * one more time. 2 HDC into next stitch. CH 2. 2 HDC into next stitch. 1 HDC into next 14 stitches. Join to first HDC. Turn. (72 stitches not including chains.)
Round 2-5: CH 1. 1 HDC into each HDC. { HDC, CH 2, HDC} into each CH space. Join to the first stitch. Turn at the end of each row. *note* make sure you do not miss the hdc before the chain spaces.
Finish off and attach your contrasting stripes colored yarn to a CH 2 space.
Round 6: Make sure your are crocheting with the nice side of the stitches facing the outside of the poncho.
CH 2. *{DC, CH 2, DC} into CH space. 1 DC into each HDC. Repeat from * around. Join to the top of first DC. Turn.
Change back to main color. Attaching into CH space.
Round 7: CH 1. *{HDC, CH 2, HDC} into CH space. 1 HDC into each stitch. Repeat from * around. Join to the top of first HDC. Turn.
Round 8-9: CH 1. 1 HDC into each HDC. { HDC, CH 2, HDC} into each CH space. Join to the first stitch. Turn at the end of each row.
Repeat rows 6-9 four more times.
Edging
Using your contrasting stripes colored yarn, attach into CH 2 space.
Make sure your are crocheting with the nice side of the stitches facing the outside of the poncho.
CH 2. *{DC, CH 2, DC} into CH space. 1 DC into each HDC. Repeat from * around. Join to the top of first DC.
Using your Highlight color, attach into CH 2 space.
CH 1, 4 HDC into each CH 2 space. 1 HDC into each DC. Join to first HDC.
Weave in all of your ends.
Add a tassel to the tip of your hood. I used THIS tutorial.
Attach yarn to the corner of your hood. CH 30. Slip stitch back up your chain. Finish off, weave in your end, and repeat on other side.
*Optional buttons and loop* Attach yarn to one side of the chest opening. We had to have this to be sure the head could fit through easily… but that doesn't mean we always want it wide open.
Ch 8. Slip stitch back to starting spot to create a button loop. Add a button to both sides- one is for appearance.
Check out this free Boot crochet pattern review to match!

That looks really cute! I can’t wait to try it.
Thank you for this delightful pattern! The hood design is perfect!!!!
ADORABLE!!! I’ve got to make this for my granddaughter!! Love it! <3
It’s just too cute! Can you tell me what size it is? Or for what age?
Should fit most toddlers. 1-3 years old. May fit some smaller-average children to an older age.
I finally did this pattern and I find it very easy the only step I did not understand as the step before 33 so I skipped it but the Poncho came out beautiful though. I wish I could upload a picture of the poncho to show you
I am stuck on row 32 for almost a months and even your explanation below did not help me, can please explain this to me again. I really want to have this for my daughter and winter is coming soon. Thank you in advance
I’m stuck on 32 as well. It’s there perhaps a diagram?
I’d love to see it in adult size! It wonderful!
I am hoping to write up child and adult versions <3
Oh, I hope you get around to the child sized pattern. I have been looking for a poncho pattern that tickles my fancy for awhile. I love this one. I need a size 6 little girl size.
I’m glad to read this. I’ve been looking for a poncho pattern for my “tall” 9 yr. old granddaughter. I will follow to watch when you come up with that pattern. Thanks, this is beautiful.
oh that would be wonderful… i know my neighbor has been looking for a longer warm poncho with hood and i would love to make one and surprise her.. can’t wait to see the adult version.. thank you 😀
Hi,
I am not using the same yarn (red heart). Do you possibly have a gauge I can calculate off of?
are these crochet stitches in US terminology, thanks in advance
US terminology.
This is so adorable…I’m trying this for three grandbabies!!
What size is the poncho?
Toddler. For sizes 12 months- 3T
I am kind of new to reading patterns I seem to be a bit confused on what this means
***You will put 3 SC over each side of the next 3 DC. 2 SC over each side of the next 22 HDC. Put 3 SC over each side of the next 3 DC*** does it mean the stitches below… I don’t know I am so confused can you help me get through this… thank you
You will be turning and working around, going down the edge/side of previous stitches/rows.
That’s way more clever than I was exepcting. Thanks!
Hi, I’m sorry to be a pest, but did you understand how to do this? If you did, could you please explain it to me, as I’m so lost, I have no idea what I’m to do and even the above explanation makes no sense to me. Please help if you can. I’m trying to make this for my neice, she’s just turned 18 months. Thank you, and thank you a million in advance if you can help me with this! Xxx
Do you have a tutorial on this. I am stuck
I figured out…. make sure you nite the rows. If you miss 22 to 28…or the next two, 29 to 30, your count will be off when crochet the increases to the sides…the slit.
working on this pattern and round 32 after sc in 64 and 2scin next makes no sense to me.. Could you explain it a bit more please. I don’t see how you get a stitch count of 129 thanks
You will be turning and working around, going down the edge/side of previous stitches/rows.
It seems im not the only one who got stumped here. 65 stiches across plus 32 stitches? Each round, one on each side so that has to be doubled. But what is meant by the side of the stitches? Where? Show us please.. Because there aren’t enough rows at the base of the hat from the point where the directions say to not join. I’m not getting this & I’m tempted to just modify it the way it seems right to me.
You will be turning and working around, going down the edge/side of previous stitches/rows.
Question! I’m on rounds 2-5 of the poncho portion of the pattern. Do these rounds need to be joined before turning? There’s no indication of joining. Thanks!
I literally JUST made an update. Yes you join. Sorry for any confusion! Happy Hooking.
I do not understand this row:
Row 3: Crocheting over the last 2 rows, this row will be worked into stitches from round 33, bunching the last 2 rows inside the stitches. (63 SC)
I have read it like 100 times but it still makes no sense,. I can’t understand what I am supposed to do there. Can I just skip it?
You could skip it but it would be better with it. If you do choose to skip it, let me know how it works/looks.
I would LOVE to get some insight from you for an adult pattern! There aren’t many good ones out there that are hooded. Thank you for the pattern.
Just made one,Loved it. My grand daughter is only one and this is perfect. Going to see it will fit my 3 year old grand daughter.
I’m stuck on row 32… working on the side to get 129 stitches? Sos! It’s a very cute pattern.
Do I just continue making rows along the slit?
You will be turning and working around, going down the edge/side of previous stitches/rows.
I have crocheted my whole life and have never heard of a magic circle. What is it?
Thank you for sharing, I made one for my daughter and it looks amazing.
Completely baffled with row 32 your response to others who are stuck and frustrated is same as original instructions so it really does not clarify.
Perhaps a picture or two? Been sailing along until this row
Thank you
heidi,
I am stuck too. Did you ever figure it out. Help!
Not baffled just a baffoon. I messed up. Apologies. Thanks for not responding Coz it worked out. I was very determined to complete this and found MY error.
You rock.
Thank you.
I’m so glad you figured it out. I hadn’t responded yet because I didn’t have time to see what you were missing and how to word it better. Came back to give it my attention and seen your new comment. <3 So glad you figured it out! <3
Hi, since you have figured out Round 32, could you explain it? I have tried and tried and frogged and frogged. Thanks
Hi Heidi, praying that you see my post, I know this has been so long but I’m desperate for some light on line 32.
Since you figured it out, can you please explain it?
The original post is the same as the writer’s replies to similar questions and I simply don’t understand her instructions
What a lovely poncho! How about a baby size?! 6-12 months would be awesome! No fighting to get those little arms inside sleeves would be great. Like a blanket with a hood….if you have ideas how to size this down I would really appreciate it!
Thanks for your sharing of this!
Val
Hi there! I am very new to crochet – just wanted to ask about the supply list – about 3 skeins total are needed for this adorable (and ONLY hooded poncho in this size that I have bee able to find! Was so excited!). Pretend for the moment that I am only going to use one colour (boring, I know), about how many yards does each skein need to be? (Sorry if this is a really silly question!). Can’t wait to try it out! 🙂
I am an experienced crocheter and reading patterns and am not able to understand rows 32. Am I miss I g something? You say turn and work down edges but how do you do it on both sides?
When I say turn, I mean to rotate your piece. Instead of going back and forth, you will now work the whole way around it, including the sides of the rows you have already crocheted.
Thank you. I think this means both sides of the neck hole, rather than both sides of each stitch as I was reading and not understanding. Is that correct?
I’m very confused after round 32. Turn, working up the sides of the stitches. What exactly does this mean? Is it possible to make a video to show exactly how this is
done? I am so anxious to finish this lovely poncho for my second grandchild!
When I say turn, I mean to rotate your piece. Instead of going back and forth, you will now work the whole way around it, including the sides of the rows you have already crocheted.
the still does not make sense because when you follow the directions you have more than 129 stitches. A video would be nice to show us what this step is because it does not make sense. I figured how to do something else to skip this and still get the 129 stitches in the pattern
I figured it out. So as you are move along round 32 you will make 64 SC. The 2 into the next stitch are to begin rounding the corner so you can continue to work SC into the neck of the hood as there are only the sides of stitches as of now. (We are at 66 stitches). You will be continuing round 32 to make a workable border along the neck. 3 sc on each of the D.C. rows (Brings the st count to 75) then 2 in each row of hdc will bring the count to 119. Now you will be almost back where you started. Stitch another 3 into the remaining DC rows bringing your count to 128. One more sc into the last stitch and slip into the first st of the round. 129 total and now you will have a nice even finish all the way around your hood.
Thank you! I have been trying to work through this for days!!! We’ve gone from rows to “rounds”.
Thank you Soo much!!
thankyou…. I think I get it!!!
You all rock, was lucky and figured it out also. Original directions are pretty darn good.
im totally lost on row 32 i can not work out how i get all these extra stitches is there any way u could put up a small vid as i cant understand it
id love to make this
When I say turn, I mean to rotate your piece. Instead of going back and forth, you will now work the whole way around it, including the sides of the rows you have already crocheted.
I’m also stuck on row 32 of the hood
When it says to go up the sides is that the neck hole or the face part? And where do you join? If I join the neck hole it will fit over a toddlers head and the neck opening looks completely open in the picture
I’ve asked 3 people and no one can figure it out
Thanks
At first in row 32 you work the hood part, but then you continue working around the neck part as well… joining to your first stitch. You are not closing the poncho until after you reach the “Poncho” Portion of the directions.
I really like your pattern for the toddler poncho and am excited to make it for my granddaughter. However, I am struggling with the directions for row 32. I’m fine with the first part of ch 1, 1 sc into the next 64 sts, 2 sc in the next stitch. This is where I am confused ~ turn, working up the side of the stitched (the neck of the hood). You will put 3 sc over EACH side of the next 3 DC, 2 sc over EACH side of the next 22 hdc. Put 3 sc over EACH side of the next 3dc, 1 sc into the starting stitch. join to first sc (129 sts).
I’ve asked a couple of more experienced crocheters, but they don’t get it either. Is it possible to post a couple of pictures that illustrate what the second part of row 32 directions should look like? Thank you for your help with this.
When I say turn, I mean to rotate your piece. Instead of going back and forth, you will now work the whole way around it, including the sides of the rows you have already crocheted.
I of course misread something. I am up to where you add your striped yarn, I will have no pointed peak in the front because I have no shell (2HD,chain 2, 2 HD) in front, can I add one? I realize it will not be as pointed…but can’t rip all this out! Obviously I join together here too?
I love this Poncho, I have never made anything like this but I am going to try and make 3 matching ones for my 2 Granddaughters and my Great Niece. Is there by any chance a tutorial video? I would like to double check my progress to make sure that I am reading the directions right.
Thank you
Melissa
At Round 32 of the hood, what does ” working up the side of the stitches” mean? I am confused about ” 3 SC over EACH SIDE….” Thank you for your help.
When I say turn, I mean to rotate your piece. Instead of going back and forth, you will now work the whole way around it, including the sides of the rows you have already crocheted.
I’m a fool…I have read through EVERY comment, done and undone a million times and JUST DON’T GET IT!!! You keep saying “You will be turning and working around, going down the edge/side of previous stitches/rows” but i keep getting lost at “2SC over each side of the next 22 HDC”. I just can’t picture it or figure out how to make this work. I have blown up the picture a million times trying to see b, as i am very visual, and I CAN NOT see it. PLEASE HELP- I’M SO STUCK!!!!
When I say turn, I mean to rotate your piece. Instead of going back and forth, you will now work the whole way around it, including the sides of the rows you have already crocheted.
Michelle, the light finally went on for me. If u miss row 19 DO NOT JOIN, then u have a good with no opening. If u didn’t join there will be a open V in the hood, at which point, you will start going down the V after you have completed 65 stitches. Hope this helps
Correction: Hood without opening. Not good 🙂
THIS….this has been the light at the end of the tunnel. Thank you, thank you, thank you.
I am completely lost on the ‘side’ part after row 32. Like completely. In my years of crocheting I have NEVER had a pattern say crochet on each side especially without a video or picture to show what they mean.
I’m sorry I’m just completely frustrated with this pattern right now & I promised this for a co-worker…. I really need some guidance & it appears I’m not the only one so why hasn’t something been done about this already??
When I say turn, I mean to rotate your piece. Instead of going back and forth, you will now work the whole way around it, including the sides of the rows you have already crocheted.
I no longer have the piece and have not had a chance to make more. When I do, I will be sure to get more photos. Until then, there isn’t much else I can do other than share the written pattern.
For row 32, try this. Lay hood flat with pointed end going left. Looking at the opening on the right side, you will be crocheting around the opening. Pick up side farthest from you. Start on the bottom left side of hood working up,around and down to right side…
I would like to say “Thank you!” for the lovely pattern. This is my first real project (besides scarfs) and I really enjoyed it! My grand baby will enjoy it I’m sure! Thanks again!
For those struggling with row 32, try visualizing the previous rows going from your left chin up and over your head to the right side of your chin. Row 32 starts the same, but will add to this by creating stitches from your right chin backward and around your neck to your left chin again. The way to do this is to add stitches in the stems of previous stitches at the end of rows that were no longer joined together. I hope that helps some.
Loving this so far! Just want to clarify..for the neck of the poncho, row 3, you start with 3 dc and end with 3Hdc, correct? Just wanting to make sure it’s not a typo and I should end with 3dc instead 🙂
Oh no! Yes, this would be off balance. I just edited to make the row only consist of HDC. Ty for pointing this out.
Iam stuch on row 3 of hood edge and highlight,would you pkease explain this again
You bunch together and crochet over previous rounds. This will have the previous row inside of your stitches. Kind of like crocheting around a cord… it will give it a nice thick and strong edging.
what do you mean bunch together
I am sure you are fed up with row 32 queries but here goes. I understand the first part and that I now have to work around the neck BUT I just cannot get 129 stitches. Pattern only states working on one lot of 22 stitches, surely there should be two lots. I have been crocheting for many years but just cannot decipher this.
You were working back and forth around the front of the hood, but then you would around the entire opening of your crochet piece.
I read and understood the pattern exactly like you. If you don’t mind sharing the explanation please email me at [email protected]
Finally figured the confusion out. Where it says put 3 sc over 3 dc then 2 sc over each side of the next 22 hdc then 3 sc over each side of the next 3 dc. This all takes place in the portion of the hood that would wrap around the neck. The slit potion of the hat. The total of those stitches adds up to 62. What is missing in the directions is where it then says 1 sc into the starting stitch it should say and sc all the way around the hood into the next 66 stitches . I then get 128 stitches. Close enough for me. Hope this helped.
Where I also originally made my first mistake was at round 19. I never read do not join and continued in the round for 31 rounds. Once I ripped it back out and started over I was determined to figure this out.
Love this! Went out and got the yarn today, I usually use my own colors but I LOVE these, and was happy to get exactly what colors you used.I usually go by the one project at a time rule, but I cant wait to start this, the other can wait. First time using your patterns, so I hope to be able to understand. I’m a better knitter than crocheter, but LOVE to crochet more. I think I am past beginner, but we shall certainly see! Your patterns blow me away. So creative, clean lines, not your grandmas crochet!!
Hi, Could someone please explain to me row 3 of hood edge and highlight. I read the comment above but still don’t get it. Thanks!
This is how I wrote it out to help myself understand it.
Row 32(a) – Chain 1. 1 single crochet into each stitch across. (65 stitches). Chain 1.
Row 32(b) – With right side of work facing you pick up and single crochet 32 stitches evenly spaced along side of neck to middle of ‘V’. Continue along other side of ‘V’ and pick up and single crochet 32 stitches evenly spaced. This will bring you back to the first stitch of the front edge of the hood. Join with a slip stitch. (129 stitches)
This gives you a nice single stitch edge all the way around your hood. It looks finished but the final row is an added fancy touch.
Row 33 – Do as instructed in pattern.
This is my second time making it and I am understanding the instructions better this time around. I really love this pattern and appreciate the designer doing this for free. I am posting this and hope it helps lessen the questions you get about this section. I hope I haven’t offended you posting this as I just hope it helps everyone. Of course this is me assuming that I have made it any clearer for anyone and we all know what happens when we assume things. Hope this helps and happy creating.
Cheers.
Thank you! I think the hardest part for me when designing something different, is finding the correct words and how to put it together in ways all people can understand. I hope the way you broke it up helps someone. And thank you for posting this here ON the pattern. I really appreciate it.
Hi Bonnie,
I didn’t have an issue until I got to row 33. I am clueless 🙁 Any chance you can explain it to me? My email address is [email protected] . If I hear from you. THANKS A BUNCH!!!!
Have a Blessed Day!
OK Bonnie, just got it! LOL
Row 32 does not add up I single crochet 64 across turn my work and worked along the edge but it doesn’t add up to the number. It seems like I am not the only one that’s having a problem with that row please explain little bit more. I actually read one of your comment at the top that you were explaining how broth 32 worked but it still does not add up.
Thank you for this pattern. I am currently making number five. I made them for my twin grandchildren and two more for a clothing drive for foster children. For the boy/girl twins, I made the main color by gender with the stripes matching to show that they are twins. I love it!
If you have a moment to help me with row 33. Please email me [email protected]
I am stuck on Round 6 of the Poncho. Do i have to change colors? Please help
I am stuck on row 32…..i don’t understand what the instructions mean after the part where is says work up the side of the neck…… and says end up with 1129 stitches…..
then row 33…..says you end up with 135 stitches……i am really confused….can you try to explain to me better. asap…..i am trying to finish this by the weekend for my step granddaugher for her birthday
I need you or someone to explain what row 3 means in the section Hood Edge and Highlight…..I can not figure out what it means….
Please explain
So cute! What are the finished measurements?
On round 1 of poncho you have the wrong stitch count. It should be 76 instead of 72. Thanks for the pattern.
I love this pattern I made it for a friend’s great granddaughter u did a wonderful job I didn’t have one problem with understanding the pattern. thank u for a wonderful poncho!!
Is there a video for this pattern?
After round 32 to begin the neck (going down side if slit) there are 6 rows each side to he worked, I get the first 3 to do 3 SC but I don’t see where I can do 2 SC I the next 22 hdc when there are only 3 rows left to be worked, please help with better instructions. Thank you
After round 32 to begin the neck (going down side if slit) there are 6 rows each side to be worked, I get the first 3 to do 3 SC but I don’t see where I can do 2 SC in the next 22 hdc when there are only 3 rows left to be worked, please help with better instructions. I count 40 from your stitches and you say 129??? 9+22+9 does not equal 129. Please clarify.Thank you
I ADORE this poncho for real!! but i wanna make it for my own but not good with patters to read or to make bigger. Pls can anybody help me to get this poncho for adult? THank you in advanced!!!!!
Round 32. I was also very confused on this round until I went back and realized I missed the DO NOT JOIN on round 19. I frogged until that step and reworked it and now it makes sense. You just work up the sides of the split, up one side then down there itthey to the initial score in that step. If 32 doesn’t make sense make sure you got step 19 correct.
Yup that’s what i think everyone is doing wrong and i missed that 22-28 were repeats… Totally skipped that!!!! So do NOT join after row 19!
Just finished making this! I used a smaller gauge but it still worked. Looks great! I also did a picot edge on the bottom. There are some areas of the pattern you have to read carefully but overall I didn’t have an issue (and it was the first time I’ve crocheted a garment before too! Or done magic circle)