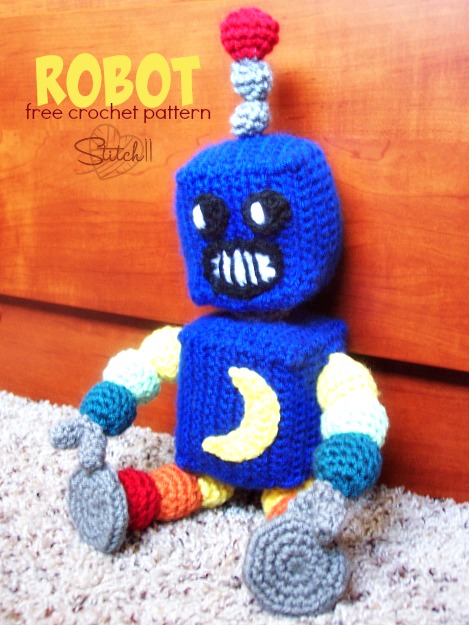
Supplies
E/ 3.5 mm crochet hook
Med/worsted weight yarn (gray, blue, dark green, light green, yellow, orange, red, black and white)
Yarn needle
Stitches
Magic Circle
CH – Chain
SC – Single Crochet
SC DEC – Single Crochet Decrease
HDC – Half Double Crochet
Feet and Legs
Starting with gray yarn.
Round 1: Magic Circle. Ch 1, 7 SC into magic circle. Pull ring tight and join to first SC. (7 SC)
Round 2: CH 1. 2 SC into each SC. Join to first SC. (14 SC)
Round 3: CH 1. 2 SC into the first SC. 1 SC into the next SC. **2 SC into next SC. 1 SC into next SC. Repeat from ** 5 more times. Join to first SC. (21 SC)
Round 4: CH 1. 2 SC into first SC. 1 SC into each of the next 2 SC. ** 2 SC into the next SC. 1 SC into each of the next 2 SC. Repeat from ** 5 more times. Join to first SC. (28 SC)
Round 5: In back loops only- CH 1. 1 SC into each back loop around. Join to first SC. (28 SC)
Round 6: In back loops only- CH 1. **SC DEC. SC into each of the next 2 back loops. Repeat from ** 6 more times. Join to first SC. (21 stitches)
Round 7: CH 1. **SC DEC. SC into next stitch. Repeat from ** 6 more times. Join to first SC. (14 stitches)
Round 8: CH 1. SC DEC around. Join to first SC DEC. (7 stitches)
Finish off and weave in your yarn ends. When doing this, weave your starting end on the top.. so the piece wants to stay flat (it will hold the top and bottom together). Be sure not to mess up your last row of stitches, as you will be crocheting in them in your next round.
Join red yarn to a front loop.
Round 9: CH 1. 2 SC into each front loop around. Join to first SC. (14 SC)
Round 10-12: CH 1. 1 SC into each SC around. Join to first SC. (14 SC)
Round 13: CH 1. SC DEC around. Join to first SC DEC. (7 stitches)
Finish off. Add a small amount of stuffing/batting.
Tip: When you changing colors, work over your yarn ends the entire way around. Once you are done with the new color, pull those yarn ends tight. Then stuff them into the leg. This will just make even more definition of the crease between colors.
Repeat rounds 9-13 two more times with the colors listed below.
-Orange
-Yellow
Repeat for second leg.
Arms
Starting with dark green yarn
Round 1: Magic Circle. CH 1. 7 SC into magic circle. Pull magic circle tight. Join to first SC. (7 SC)
Round 2: CH 1. 2 SC into each front loop around. Join to first SC. (14 SC)
Round 3-5: CH 1. 1 SC into each SC around. Join to first SC. (14 SC)
Round 6: CH 1. SC DEC around. Join to first SC DEC. (7 stitches)
Finish off. Add a small amount of stuffing/batting.
Repeat rounds 2-6 two more times with the colors listed below.
-Light Green
-Yellow
Claw
With gray yarn
Round 1: Magic Circle. CH 1, 5 SC into magic circle. Pull magic circle tight. Join to first SC. (5 SC)
Round 2: CH 1. SC into each of the back loops around. Join to first SC. (5 SC)
Round 3-9: CH 1. SC into each stitch around.
Finish off leaving long tail.
Weave your tail around each stitch around and pull tight. Secure yarn end to keep the whole closed. With your yarn needle. Pull the yarn through the center of the peace so you can attach it from the middle, to the end of the dark green piece of the arm. You may want to pull the yarn through both sides of the claw to help bring each end closer together while you are attaching. This will make it look like a claw.
Repeat for second arm and claw.
Robot Body Walls
Using blue yarn
Row 1: CH 15. Turn. Skip one CH. SC into next 14 CH.
Row 2-14: CH 1. Turn. SC into next 14 SC.
Row 15: CH 1, Turn. SC into each front loop across.
Row 16-28: CH 1, Turn. SC into next 14 SC.
Row 29: Repeat row 15.
Row 30-42: Repeat rows 16-28.
Row 43: Repeat row 15.
Row 44-56: Repeat rows 16-28.
Finish off leaving long tail. Using yarn needle and yarn tail, Attach both ends of your piece through the back loops of row 56. The back loops that were left at each edge of the square will be on the outside of your piece. Now you have the walls of the body.
Robot Body Top and bottom
Using blue yarn.
-make two-
Row 1: CH 15. Turn. Skip one CH. SC into next 14 CH.
Row 2-14: CH 1. Turn. SC into next 14 SC.
Finish off leaving long tail for attaching to the body walls.
Attach one square to the robot body walls. Attach all but one side of the other square…. stuff the cube and finish attaching the square.
Attach the legs and the arms.
Robot Head Walls
Using blue yarn
Row 1: CH 13. Turn. Skip one CH. SC into next 12 CH.
Row 2-12: CH 1. Turn. SC into next 12 SC.
Row 13: CH 1. Turn. SC into each front loop across.
Row 14-24: CH 1. Turn. SC into next 12 SC.
Row 25: Repeat row 11.
Row 26-36: Repeat rows 12-20
Row 37: Repeat row 11.
Row 38-48: Repeat row 12-20
Finish off leaving long tail. Using yarn needle and yarn tail, Attach both ends of your piece through the back loops of row 48. The back loops that were left at each edge of the square will be on the outside of your piece. Now you have the walls of the head.
Top and Bottom of Head
Using Blue Yarn
-Make Two-
Row 1: CH 13. Turn. Skip one CH. SC into next 12 CH.
Row 2-12: CH 1. Turn. SC into next 12 SC.
Attach one square to the robot head walls. Attach all but one side of the other square…. stuff the cube and finish attaching the square. Set aside.
Robot Neck
Using gray yarn. Leaving a long starting tail.
Round 1: Magic Circle. CH 1. 8 SC into magic circle. Pull circle tight. Join to first SC. (make sure your starting tail is on the nice side of the crochet.. you will need this for attaching)
Round 2: CH 1. 2 SC into each stitch around. Join to first SC.
Round 3-4: CH 1. 1 SC into each SC around. Join to first SC.
Round 5: CH 1. SC DEC around. Join to first SC.
Finish off leaving long yarn tail for attaching.
Lightly stuff the neck.
Using your long starting tail attach the neck to the center top of the body. Using your finishing off tail, attach the neck to the center bottom of the head. Make sure you attach the neck really well!!!! Weave in your ends.
Moon Applique
Using yellow yarn
CH 11. Turn. Skip first CH. Slip stitch into next CH. 2 SC into next CH. 2 HDC into next CH. DC into next CH. 2 DC into each of the next 2 CH. DC into next CH. 2 HDC into next CH. 2 SC into next CH. Slip Stitch into next CH.
Robot Antenna
Starting with gray yarn
Round 1: Magic circle. CH 1. 4 SC into magic circle. Pull yarn end through the hole so its on the outside. You will want to use this when attaching it to the robot head. Pull circle tight. Join to first SC.
Round 2: CH 1. 2 SC into each SC around. Join to first SC. (8 SC)
Round 3-4: CH 1. 1 SC into each SC around. Join to first SC. (8 SC)
Round 5: CH 1. SC DEC 4 times. Join to first SC DEC. (4 stitches)
Round 6: CH 1. In back loops only. 2 SC into each SC around. Join to first SC. (8 SC)
Round 7-8: CH 1. 1 SC into each SC around. Join to first SC. (8 SC)
Round 9: CH 1. SC DEC 4 times. Join to first SC DEC. (4 stitches)
Change to red yarn.
Round 10: CH 1. In back loops only. 2 SC into each SC around. Join to first SC. (8 SC)
Round 11: CH 1. 2 SC into first stitch. 1 SC into next stitch. **2 SC into next stitch. 1 SC into next stitch. Repeat from ** 2 more times. (12 SC)
Round 12-13: CH 1. 1 SC into each SC around. Join to first SC. (12 SC)
Round 14: CH 1. SC DEC 6 times. Join to first SC. (6 stitches)
Finish off leaving long yarn end. Lightly stuff the end of the antenna. Weave yarn end back and forth around. Pull end tight. Weave in your end.
Attach to the top of the robot head.
Robot Mouth
Starting with white yarn
Row 1: CH 7. Skip 1 CH. HDC in next 6 CH.
Row 2: CH 1. Turn. HDC in next 6 HDC.
Finish off and weave in your ends.
Join black yarn.
CH 1 and SC around the entire outside of the piece. Doing 1 SC into the side of each HDC while working up and down the sides of the mouth. 2 SC into the corner stitches. Join to first SC.
Finish off leaving long tail. Using yarn needle.. embroider the lines for the robot teeth. Attach to robot face.
Robot Eyes
Starting with black yarn
-Make Two-
Row 1: Magic Circle. CH 1. 9 HDC into magic circle. Pull ring tight. Join to first HDC. (9 HDC.
Finish off leaving a long tail for attaching. Before you attach, take your white yarn and your yarn needle and embroider a sparkle in the eye.

I was admiring the blue robot and then I noticed that there is no estimate for height. I’m wanting to makes some figurines or animals, 4 to 5 inches tall. I want to be able to mail them for some gifts. I’ ve noticed this seems to be a common practice. I’ve already made a hugh frog and and a medium size stuffed frog. Any ideas or suggestions? Love your site and work!! Carol Moger
This robot is about a foot tall with the legs and antenna. I meant to add that to the pattern. So sorry!