• Home
  • Free Patterns
    • Toys
    • Costumes
    • Bags
    • Flowers
    • Hats
    • Pattern Reviews
    • Household
    • Newborn
    • Scarves
    • Sports
  • Disclosure
  • Contact
  • Yummy Food
  • Round Ups

Stitch11

A Yarntastic Life!

  • Girls
  • Boys
  • Hats
  • Newborn
  • Flowers
  • Household
  • Costumes
  • Toys
  • Pattern Reviews
  • Grannys
You are here: Home / Archives for Costumes

Dreaded Chemo Hat

June 24, 2017 By stitch11 9 Comments


Dreaded Chemo Hat - Free Crochet pattern

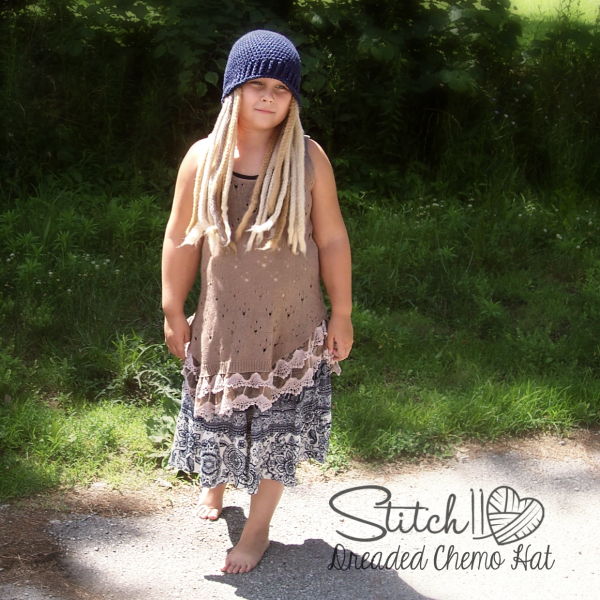
My aunt was recently diagnosed with leukemia. I had asked her if there was anything I could do for her, and her only request was a dreaded chemo hat.
By the way, my aunt is brilliant!

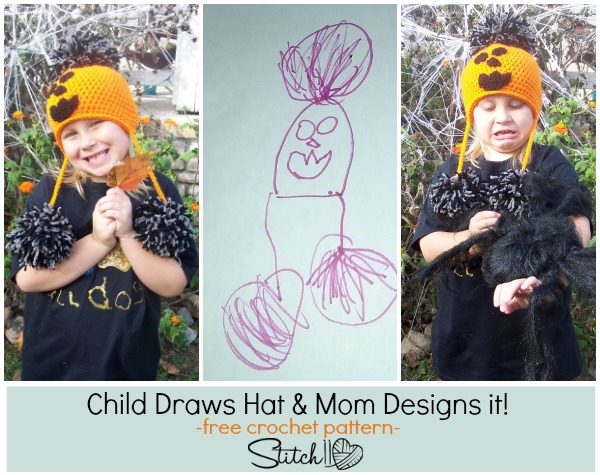
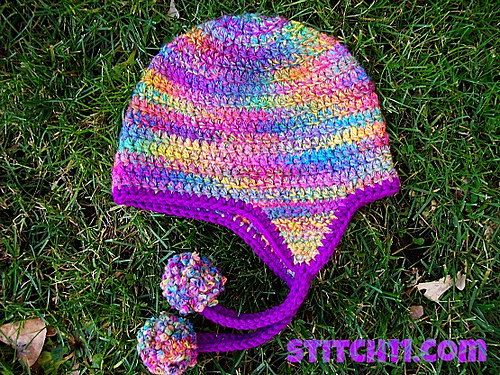
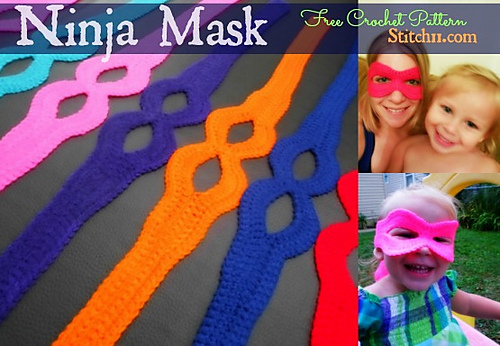
You can use any hat pattern you wish! I used The Adult Beanie for Men and Women.  I only increased to 70 stitches.  Get the free Stitch11 pattern HERE.

The yarn for the beanie is Red Heart Sparkle Soft. You can buy Red Heart Sparkle Soft HERE.

For the Dreads I used a 6 mm crochet hook and Red Heart Super Saver in the colors Buff, Mushroom, and Warm Brown. You can buy Red Heart Super Saver HERE.

With the dreads, I used two strands held together.

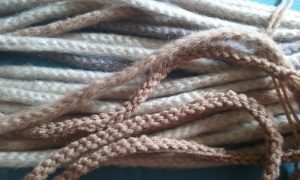
Chain 41, turn, slip stitch up next 40 Chains. 
Finish off leaving long enough ends for attaching.

Before attaching you will want to brush the dreads with velcro.
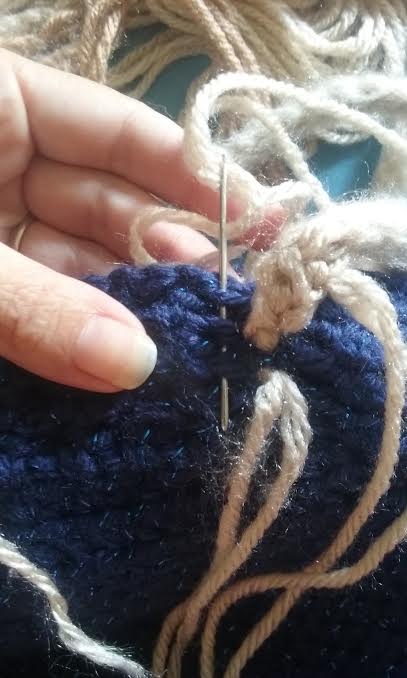
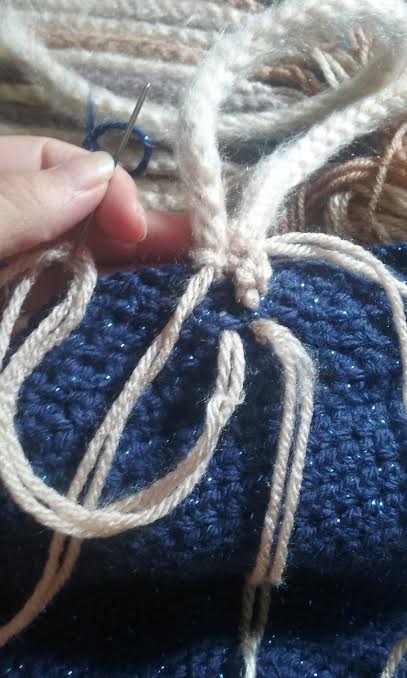
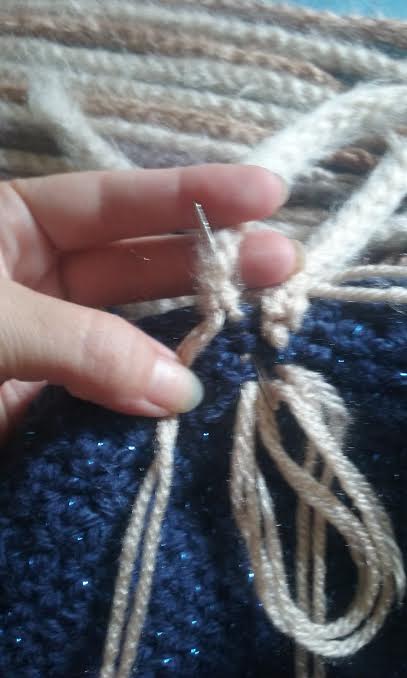
When attaching the dreads, be sure to weave back and forth at least twice… or until it feels secure.  You will weave two strands at a time… helping to secure it to the max.
I added a few extra dreads behind the front ones to make it full and have depth like real dreads.
With the photos below, you can see the difference the velco makes, and also how I attached the dreads.

Stitch11 Dreads1

Stitch11 Dreads1


Filed Under: Costumes, Free Patterns, Hats

Headphone Beanie for Children

November 3, 2016 By stitch11 1 Comment

stitch11-headphone-beanie-child-size

This free crochet pattern is inspired from the mind of my cousins 4 year old son. He made the request, and I was thrilled to bring his idea to life!

Supplies
6 mm crochet hook
Red Heart With Love – Black, Gray, and Blue.
Cherub DK yarn (for music note)
E/ 3.5 mm crochet hook  (for music note)
Yarn needle

Stitches
Magic Circle
Slip Stitch
SC – Single Crochet
HDC – Half Double Crochet
FPSC – Front Post Single Crochet

This pattern is Child Size. Fits most 3-10 year olds.

[Read more…]

Filed Under: Boys, Costumes, Free Patterns, Hats

Child Size Pumpkin Hat

October 28, 2016 By stitch11 1 Comment

child-draws-pumpkin-hat-and-mom-designs-it-free-stitch11-crochet-pattern

My daughter requested a hat. She drew a photo and picked out the yarn colors. Although I know not everyone will want a pumpkin face exactly the way my daughter designed, I am sharing with you the pattern.
If you would like a more traditional face, I'm sure you could find a pattern with a quick online search.

Supplies
6 mm crochet hook
Red Heart Super Saver (orange) Red Heart With Love (Gray and Black)
Yarn needle

Stitches
Magic Circle
Slip Stitch
CH – Chain
SC – Single Crochet
HDC – Half Double Crochet
DC – Double Crochet
DC 2 TOG – Double Crochet Two Together
FPSC – Front Post Single Crochet

[Read more…]

Filed Under: Costumes, Free Patterns, Hats

Halloween by Stitch11

September 1, 2016 By stitch11 Leave a Comment

Halloween Costumes by Stitch11 - free crochet patterns

Although we have A LOT of Halloween crochet patterns here at Stitch11 (See them all here), these are the crochet Halloween costumes I have designed for my daughter!
Get your free copies of all the patterns and tutorials!

Princess Hat with Braids
How to Make a Tutu
Kitty Hat 
Kitty Fingerless Mittens 
Leg Warmers 
Fox Costume
Rainbow Dash Costume

Filed Under: Costumes, Free Patterns

Crochet Mermaid Tail

June 4, 2016 By stitch11 2 Comments

Crochet Mermaid Tail

I will do my best to share with everyone how I made this mermaid blanket. I had planned on simply following MJ's Off The Hook Designs Mermaid Blanket – but I misread the yarn weight. :O I know, I know… I can hardly believe it myself. I used 2 strands of Worsted Weight instead of using the Bulky. I have no clue what I was thinking!!!
So instead, I based the blankets measurements from the pattern. I used a shell stitch instead of HDC.
Then when it came to the fin, I used the Mad Fruit Angel Wing Mermaid Fin. I did skip a few steps on the fin, because I felt it was turning out large enough. I LOVE this pattern!! Simply beautiful!

We have all seen the many mermaid tail photo's floating around our FB groups and walls.. my best advice to anyone who wants to make one is to pick through all your favorite designs, combine them, and make them unique with your own imagination. <3 Happy Hooking!

Filed Under: Costumes, Pattern Reviews

Free Magical Crochet Patterns

March 30, 2016 By stitch11 Leave a Comment

23-Free-Magical-Crochet-Patterns

I am between crochet projects. Although I have a really long *to do* list (like most of us) I couldn't help but to be swept away with checking out all the free crochet patterns online.  Although I know what I should crochet next, I am tempted to go other directions. Those fairy wings are calling my name!

Check out all 23 of these amazingly magical and free crochet patterns!

Enchanted Ivy Wings – by  Lisa Jelle

Unicorn Hat – Review by Stitch11

Baby Unicorn – Review by Stitch11

Margarita (Fairy) – by Mia Zamora-Johnson

Crochet Tooth Fairy Pillow – by Repeat Crafter Me

Mini Treasure Bag – by Stitch11 

Spring Fairy House – by Crafty is Cool

Grandma Perkins Magical Flower Child – by Look at What I Made 

Colorful Spring Mandala – Review by Stitch11 

Sophie's Mandala – Review by Stitch11 

Stitch11 Mandala – by Stitch11 

Magical Toadstool Finger Puppet Set – by Moogly 

Amigurumi Mushroom – by Little Things Blogged

Sun-Shroom – by Olka Novitskava

Baby Dragon – Review by Stitch11 

Dragon for the Princess – Review by Stitch11

Summertime Concert Crown – by Raising Robertsons Farts

Deer Daisy Woodland Crown – by Raising Robertsons Farts

Geodes – How to turn a rock into a necklace – by Stitch11

Hooded Poncho for Toddlers – by Stitch11 

Tangled Happy Wand – by Tangled Happy

Rainbow Tail – by Stitch11 

Infant Flower Cocoon – by Stitch11

Filed Under: Costumes, Free Patterns, Round Ups, Uncategorized

Another Child Mouse Hat

December 16, 2015 By stitch11 Leave a Comment

Child Size Minnie Mouse Hat - Free Crochet Pattern

Each time I make something… I tend to want to do things a little differently.
I decided to use Caron Simply Soft this time.
In order to get the correct size, instead of using the original Minnie Mouse Hat for Preschoolers or the Child Size Minnie Mouse Hat, I used the Hat Pattern from the Batman Hat.
I paired the hat with the ears from the Preschool Minnie Mouse Hat. I used two strands of caron simply soft held together to make sure they would be strong. (instead of making 2 layers for each ear) I still crocheted the edging around the ear.
For the bow, I held 3 strands of Red Heart Soft together and followed the free Boutique Bow pattern.

Filed Under: Costumes, Free Patterns, Girls, Hats, Inspired, Pattern Reviews, Uncategorized

Child Size Batman Beanie

December 1, 2015 By stitch11 7 Comments

Bat Beanie - Child Size - Free Crochet Pattern by Stitch11

Supplies
5 mm crochet hook
black and yellow medium weight yarn (I used Caron Simply Soft)
Yarn needle
Black Felt

-NOTE- If you choose to use another medium weight or worsted weight yarn, it may work up larger than with Caron Simply Soft. If that is the case, stop increasing at 60 stitches. For Child size, when laying your hat flat, it sure measure between 9 and 10 inches across. 

Stitches Used
Slip Stitch
Magic Circle 
CH- Chain
SC- Single Crochet
HDC- Half Double Crochet
FPDC – Front Post Double Crochet 
FPSC – Front Post Single Crochet


The Child Size Beanie
You will be working in continuous rounds.

Round 1: Magic Circle. 10 HDC in magic circle.  (10)
Round 2: 2 HDC into each of the next 10 stitches. (20)
Round 3: **2 HDC into the next stitch. HDC into the next stitch. Repeat from ** 9 more times. (30)
Round 4: **2 HDC into the next stitch. HDC into the next 2 stitches. Repeat from ** 9 more times. (40)
Round 5: **2 HDC into the next stitch. HDC into the next 3 stitches. Repeat from ** 9 more times. (50)
Round 6: **2 HDC into the next stitch. HDC into the next 4 stitches. Repeat from ** 9 more times. (60)
Rounds 7: 1 HDC into each of the next 60 stitches. (60)
Round 8: **2 HDC into the next stitch. HDC into the next 5 stitches. Repeat from ** 9 more times. (70)
Round 9-17: 1 HDC into each of the next 70 stitches. (70)
Round 18: 1 HDC into the next 68 stitches. SC into the next stitch. Slip stitch into the next stitch. (70)
Round 19: CH 1. SC into the same stitch. FPDC into the next stitch. **SC into the next stitch. FPDC into the next stitch. Repeat from ** around. Join with a slip stitch to the first SC. (70)
Change to Yellow
Round 20: CH 1. SC into the same stitch. FPDC into the next stitch. **SC into the next stitch. FPDC into the next stitch. Repeat from ** around. Join with a slip stitch to the first SC. (70)
Change to Black 
Round 21:CH 1. SC into the same stitch. FPDC into the next stitch. **SC into the next stitch. FPDC into the next stitch. Repeat from ** around. Join with a slip stitch to the first SC. (70)
Change to Yellow
Round 22: CH 1. SC into the same stitch. FPDC into the next stitch. **SC into the next stitch. FPDC into the next stitch. Repeat from ** around. Join with a slip stitch to the first SC. (70)
Change to Black
Round 23: CH 1. SC into the same stitch. FPDC into the next stitch. **SC into the next stitch. FPDC into the next stitch. Repeat from ** around. Join with a slip stitch to the first SC. (70)
Round 24: CH 1. FPSC into each stitch around. Join to first stitch. Finish off and weave in your ends.

For the “Bat Symbol” I just used Google Images. I drew the one I liked onto some black felt, and cut it out. 

The Oval
Using Yellow

Round 1: CH 8. Skip 1st CH from hook. 2 HDC into next CH. 1 HDC into each of the next 5 CH. 3 HDC into last CH.
Turn your work and start crocheting into the other side of the chains. 
1 HDC into next 5 CH. 1 HDC into starting CH. Join to first HDC.
Round 2: CH 1. 3 HDC into same stitch. 1 HDC into next 7 stitches. 4 HDC into next stitch. 1 HDC into next 7 stitches. 1 HDC into starting stitch. Join to first HDC.
Round 3: CH 1. 1 HDC into same stitch. 1 HDC into next stitch. 3 HDC into next stitch. 1 HDC into next 7 stitches. 3 HDC into next stitch. 1 HDC into each of the next 2 stitches. 3 HDC into next stitch. 1 HDC into each of the next 7 stitches. 3 HDC into next stitch. Join to first HDC.
Round 4: CH 1. HDC into same stitch and into next 3 stitches. 3 HDC into next stitch. HDC into next 9 stitches. 3 HDC into next stitch. 1 HDC into next 4 stitches. 3 HDC into next stitch. 1 HDC into next 9 stitches. 3 HDC into last stitch. Join to first HDC.
Round 5: CH 1. 2 HDC into same stitch. 1 HDC into each of the next 2 stitches. 2 HDC into next stitch. 1 HDC into next stitch. 2 HDC into next stitch. 1 HDC into next 11 stitches.
2 HDC into next stitch. 1 HDC into next stitch. 2 HDC into next stitch. 1 HDC into each of the next 2 stitches. 2 HDC into next stitch. 1 HDC into next stitch. 2 HDC into next stitch. 1 HDC into next 11 stitches. 2 HDC into next stitch. 1 HDC into next stitch.
Finish off with a long tail for attaching to the hat.

You have the choice to hot glue the batman symbol or sew it onto the yellow oval. Then attach the oval to the front of your hat.

Filed Under: Boys, Costumes, Free Patterns, Hats

Infant Bow Tie – Free Crochet Pattern

November 11, 2015 By stitch11 13 Comments

Infant Bow Tie - Free Crochet Pattern - Design by Stitch11

Infant Bow Tie Crochet Pattern

Stitches Used 
CH – Chain
Slip Stitch
SC – Single Crochet
HDC – Half Double Crochet
DC – Double Crochet

Supplies
Medium/worsted weight yarn
5 MM crochet hook
Yarn needle
Small button (about 1 CM)

The Bow
Row 1: CH 25. Turn. Skip 1 CH. **DC in next 3 stitches. HDC in next 2 stitches. SC in next 2 stitches. HDC in next 2 stitches. DC in next 3 stitches. Repeat from ** one more time.
Row 2: CH 1, turn. **DC in next 3 stitches. HDC in next 2 stitches. SC in next 2 stitches. HDC in next 2 stitches. DC in next 3 stitches. Repeat from ** one more time.
Row 3: CH 1, turn. **DC in next 3 stitches. HDC in next 2 stitches. SC in next 2 stitches. HDC in next 2 stitches. DC in next 3 stitches. Repeat from ** one more time.
Finish off leaving a long tail. Weave the ends together. The SC stitches from each row should fold over to be on top of one another in the center of the bow.  Leaving the DC stitches on the sides of the bow.
Weave your yarn end towards the center of the bow. Wrap it around the center of the bow a few times.. Do not cut the remaining yarn off. You will use this to attach the bow to the band.
The Band 
Make a CH that is 12-13 inches long. If you need to adjust the size, measure the neck and add about 2 inches. Keep in mind that this band will be adjustable. The button can slide between any stitch.
Turn, skip 1 CH and HDC into each of the remaining chains.
Finish off leaving a long enough tail to attach a button to the end.
Attach the bow to the center.

Filed Under: Boys, Costumes, Free Patterns, Newborn

Unicorn Hat – Free Pattern – Review

October 26, 2015 By stitch11 Leave a Comment

Unicorn Hat - Free Pattern - Review

When a friend asked me if I could make a unicorn hat, THIS FREE PATTERN by Repeat Crafter Me quickly came to mind.
I love how she writes most of her hat patterns in multiple sizes! It makes her designs very reliable when you get requests such as “6-9 month size”. Thanks Repeat Crafter Me!

Filed Under: Costumes, Free Patterns, Hats, Pattern Reviews

Free DIY Rainbow Pony Costume Tutorial

October 24, 2015 By stitch11 Leave a Comment

Free DIY Rainbow Pony Costume Tutorial

It's finally finished and ready to share! The last touches included using RIT DYE for the sweater and shoes. I was able to find pants at JC Pennys the correct color. I  Hot glued the rainbow lightning to the sweater and added a button to the back of the pants for attaching the tail.
Free Pony Hat Crochet Pattern
Free Rainbow Tail Crochet Pattern
Free Leg Warmer and Fingerless Gloves Patterns 
Free Lightning Bolt and Cloud Crochet Pattern 
How To Make Wings (no sew & no crochet) 

You may also like last years FOX COSTUME TUTORIAL!

Filed Under: Costumes, Crafts, Free Patterns, Inspired, Toys

Photo Tutorial – How to make WINGS!

October 23, 2015 By stitch11 Leave a Comment

How to make WINGS - Photo tutorial

These wings are one of the last pieces to my daughters costume. To see the previous pieces/tutorials check out Rainbow Pony Hat, Rainbow Tail, Rainbow Lightning Bolt, and the Leg Warmers and Fingerless Gloves.

For these wings you will need:

Less than 1 yard of fleece
Cardboard (about 4 cereal boxes)
Hot glue gun and sticks
3/8 elastic
Scissors

How to make WINGS - Photo tutorial

First, you will want to draw the back layer of the wing.

How to make WINGS - Photo tutorial

Cut it out, and trace it the other direction for the other wing.

How to make WINGS - Photo tutorial

Cut the other out, and now you will trace them both again. We will be layering them to make them stronger.

How to make WINGS - Photo tutorial

Cut out your second set like you did the first. Now lay them on more cardboard and trace the inside of the pieces. This is just to make sure your second layer has the same size and shape as the back layer.

How to make WINGS - Photo tutorial

See….

How to make WINGS - Photo tutorial

Cut out your first one, flip it, and trace it for the other side.

How to make WINGS - Photo tutorial

And, trace them again. Cut them out as well!

How to make WINGS - Photo tutorial

Next, you will hot glue the matching pieces together. So instead of 8 pieces, you now have 4. Each wing is stronger with them doubled and glued together. Go around the edges and cut the wonky looking pieces off to smooth it out.

How to make WINGS - Photo tutorial

Trace each piece onto your fleece, from both sides of each piece.

How to make WINGS - Photo tutorial

Start hot gluing each piece to the already glued together cardboard pieces.

How to make WINGS - Photo tutorial

While gluing, you will have to glue little parts at a time. If you try to glue the entire thing at once, half of your glue will dry before you place the fleece on it. (Learn from my mistakes! ha!)

How to make WINGS - Photo tutorial

After you glue all the pieces together, trim the wonky edges. If you do not have wonky edges, you are a much better tracer and cutter than I am. 😉

How to make WINGS - Photo tutorial

This is what you have!

How to make WINGS - Photo tutorial

Now make a rectangle the same way you made your wings. 2 layers of cardboard hot glued together with fleece hot glued around it.

How to make WINGS - Photo tutorial

Hot glue the rectangle onto the large wings.

How to make WINGS - Photo tutorial

Hot glue the smaller wings onto the top of the rectangle piece.

How to make WINGS - Photo tutorial

Cut your elastic at about 18 inches (adjust for the person who will be wearing it) tie them into a knot to make them a loop. Hot glue it down. I used an overload of glue. 😉
How to make WINGS - Photo tutorial

Cut another rectangle of fleece and hot glue it all over, over the elastic.
TA DA!

How to make WINGS - Photo tutorial

Filed Under: Costumes, Crafts

Rainbow Lightning Applique

October 19, 2015 By stitch11 Leave a Comment

Rainbow Lightning - Free Applique Crochet Pattern

The crocheted Rainbow Lightning shooting out of a cloud is the latest piece to my daughters Halloween costume. Check out the previous Rainbow Pony costume patterns; The Pony Hat, Rainbow Tail and the Fingerless Gloves and Leg Warmers!
Next I will be figuring out the wings!

Supplies
F/G- 3.75 mm crochet hook
White, Purple, Blue, Green, Yellow, Orange, and Red Med/Worsted Weight Yarn
Yarn needle.

[Read more…]

Filed Under: Costumes, Free Patterns, Inspired, Toys

Rainbow Tail

October 10, 2015 By stitch11 Leave a Comment

Rainbow Tail free crochet pattern by Stitch11

I wanted to share with everyone how to make your own rainbow tail!
If you love this, you will also love the Rainbow Pony Hat and the matching legwarmers and fingerless gloves.
Keep watching for the next pieces of the costume!

Stitches
Magic Circle
HDC – Half Double Crochet
HDC DEC – Half Double Crochet Decrease

Supplies
Medium/Worsted Weight yarn (yellow, green, blue, purple, red, and orange.)
6 mm crochet hook
Yarn Needle

[Read more…]

Filed Under: Costumes, Free Patterns, Inspired, Toys

Child Size Leg Warmers and Fingerless Gloves

October 5, 2015 By stitch11 Leave a Comment

Child Size Leg Warmers and Fingerless Gloves - Free Crochet Pattern

In addition to my daughters Rainbow Pony Hat, she now has matching leg warmers and fingerless gloves. The next part of her costume will be the rainbow tail! Make sure you are following me on Facebook to see all the updates to the free Halloween costume patterns!

Don't want to wait? Check out this Halloween Post! 

Medium/WW Yarn – (Red Heart, Crafters Choice, or I Love This Yarn will each work great for this pattern) –
Yarn needle – for weaving in ends
J-6.00 MM crochet hook

[Read more…]

Filed Under: Boys, Costumes, Free Patterns, Girls

Child Size Rainbow Pony Hat

September 27, 2015 By stitch11 2 Comments

Rainbow Pony - Free Child Size Crochet PatternThis year, my daughter has requested to be a rainbow Pegasus pony. Last year, she was a fox. You can find the fox costume tutorial HERE!
The hat is the first piece of her costume.

Supplies
5 mm crochet hook
#4 Medium-Worsted Weight Yarn. (I used a mix of Crafter's Secret, Red Heart Super Saver, and I Love This Yarn. You will need Teal/Blue, Dark blue, Purple, Red, Orange, Yellow, and green)
Yarn needle for weaving in ends and attaching pieces.
You will need felt for the eyes. I used a magenta, white, and black.
Hot glue gun for piecing together and attaching the eyes.

Stitches
Magic Circle
CH – Chain
SC – Single Crochet
HDC- Half Double Crochet
FPSC – Front Post Single Crochet
Note- Number between ( ) is the final stitch count of each round.

HAT PATTERN
Round 1: Magic Circle. CH 1. 12 HDC into magic circle. Join to first HDC. (11)
Round 2: CH 1. 2 HDC into each HDC around. Join to first HDC. (22)
Round 3: CH 1. HDC into each stitch around. Join to first HDC. (22)
Round 4: CH 1. 2 HDC into first HDC. 1 HDC into next HDC. *2 HDC into next HDC. 1 HDC into next DC. Repeat from * around. Join to first HDC. (33)
Round 5: CH 1. 2 HDC into first HDC. 1 HDC into each of the next 2 HDC. *2 HDC into the next HDC. 1 HDC into each of the next 2 HDC. Repeat from * around. Join to the first HDC. (44)
Round 6: CH 1. 1 HDC into each stitch around. Join to first HDC. (44)
Round 7: CH 1. 2 HDC into first HDC. 1 HDC into each of the next 3 HDC. *2 HDC into the next HDC. 1 HDC into each of the next 3 HDC. Repeat from * around. Join to the first HDC. (55)
Round 8: CH 1. 2 HDC into first HDC. 1 HDC into each of the next 4 HDC. *2 HDC into the next HDC. 1 HDC into each of the next 4 HDC. Repeat from * around. Join to the first HDC. (66)
Round 9-18: CH 1. 1 HDC into each stitch around. Join to first HDC. (66)
Round 19-20: CH 1. SC into each stitch around. Join to first stitch. (66)
Round 21: CH 1. FPSC over each stitch. Join to first stitch. (66)
Finish off and weave in ends.

EAR PATTERN
Make two.
Round 1: Magic Circle. CH 1. 6 HDC into magic circle. Join to first HDC. (6)
Round 2: CH 1. 2 HDC into the first HDC. 1 HDC into next HDC. *2 HDC into the next HDC. 1 HDC into next HDC. Repeat from * 1 more time. Join to first HDC. (9)
Round 3: CH 1. 2 HDC into the first HDC. 1 HDC into each of the next 2 HDC. *2 HDC into the next HDC. 1 HDC into each of the next 2 HDC. Repeat from * 1 more time. Join to first HDC. (12)
Round 4: CH 1. 2 HDC into the first HDC. 1 HDC into each of the next 3 HDC. *2 HDC into the next HDC. 1 HDC into each of the next 3 HDC. Repeat from * 1 more time. Join to first HDC. (15)
Round 5: CH 1. 2 HDC into the first HDC. 1 HDC into each of the next 4 HDC. *2 HDC into the next HDC. 1 HDC into each of the next 4 HDC. Repeat from * 1 more time. Join to first HDC. (18)
Round 6: CH 1. 2 HDC into the first HDC. 1 HDC into each of the next 5 HDC. *2 HDC into the next HDC. 1 HDC into each of the next 5 HDC. Repeat from * 1 more time. Join to first HDC. (21)
Round 7: CH 1. 1 HDC into each of the first 3 stitches. 1 SC into each of the next 15 stitches. 1 HDC into each of the last 3 stitches. Join to first HDC. (21)
Round 8: CH 2. 2 DC into the first stitch. 1 DC into the next stitch. HDC into next stitch. 1 SC into each of the next 15 stitches. HDC into next stitch. 1 DC into last 2 stitches. Join to first DC. (22)
Round 9: CH 2. 2 DC into the first stitch. 1 DC into the next stitch. HDC into the next stitch. 1 SC into each of the next 16 stitches. HDC into the next stitch. 1 DC into last 2 stitches. Join to first DC. (23)
Round 10-11: CH 1. 1 HDC into each of the first 5 stitches. SC into next 13 stitches. 1 HDC into each of the last 5 stitches.
Finish off leaving long end for attaching.

When attaching the ears, notice how I curled the inner side of the ear in a little… attaching down row 5.  The ears are attached between rows 5 and 10.

Hair Pattern
Make six. (red, yellow, orange, green, blue, and purple)

Round 1: Magic Circle. CH 1. 4 HDC into magic circle. Join to first HDC. (4)
Round 2: CH 1. 2 HDC into first stitch. 1 HDC into the next stitch. 2 HDC into the next stitch. 1 HDC into the next stitch. Join to first HDC. (6)
Round 3: CH 1. 1 HDC into each HDC. Join to first HDC. (6)
Round 4: CH 1. 2 HDC into first stitch. 1 HDC into each of the next 2 stitches. 2 HDC into the next stitch. 1 HDC into each of the next 2 stitches. Join to first HDC. (8)
Round 5: CH 1. 1 HDC into each HDC. Join to first HDC. (8)
Round 6: CH 1. 2 HDC into first stitch. 1 HDC into each of the next 3 stitches. 2 HDC into the next stitch. 1 HDC into each of the next 3 stitches. Join to first HDC. (10)
Round 7: CH 1. 2 HDC into first stitch. 1 HDC into each of the next 4 stitches. 2 HDC into the next stitch. 1 HDC into each of the next 4 stitches. Join to first HDC. (12)
Round 8: CH 1. 1 HDC into each HDC. Join to first HDC. (12)
Finish off and set aside.
Using same color-
Round 1: Magic Circle. CH 1. 4 HDC into magic circle. Join to first HDC. (4)
Round 2: CH 1. 2 HDC into first stitch. 1 HDC into the next stitch. 2 HDC into the next stitch. 1 HDC into the next stitch. Join to first HDC. (6)
Round 3: CH 1. 2 HDC into first stitch. 1 HDC into next stitch. *2 HDC into next stitch. 1 HDC into next stitch. Repeat from * 1 more time. Join to first HDC. (9)
Round 4: CH 1. 1 HDC into each HDC. Join to first HDC. (9)

Slip stitch into the piece you sat aside.  You will be working around the two parts to make them one piece.
We will call the next round “Round 9” to take off from where we left off after the first piece.

Round 9: CH 1. 1 HDC into each stitch around. Join to first HDC. (21)
Round 10: CH 1. HDC into first 6 stitches. 2 HDC into next stitch. 1 HDC into each of the next 9 stitches. 2 HDC into next stitch. 1 HDC into each of the next 4 stitches. Join to first HDC. (23)
Round 11-18 : CH 1. 1 HDC into each stitch around. Join to first HDC. (23)
Each one will end at a different Round- repeating round 18.
RED – End at Round 18.
ORANGE – End at Round 20.
YELLOW – End at Round 22.
GREEN – End at Round 22.
BLUE  – End at Round 20.
PURPLE -End at Round 18.
-Note- Use your own judgement. You may want to add or subracts rounds for your own liking. You may also want to change them if one color works up thinner/tighter than the other.

Finish off leaving long tail for attaching. Repeat for each color.

When attaching the hair, I attaches the entire way around the first round of each piece. I also then secured the red, orange, and yellow by attaching it in more than one area to make it lay where I wish.

Eyes

I used THIS TUTORIAL as a guide for making the eyes. My daughter wanted “normal” eyes…. but a part of me wishes she would have went for the angry look. Either way, get crafty and have fun! Remember, google images is your friend! You will also find crochet tutorials for eyes like this.
I used a hot glue gun to piece together and attach the eyes.

Filed Under: Costumes, Free Patterns, Girls, Hats

Ghostly Activities

September 19, 2015 By stitch11 Leave a Comment

Ghostly Activities - Crochet and Crafts - Stitch11

My neighbors started decorating for Autumn. The moment my daughter noticed their pumpkins and scarecrows, she started begging for us to start decorating too.
We pulled out the Halloween boxes and played with all the old costumes and masks. Made a mess with fake spider webs… and realized we are missing decorations from the move.
I'm not too worried about all the missing decorations as I am sure they are packed away in the back of one of the closets with an invisibility cloak draped over them. >.<
Besides… this is a perfect opportunity to get crafty!
I decided to share with you my adventure for finding the funnest decorations and activities. Each week until Halloween, we will be creating a few different things from different categories. The first is Ghostly Activities! Have fun!

First, the non crochet related Ghostly Activities.

  1. Simple Coffee Filter Ghosts
  2. Ghost Jugs
  3. Ghost Garland 
  4. Ghost Rocks
  5. Glue Ghosts 
  6. Smoking Boo Bombs

Now, the (free) Crochet Ghostly Activities! 

  1.  Lollipop Ghost Crochet Pattern
  2. Ghost Candy Bowl 
  3. Amigurumi Ghosts (photo tutorial)
  4. Ghost Puppet
  5. Ghost Applique/Coaster

Filed Under: Costumes, Crafts, Free Patterns, Round Ups

38 Crochet Patterns to Assist You This Halloween

September 10, 2015 By stitch11 1 Comment

Stitch11 Halloween Crochet Patterns and Reviews


Here's a list of 38 crochet patterns that can assist you this Halloween. Each one is either written by me, Stitch11, or reviewed by me. Happy Halloween!

Fox Costume
Minnie Mouse Hat – Toddler Size and Child-Adult Size
Hockey Helmet
Where's Waldo
Cat Hat
Hawaiian Lei
0-3 Month Frog Hat
Eyeballs
Mini Witch Hat
Bunny Hat
Cat Paw Fingerless Gloves
Newborn Baseball Set
Apple Cozies
Newborn Knot Skull Hat
Ninja Mask
Giraffe Hat – 6-12 Month Size and Adult Size
Flower Cocoon
Sock Monkey Hats – 0-3 Months, 6 Month, Toddler, and Child Size
Princess Hat with Braids – Newborn and Toddler Size 
Fluffy Animal Tail
Skull Beanie
Hood
Baby Cyclops Hat
Tutu
Newborn Witch Hat
Lion Hat
Pirate Eye Patch
Princess Crown – 12 Months, Toddler and Child
0-3 Month Princess Crown
Duck Hat
Owl Set
Captain America Hat
0-3 Months Bear Hat
Yoda Hat – Baby and Adult Size
Newborn Turtle Costume
Kings Crown
Toddler Witch Hat
Bear Hood

Filed Under: Costumes, Free Patterns, Pattern Reviews, Round Ups

Rainbows for Love -Free Crochet Patterns and Other Rainbow Tutorials

June 27, 2015 By stitch11 Leave a Comment

Rainbows for Love - Free crochet patterns and tutorials


Let's take a moment to sit back, take a deep breath…. and smile. The right to LOVE is sweeping across the states! Let's keep sharing the love! The more we love, the less room there is for hate. <3 <3

Here are 19 rainbow tutorials. Most of these tutorials are crochet, but some are cooking and some are crafty. Share the love!


Hood For Tots
– Design by Stitch11

SPSD3-Simply-Pampered-Basket-The-Hooked-Haberdasher
Simply Pampered DIY Crisco Candle Recipe and Basket Crochet Pattern
– Design by The Hooked Haberdasher

sweetheart-love-flowers
Sweetheart Love Flower
– Design by Stitch11

Simply-Pampered-Spa-Day-2-The-Hooked-Haberdasher
Simply Pampered Lacy Round Washcloth and Bath Salts
– Design by The Hooked Haberdasher

How-to-make-Rainbow-Jello
Rainbow Jello
– Design by Stitch11

9880993
Flower Child Bag
– Design by Trifles N Treasures

Crochet-Lalaloopsy
Lalaloopsy Doll
– Design by Stitch11

Rainbow-Daze-Washcloth-e1429812502111
Rainbow Daze Washcloth
– Design by Simply Collectible Crochet

1150153_10152113236157713_299595242_n
Boutique Bow
– Design by Stitch11

A-Very-Good-Hat-FB
Good Hat
– Design by Moogly

Kaleido-Dreams_medium
Kaleido Dreams Square
– Design by Stitch11

magic-rainbow-baby-fb-1
Magic Rainbow Baby Blanket
– Design by Moogly

024_medium
Curly Q Hat
– Design by Stitch11

Eloise-Girls-Folded1
Eloise Sweater
– Design by Moogly

000_1077_medium
Baby Robot
– Design by Stitch11

bfeff8b658dfc62497bb6249d902d503
Rainbow Fan
– Tutorial by DIY Home Tips and Tricks

6-12_month_leg_warmers_medium
6-12 Month Leg Warmers
– Design by Stitch11

4da853e32097d038ee536a60f82c65dc
Rainbow Wings
– Tutorial by Katie Kupcake

Crochet_Ninja_Mask_medium
Ninja Mask
– Design by Stitch11


Filed Under: Boys, Costumes, Crafts, Free Patterns, Girls, Inspired, Round Ups

Child-Teen/Small Adult Size Mouse Hat with a Bow

June 7, 2015 By stitch11 3 Comments

Minnie Mouse Hat - Free Crochet Pattern - Preschool and child-teensmall adult sizes

For the next couple months, I will be working on birthday gifts and baby shower gifts. I will do my best to either write up what I make or review and link the patterns I decide on. This is going to be a fun summer in my little crochet world so make sure you follow Stitch11 on Facebook!

My niece is turning 6! Last week while she was at my house, she told me that she “REALLY REALLY loves Minnie Mouse”! I asked her if that means she needed a Minnie Mouse hat and of course she says “YES!!!”

This hat fits most heads 5 years and up! Although it won't fit all adults, it fits me great. If you are wanting to make it for a larger head just add an extra increase round. If you want it for someone younger than 5, check out my Preschool Minnie Mouse Hat pattern! It's free as well.

Supplies
I/9 – 5.5 mm crochet hook
black med-worsted weight yarn (I used I Love This Yarn)
Yarn needle
You will also need…
#5 Pink Bulky Weight Yarn and a 6.5 mm crochet hook for the bow. For THIS bow, I actually used two strands of Caron Simply Soft held together.

Stitches Used
Magic Circle 
CH- Chain
SC- Single Crochet
HDC- Half Double Crochet
FPDC – Front Post Double Crochet 
FPSC – Front Post Single Crochet

You will also be using these stitches when making the bow
DC- Double Crochet
HDC-2-TOG
DC-2-TOG


You will be working in continuous rounds.

Round 1: Magic Circle. 10 HDC in magic circle.  (10)
Round 2: 2 HDC into each of the next 10 stitches. (20)
Round 3: **2 HDC into the next stitch. HDC into the next stitch. Repeat from ** 9 more times. (30)
Round 4: **2 HDC into the next stitch. HDC into the next 2 stitches. Repeat from ** 9 more times. (40)
Round 5: **2 HDC into the next stitch. HDC into the next 3 stitches. Repeat from ** 9 more times. (50)
Round 6:  1 HDC into each of the next 50 stitches. (50)
Round 7: **2 HDC into the next stitch. HDC into the next 4 stitches. Repeat from ** 9 more times. (60)
Rounds 8-13: 1 HDC into each of the next 60 stitches. (60)
Round 14: 1 HDC into each of the next 56 stitches. SC into the next stitch. Slip stitch into the next stitch. (60)
Rounds 15-20: CH 1, HDC into same stitch. FPDC over next stitch. ** HDC into next stitch. FPDC over next stitch. Repeat from ** around. Join to first HDC. (60)
Round 21: CH 1, FPSC into each stitch around. Join to first FPSC. (60)

Finish off and weave in your ends.

Ears

Round 1: Magic Circle. CH 1. 6 HDC into magic circle. Do NOT join. Pull ring tight.(6)
Round 2: CH 1, turn. 2 HDC into each stitch across. (12)
Round 3: CH 1, turn. 2 HDC into the first stitch. 1 HDC into the next stitch. **2 HDC  into the next stitch. 1 HDC into the next stitch. Repeat from ** across. (18)
Round 4: CH 1, turn. SC into next 4 stitches. 2 SC into the next stitch. HDC into next 3 stitches. 2 HDC into each of the next two stitches. HDC into next 3 stitches. 2 SC into the next stitch. SC into next 4 stitches. (22)
Round 5: CH 1, turn. SC into next 6 stitches. 2 SC into the next stitch. HDC into next 3 stitches. 2 HDC into each of the next two stitches. HDC into next 3 stitches. 2 SC into the next stitch. SC into next 6 stitches. (26)
Round 6: CH 1, turn. SC into next 8 stitches. HDC into next stitch. 2 HDC into the next stitch. HDC into each of the next 6 stitches. 2 HDC into the next stitch. HDC into the next stitch. SC into next 8 stitches. (26)

Finish off and repeat for a total of 4 ears.

Layer 2 ears together and join from one side to the other with the Single Crochet stich. No need to join the bottom, you will do that when attaching it. This will make it a thicker and stronger ear. Attach the ear to the hat and repeat for other ear. I attached my ears across rounds 2-9.

Now all you need to do is make your Minnie Mouse Bow and attach it in front of your ears. For the bow in the picture, I used two strands of pink Caron Simply Soft held  together.
When I attached my bow, I used black yarn and not only attached the bottom center to the hat, but I also attached it to the ears a little bit.

Filed Under: Costumes, Free Patterns, Girls, Hats

  • 1
  • 2
  • 3
  • 4
  • Next Page »
  • Email
  • Facebook
  • Pinterest
  • RSS

Stitch11 is a Red Heart Blogger!

unnamed

.

Grab My Button

Archives

Privacy Policy

Copyright © 2026 Stitch11.com · All Rights Reserved · Log in