• Home
  • Free Patterns
    • Toys
    • Costumes
    • Bags
    • Flowers
    • Hats
    • Pattern Reviews
    • Household
    • Newborn
    • Scarves
    • Sports
  • Disclosure
  • Contact
  • Yummy Food
  • Round Ups

Stitch11

A Yarntastic Life!

  • Girls
  • Boys
  • Hats
  • Newborn
  • Flowers
  • Household
  • Costumes
  • Toys
  • Pattern Reviews
  • Grannys
You are here: Home / Archives for Free Patterns / Boys

Elf Stocking Hat – All Sizes

December 1, 2016 By stitch11 10 Comments

Elf Stocking Hat - All Sizes

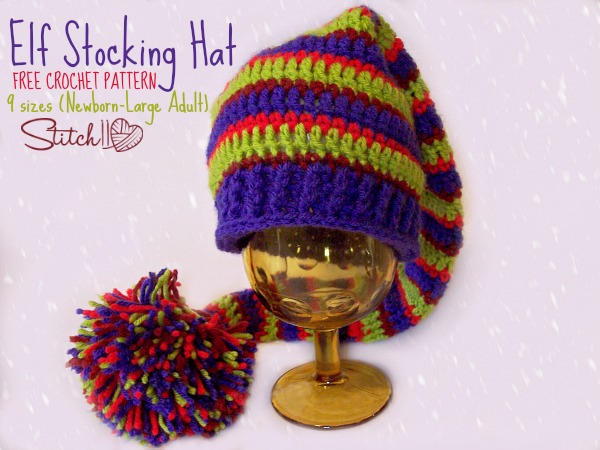
I am excited to share with you my first attempt at including all sizes at once! Please show me your finished pieces so I know I did my job correctly. Enjoy this fun & free Elf Stocking Hat crochet pattern by Stitch11!

Supplies 
I/9 – 5.5 mm Crochet Hook 
Medium/Worsted Weight  –  Red Heart Super Saver
Color A – Neon Red
Color B – Neon Green 
Color C – Purple
Color D – Dark Red
Yarn Needle for weaving in your ends. 

Stitches and Terms
Magic Circle 
CH – Chain
SC – Single Crochet
HDC – Half Double Crochet
DC – Double Crochet
Join –  join using a slip stitch.
FPDC – Front Post Double Crochet
FPSC – Front Post Single Crochet

[Read more…]

Filed Under: Boys, Free Patterns, Girls, Hats, Newborn

Headphone Beanie for Children

November 3, 2016 By stitch11 1 Comment

stitch11-headphone-beanie-child-size

This free crochet pattern is inspired from the mind of my cousins 4 year old son. He made the request, and I was thrilled to bring his idea to life!

Supplies
6 mm crochet hook
Red Heart With Love – Black, Gray, and Blue.
Cherub DK yarn (for music note)
E/ 3.5 mm crochet hook  (for music note)
Yarn needle

Stitches
Magic Circle
Slip Stitch
SC – Single Crochet
HDC – Half Double Crochet
FPSC – Front Post Single Crochet

This pattern is Child Size. Fits most 3-10 year olds.

[Read more…]

Filed Under: Boys, Costumes, Free Patterns, Hats

Child & Adult – Cutie Pie Mittens

October 6, 2016 By stitch11 2 Comments

stitch11-child-teen-adult-mittens-freecrochetpattern

If you have read my About Me, you know that one of the reason I wanted to learn how to crochet, was to crochet my daughter some mittens. After 4 quick years, I FINALLY created her a pair; and me a pair to match!
Enjoy this free crochet pattern for mother-daughter mittens!

Supplies
G/6 – 4.25 mm crochet hook
Yarn Needle
Red Heart – Cutie Pie yarn (I used Grape and Koala) #3 Light

Stitches
Magic Circle
SC – Single Crochet
HDC – Half Double Crochet
HDC DEC – Half Double Crochet Decrease.
FPSC – Front Post Single Crochet
FPDC – Front Post Double Crochet

-Note- I only used 1/2 skein for 2 pairs of mittens.

Let's get started!

Child
Round 1: Magic Circle. CH 1. 8 HDC into magic circle. Join to first HDC. Pull ring tight.
Round 2: CH 1. *2 HDC into next stitch. 1 HDC into next stitch. Repeat from * 3 more times.  Join to first HDC. (12 HDC)
Round 3: CH 1. *2 HDC into next stitch. 1 HDC into each of the next 2 stitches. Repeat from * 3 more times. Join to first HDC. (16 HDC)
Round 4: CH 1. 2 HDC into next stitch. 1 HDC into each of the next 3 stitches. Repeat from * 3 more times. Join to first HDC. (20 HDC)
Round 5-11: CH 1. 1 HDC into each HDC. Join to first HDC.  (20 HDC)
Note: For longer hands, repeat round 5 until desired length.
Finish off.

Child Thumb Piece
Round 1: Magic Circle. CH 1. 8 HDC into magic circle. Join to first HDC. Pull ring tight.
Round 2-6: CH 1. 1 HDC into each HDC. Join to first HDC.
Joining Thumb and Mitten
(Photos below will show how I joined the thumb)
Round 12:  Slip stitch into any stitch from the mitten. This will join your thumb piece and mitten piece.
CH 1. HDC into same stitch and each of the stitches around. Join to first HDC. This will be a total of 28 stitches.
Round 13-14: CH 1. 1 HDC into each stitch around join to first HDC. (28 HDC)
Round 15: CH 1. *HDC into next 5 stitches. HDC DEC.  Repeat from * 3 more times. Join to first HDC. (24 Stitches)
Round 16-18: CH 1. 1 HDC into each stitch around. Join to first HDC. (24 HDC)
Round 19-20: CH 1. SC into first stitch. FPDC around next stitch. * SC into next stitch. FPDC around next stitch. Repeat from * around. Join to first SC. (24 stitches)
Change to contrasting color. 
Round 21: CH 1. SC into first stitch. FPDC around next stitch. * SC into next stitch. FPDC around next stitch. Repeat from * around. Join to first SC. (24 stitches)
Change back to main color. 
Round 22: CH 1. SC into first stitch. FPDC around next stitch. * SC into next stitch. FPDC around next stitch. Repeat from * around. Join to first SC. (24 stitches)
Round 23: CH 1. FPSC around each stitch. Join to first FPSC. (24 FPSC)

Finish off. Turn your glove inside out. Weave in your ends. You can use the end from attaching your thumb piece to close up any holes that may seem too big where you slip stitched to join the thumb.
Repeat for second glove.

Joining

Teen/Adult
Round 1: Magic Circle. CH 1. 8 HDC into magic circle. Join to first HDC. Pull ring tight.
Round 2: CH 1. 2 HDC into each HDC around. Join to first HDC. (16 HDC)
Round 3: CH 1. *2 HDC into next stitch. 1 HDC into next stitch. Repeat from * 7 more times. Join to first HDC.  (24 HDC)
Round 4-16: CH 1. 1 HDC into each HDC around Join to first HDC. (24 HDC)
Note: For longer hands, repeat round 4 until desired length.
Finish off.
Teen/Adult Thumb Piece
Round 1: Magic Circle. CH 1. 10 HDC into magic circle. Join to first HDC. Pull ring tight.
Round 2-8: CH 1. 1 HDC into each HDC. Join to first HDC.
Joining Thumb and Mitten
(Photos above will show how I joined the thumb)
Round 17:  Slip stitch into any stitch from the mitten. This will join your thumb piece and mitten piece.
CH 1. HDC into same stitch and each of the stitches around. Join to first HDC. This will be a total of 34 stitches.
Round 18-21: CH 1. 1 HDC into each stitch around join to first HDC. (34 HDC)
Round 22: CH 1. *1 HDC into next 6 stitches. HDC DEC. 1 HDC into next 7 stitches. HDC DEC. Repeat from * one more time.  Join to first HDC. (30 HDC)
Round 23: CH 1. 1 HDC into next 13 stitches. HDC DEC. Repeat from * one more time. Join to first HDC. (28 HDC)
Round 24- 26 CH 1. SC into first stitch. FPDC around next stitch. * SC into next stitch. FPDC around next stitch. Repeat from * around. Join to first SC. (28 stitches)
Change to contrasting color. 
Round 27: CH 1. SC into first stitch. FPDC around next stitch. * SC into next stitch. FPDC around next stitch. Repeat from * around. Join to first SC. (28 stitches)
Change back to main color. 
Round 28: CH 1. SC into first stitch. FPDC around next stitch. * SC into next stitch. FPDC around next stitch. Repeat from * around. Join to first SC. (28 stitches)
Round 29: CH 1. FPSC around each stitch. Join to first FPSC. (28 FPSC)

Finish off. Turn your glove inside out. Weave in your ends. You can use the end from attaching your thumb piece to close up any holes that may seem too big where you slip stitched to join the thumb.
Repeat for second glove.

Filed Under: Boys, Free Patterns, Girls

Golf Cap – Free Crochet Pattern – Review

August 19, 2016 By stitch11 2 Comments

Golf Cap - Free Crochet Pattern - Review by Stitch11- Design by Moogly

The men my husband works with have been planning a company golf outing. My husband begged me to crochet him a golfers hat. I'm not 100% sure if he's wanting it to be cool, or funny- probably both! Ha!

I remember Moogly sharing a free pattern for both adult and child size Golf Caps, so I didn't even have to hunt a pattern down!

GET YOUR FREE COPY HERE! 

As always, Moogly's pattern is very easy to follow! I was so very happy to find out how quickly the golf cap worked up! It took no time at all!!

I didn't want to ask my husband to model for me… but maybe I can talk him into snapping a selfie on the golf course!

Filed Under: Boys, Free Patterns, Hats, Pattern Reviews, Sports

Cat Puppet

June 20, 2016 By stitch11 3 Comments

Kitty Puppet - Free Crochet Pattern- Design by Stitch11

It all started with the Stitch11 Snake Puppet. It wasn't long before my daughter and I also designed the Puppy Puppet.  And now a few years later, my daughter still requests the puppy puppet during bath time. <3 When I told her how long she has had her puppet, she agreed that she really LOVES it, and requested I make a cat puppet too.
I hope the children in your life love this free cat puppet pattern too. <3

Stitches
Slip Stitch
CH – Chain
SC – Single Crochet
HDC – Half Double Crochet
DC – Double Crochet

Supplies
Medium/worsted weight yarn (I prefer Red Heart brands) I used red.
H-5 mm crochet hook
DK weight yarn (I used Cascade Yarns) I used eggshell, brown, pink and teal.
D- 3.25 mm crochet hook
Yarn needle

Get Started!

Body (make 2)
Using Med/Worsted weight and 5 mm hook

Round 1: Magic circle, 10 HDC into magic circle. Join to first HDC. Pull ring tight. (10 HDC)
Round 2: CH 1, 2 HDC into each HDC. Join to first HDC. (20 HDC)
Round 3: CH 1. 2 HDC into first stitch. HDC into next stitch. **2 HDC into next stitch. HDC into next stitch. Repeat from ** around. Join to first HDC. (30 HDC)
Round 4: CH 1, 2 HDC into first stitch. HDC into next 2 stitches. **2 HDC into next stitch. HDC into next 2 stitches. Repeat from ** around. Join to first HDC. (40 HDC)
Now you will start working in rows.
Row 1: CH 1, HDC into same stitch and next 8 stitches ( 9 HDC)
Finish off.
Row 2: CH 8 And then slip stitch into the stitch where you finished off. Slip stitch into next 8 HDC. CH 9, turn. Skip 1 CH. HDC into next 8 chain. HDC into each of the 9 HDC. (over the slip stitch) HDC into next 8 CH. (25 HDC)
Row 3-4: CH 1, Turn, HDC into same stitch and next 24 stitches. (25 HDC)
Row 5: CH 1. Turn, Slip stitch into same stitch and next 6 stitches. CH 1, HDC the same stitch and into next 10 stitches. (11 HDC)
Row 6-14: CH 1, turn, HDC into same stitch and next 10 stitches. (11 HDC)
Row 15: CH 1, SC around the entire piece. (1 SC for each HDC. 2 SC on the corners. & when you get to the part of the arm that has slip stitches, SC right over the slip stitch- not into it) Join to first SC. Finish off. and weave in your ends.

Repeat steps 1-15 for the other side.

Cat Eyes (make 2)
Using white/eggshell DK weight and 3.25 mm hook.

Round 1: Magic circle. Ch 1, 8 HDC into magic circle. Join to first HDC. (8)
Round 2: CH 1. 2 HDC into each stitch around. Join to first HDC. (16)
Using your yarn needle and the other DK weight colors, embroider the eyes to look like cat eyes.

Weave in ends and attach them to the face of the puppet.

Embroider the nose and mouth, and whiskers onto the face of the puppet.

Attach both sides of the puppet together. Make sure the clean sides of the puppet are facing out. Attach the red yarn to any outer stitch. Using the 5 mm crochet hook, CH 1, SC around to join the pieces. I put 2 SC into the corners of each arm. DO NOT crochet the bottom of the puppet closed.

Cat Ears (make 2)
Using med/worsted yarn. I used red. Use a 5 mm hook.

Row 1: CH 6, skip 1 CH. HDC into next 5 CH.
Row 2: CH 1, turn. 1 SC into each of the 5 SC.
Row 3: CH 1, turn. 1 SC into each of the 5 SC.
Row 4: CH 1, turn. HDC DEC. HDC. HDC DEC.
Row 5: CH 1, turn. HDC 3 together.
Using your yarn needle, attach the ears to your kitty puppet.

Filed Under: Boys, Crafts, Free Patterns, Girls, Toys

Pikachu – Free Crochet Pattern – Stitch11 Review

March 23, 2016 By stitch11 1 Comment

I'm not sure how many of you remember the Pokemon Balls I made a year ago, but ever since, my daughter has been begging me to make her a Pikachu.
I finally agreed to make this little monster. He is small, adorable, and very lovable. The pattern is very easy to follow and well written.
I did have confusion with the tail. I don't know what I did wrong, but whatever it was, it still worked out just fine.
Instead of felt cheeks, I just used some acrylic paint.
You can find your copy of this free Pikachu crochet pattern here.

Pikachu - Free Crochet Pattern - Stitch11 Review

Filed Under: Boys, Free Patterns, Inspired, Pattern Reviews, Toys, Uncategorized

Toddler Hooded Poncho

March 15, 2016 By stitch11 109 Comments

This Toddler Hooded Poncho crochet pattern is worked in 3 pieces - hood, neck, and poncho. It is crocheted both in the round and by rows. You can choose whatever color, with or without the highlights. Perfect for any toddler, to keep them warm in cold months as they walk around outside. #crochet #crochetlove #crochetlife #crochetaddict #crochetpattern #crochetinspiration #crochetgoodness #ilovecrochet #crochetgifts #crochet365 #addictedtocrochet #yarnaddict #yarnlove

I was given the challenge to create the perfect hooded toddler poncho. After searching online for WEEKS and not having much luck finding a hooded crochet poncho.. I knew I was left with no choice but to write one out.
Luckily, the person who wanted the poncho guided me with the wonderul directions of this poncho while still giving me creative freedom.
I am beyond pleased with the outcome! I am  also so very happy to share the pattern with you, for free!

Toddler Hooded Poncho Crochet Pattern

Supplies
For the most of the pattern you will be using Red Heart With Love. I used “Boysenberry” aka Maroon. (about 1.5 skeins)
For the highlight in front of the hood and the trim of the poncho,  I used purple Caron Simply Soft . (1/4 skein)
For the contrast stripes I used Red Heart Boutique “Unforgettable”. (1 skein)
You will need a 5 mm crochet hook.
You will need a yarn needle
*Optional* – 2 buttons

Stitches
Magic Circle
CH – Chain
SC – Single Crochet
HDC – Half Double Crochet
DC – Double Crochet

Stitch11 Crochet Poncho

Hood

Round 1: Magic Circle. CH 1. 5 HDC. Join to first HDC. Pull magic circle tight. Turn. (5 HDC)
Round 2: CH 1. 1 HDC into each HDC. Join to first HDC. Turn. (5 HDC)
Round 3: CH 1. 2 HDC into each HDC. Join to first HDC. Turn. (10 HDC)
Round 4: CH 1. 1 HDC into each HDC. Join to first HDC. Turn. (10 HDC)
Round 5: CH 1. 2 HDC into first HDC. 1 HDC into next HDC. *2 HDC into next HDC. 1 HDC into next HDC. Repeat from * around. Join to first HDC. Turn. (15 HDC)
Round 6: CH 1. 1 HDC into each HDC around. Join to first HDC. Turn (15 HDC)
Round 7: CH 1. 2 HDC into first HDC. 1 HDC into each of the next 2 HDC. * 2 HDC into next HDC. 1 HDC into each of the next 2 HDC. Repeat from * around. Join to first HDC. Turn. (20 HDC)
Round 8: CH 1. 1 HDC into each HDC around. Join to first HDC. Turn.20 HDC)
Round 9: CH 1. 2 HDC into first HDC. 1 HDC into each of the next 3 HDC. * 2 HDC into next HDC. 1 HDC into each of the next 3 HDC. Repeat from * around. Join to first HDC. Turn. (25 HDC)
Round 10: CH 1. 1 HDC into each HDC around. Join to first HDC. Turn. (25 HDC)
Round 11: CH 1. 2 HDC into first HDC. 1 HDC into each of the next 4 HDC. * 2 HDC into next HDC. 1 HDC into each of the next 4 HDC. Repeat from * around. Join to first HDC. Turn. (30 HDC)
Round 12: CH 1. 2 HDC into first HDC. 1 HDC into each of the next 5 HDC. * 2 HDC into next HDC. 1 HDC into each of the next 5 HDC. Repeat from * around. Join to first HDC. Turn. (35 HDC)
Round 13: CH 1. 1 HDC into each HDC around. Join to first HDC. Turn. (35 HDC)

Round 14: CH 1. 2 HDC into first HDC. 1 HDC into each of the next 6 HDC. * 2 HDC into next HDC. 1 HDC into each of the next 6 HDC. Repeat from * around. Join to first HDC. Turn. (40 HDC)
Round 15: CH 1. 2 HDC into first HDC. 1 HDC into each of the next 7 HDC. * 2 HDC into next HDC. 1 HDC into each of the next 7 HDC. Repeat from * around. Join to first HDC. Turn. (45 HDC)
Round 16: CH 1. 1 HDC into each HDC around. Join to first HDC. Turn. (45 HDC)

Round 17: CH 1. 2 HDC into first HDC. 1 HDC into each of the next 8 HDC. * 2 HDC into next HDC. 1 HDC into each of the next 8 HDC. Repeat from * around. Join to first HDC. Turn. (50 HDC)
Round 18: CH 1. 2 HDC into first HDC. 1 HDC into each of the next 9 HDC. * 2 HDC into next HDC. 1 HDC into each of the next 9 HDC. Repeat from * around. Join to first HDC. Turn. (55 HDC)
Round 19: CH 1. 1 HDC into each HDC around. DO NOT JOIN. Turn. (55 HDC)

Round 20: CH 1. 2 HDC into the first stitch. 1 HDC into the next 10 HDC. *2 HDC into next stitch. 1 HDC into next 10 HDC. Repeat from * around. Turn. (60 HDC)
Round 21: CH 1. 2 HDC into the first stitch. 1 HDC into the next 11 HDC. *2 HDC into next stitch. 1 HDC into next 11 HDC. Repeat from * around. Turn. (65 HDC)

Round 22-28: CH 1. 1 HDC into each HDC around. Turn. (65 HDC)
Round 29-30: CH 2. 1 DC into each of the first 5 stitches. HDC into next 55 stitches. DC into last 5 stitches. Turn. (65 stitches)
Round 31: CH 2. 1 DC into first 10 stitches. HDC into next 45 stitches. DC in last 10 stitches. Turn. (65 stitches)

Round 32: CH 1. 1 SC into the next 64 stitches. 2 SC into the next stitch.
Turn (rotate your piece), working up the side of the stitches of the neck of the hood.
You will put 3 SC over each side of the next 3 DC. 2 SC over each side of the next 22 HDC. Put 3 SC over each side of the next 3 DC. 1 SC into the starting stitch. Join to first SC. (129 stitches)

Round 33: CH 1. SC into next 64 stitches. 2 SC into each of the next 3 stitches. 1 SC into next 13 stitches. 1 HDC into each of the next 34 stitches. 1 SC into each of the next 13 stitches. 2 SC into each of the next 2 stitches. 1 SC into starting stitch.  (135 stitches)

Finish off and attach highlighting color.

Hood Edge and Highlight

Row 1: CH 1, SC into same stitch and next 64 stitches. Turn. (65 SC)
Row 2: Skip first stitch. SC into next 63 stitches. Turn. (63 SC)
Row 3: Crocheting over the last 2 rows, this row will be worked into stitches from round 33, bunching the last 2 rows inside the stitches. (63 SC)

Finish off. Count 12 stitches to the left. Attach your main color.

Neck of Poncho

Row 1: CH 1. 2 HDC into first stitch. 1 HDC into next 46 stitches. 2 HDC into next stitch. Turn. (50 HDC)
Row 2: CH 2. *2 DC into first stitch. DC into next stitch. 2 HDC into next stitch.  HDC into each of the next 44 stitches. 2 HDC into next stitch. DC into next stitch. 2 DC into last stitch. Turn (54)
Row 3: CH 2.  *3 HDC into first stitch. HDC into next 52 stitches. 3 HDC into last stitch. Turn (58)
Row 4: CH 2. * 2 DC into first stitch. DC in next stitch. 2 HDC into next stitch. HDC into each of the next 4 stitches. 2 HDC into the next stitch. HDC into each of the next 42 stitches. 2 HDC into next stitch. HDC into each of the next 4 stitches. 2 HDC into next stitch DC into next stitch. 2 DC into last stitch.CH 4 join to the top of the first DC from row 4.  Turn. (68 stitches including the chains.)

Poncho
Round 1: CH 1, 1 HDC into the first CH. 2 HDC into the next chain. CH 2. 2 HDC into the next CH. 1 HDC into next CH. 1 HDC into next 14 stitches. *2 HDC into next stitch. CH 2. 2 HDC into next stitch. 1 HDC into next 15 stitches.  Repeat from * one more time.  2 HDC into next stitch. CH 2. 2 HDC into next stitch. 1 HDC into next 14 stitches. Join to first HDC. Turn. (72 stitches not including chains.)
Round 2-5: CH 1. 1 HDC into each HDC. { HDC, CH 2, HDC} into each CH space. Join to the first stitch. Turn at the end of each row.  *note* make sure you do not miss the hdc before the chain spaces.

Finish off and attach your contrasting stripes colored yarn to a CH 2 space.
Round  6: Make sure your are crocheting with the nice side of the stitches facing the outside of the poncho.
CH 2. *{DC, CH 2, DC} into CH space. 1 DC into each HDC. Repeat from * around. Join to the top of first DC. Turn.
Change back to main color. Attaching into CH space.
Round 7: CH 1. *{HDC, CH 2, HDC} into CH space. 1 HDC into each stitch. Repeat from * around. Join to the top of first HDC. Turn.
Round 8-9: CH 1. 1 HDC into each HDC. { HDC, CH 2, HDC} into each CH space. Join to the first stitch. Turn at the end of each row.

Repeat rows 6-9 four more times.

Edging

Using your contrasting stripes colored yarn, attach into CH 2 space.
Make sure your are crocheting with the nice side of the stitches facing the outside of the poncho.
CH 2. *{DC, CH 2, DC} into CH space. 1 DC into each HDC. Repeat from * around. Join to the top of first DC.

Using your Highlight color, attach into CH 2 space.
CH 1, 4 HDC into each CH 2 space. 1 HDC into each DC. Join to first HDC.

Weave in all of your ends.

Add a tassel to the tip of your hood. I used THIS tutorial.

Attach yarn to the corner of your hood. CH 30. Slip stitch back up your chain. Finish off, weave in your end, and repeat on other side.

*Optional buttons and loop* Attach yarn to one side of the chest opening. We had to have this to be sure the head could fit through easily… but that doesn't mean we always want it wide open.
Ch  8. Slip stitch back to starting spot to create a button loop. Add a button to both sides- one is for appearance.

Check out this free Boot crochet pattern review to match!

Stitch11 free crochet poncho pattern

Filed Under: Boys, Free Patterns, Girls Tagged With: crochet poncho, hooded crochet pattern, hooded poncho, pattern, poncho, poncho pattern

Crochet Bubble Booties – Review – Free Crochet Pattern

March 1, 2016 By stitch11 3 Comments

Bubble Boots - Free Crochet Pattern - Review - Stitch11

I found this *free* adorable crochet boots pattern HERE at Whistle and Ivy!

This pattern is available in sizes 0-3, 3-6, 6-9, and 9-12. I needed 12-18 month size, and as you can see in my notes, it was a simple change of hook size to get the perfect measurements for the larger size.
Notes
-I added an extra row of HDC between rounds 12 and 13.
– I used a 5 mm crochet hook to make mine a size larger. I needed them to be 5 inches in length (12-18 month size)
-I used Red Heart Boutique, Unforgettable yarn.
I can see where they get the name “Unforgettable”. Although the pattern alone is supper cute, I honestly don't think you can go wrong with this yarn choice!

The pattern is very easy to follow, simple to adjust, and perfect for babies that love to kick their feet! Because it has two ties, and the bubble shape, these booties will not only be comfortable but will hold onto those little ninja feet!

I will definitely be using THIS free pattern again!!

If you'd like some more inspiration for baby patterns, take a peek at some of my other blog pages here: 25 Easy Crochet Baby Booties for Beginners

Filed Under: Boys, Free Patterns, Girls, Pattern Reviews

Child Size Batman Beanie

December 1, 2015 By stitch11 7 Comments

Bat Beanie - Child Size - Free Crochet Pattern by Stitch11

Supplies
5 mm crochet hook
black and yellow medium weight yarn (I used Caron Simply Soft)
Yarn needle
Black Felt

-NOTE- If you choose to use another medium weight or worsted weight yarn, it may work up larger than with Caron Simply Soft. If that is the case, stop increasing at 60 stitches. For Child size, when laying your hat flat, it sure measure between 9 and 10 inches across. 

Stitches Used
Slip Stitch
Magic Circle 
CH- Chain
SC- Single Crochet
HDC- Half Double Crochet
FPDC – Front Post Double Crochet 
FPSC – Front Post Single Crochet


The Child Size Beanie
You will be working in continuous rounds.

Round 1: Magic Circle. 10 HDC in magic circle.  (10)
Round 2: 2 HDC into each of the next 10 stitches. (20)
Round 3: **2 HDC into the next stitch. HDC into the next stitch. Repeat from ** 9 more times. (30)
Round 4: **2 HDC into the next stitch. HDC into the next 2 stitches. Repeat from ** 9 more times. (40)
Round 5: **2 HDC into the next stitch. HDC into the next 3 stitches. Repeat from ** 9 more times. (50)
Round 6: **2 HDC into the next stitch. HDC into the next 4 stitches. Repeat from ** 9 more times. (60)
Rounds 7: 1 HDC into each of the next 60 stitches. (60)
Round 8: **2 HDC into the next stitch. HDC into the next 5 stitches. Repeat from ** 9 more times. (70)
Round 9-17: 1 HDC into each of the next 70 stitches. (70)
Round 18: 1 HDC into the next 68 stitches. SC into the next stitch. Slip stitch into the next stitch. (70)
Round 19: CH 1. SC into the same stitch. FPDC into the next stitch. **SC into the next stitch. FPDC into the next stitch. Repeat from ** around. Join with a slip stitch to the first SC. (70)
Change to Yellow
Round 20: CH 1. SC into the same stitch. FPDC into the next stitch. **SC into the next stitch. FPDC into the next stitch. Repeat from ** around. Join with a slip stitch to the first SC. (70)
Change to Black 
Round 21:CH 1. SC into the same stitch. FPDC into the next stitch. **SC into the next stitch. FPDC into the next stitch. Repeat from ** around. Join with a slip stitch to the first SC. (70)
Change to Yellow
Round 22: CH 1. SC into the same stitch. FPDC into the next stitch. **SC into the next stitch. FPDC into the next stitch. Repeat from ** around. Join with a slip stitch to the first SC. (70)
Change to Black
Round 23: CH 1. SC into the same stitch. FPDC into the next stitch. **SC into the next stitch. FPDC into the next stitch. Repeat from ** around. Join with a slip stitch to the first SC. (70)
Round 24: CH 1. FPSC into each stitch around. Join to first stitch. Finish off and weave in your ends.

For the “Bat Symbol” I just used Google Images. I drew the one I liked onto some black felt, and cut it out. 

The Oval
Using Yellow

Round 1: CH 8. Skip 1st CH from hook. 2 HDC into next CH. 1 HDC into each of the next 5 CH. 3 HDC into last CH.
Turn your work and start crocheting into the other side of the chains. 
1 HDC into next 5 CH. 1 HDC into starting CH. Join to first HDC.
Round 2: CH 1. 3 HDC into same stitch. 1 HDC into next 7 stitches. 4 HDC into next stitch. 1 HDC into next 7 stitches. 1 HDC into starting stitch. Join to first HDC.
Round 3: CH 1. 1 HDC into same stitch. 1 HDC into next stitch. 3 HDC into next stitch. 1 HDC into next 7 stitches. 3 HDC into next stitch. 1 HDC into each of the next 2 stitches. 3 HDC into next stitch. 1 HDC into each of the next 7 stitches. 3 HDC into next stitch. Join to first HDC.
Round 4: CH 1. HDC into same stitch and into next 3 stitches. 3 HDC into next stitch. HDC into next 9 stitches. 3 HDC into next stitch. 1 HDC into next 4 stitches. 3 HDC into next stitch. 1 HDC into next 9 stitches. 3 HDC into last stitch. Join to first HDC.
Round 5: CH 1. 2 HDC into same stitch. 1 HDC into each of the next 2 stitches. 2 HDC into next stitch. 1 HDC into next stitch. 2 HDC into next stitch. 1 HDC into next 11 stitches.
2 HDC into next stitch. 1 HDC into next stitch. 2 HDC into next stitch. 1 HDC into each of the next 2 stitches. 2 HDC into next stitch. 1 HDC into next stitch. 2 HDC into next stitch. 1 HDC into next 11 stitches. 2 HDC into next stitch. 1 HDC into next stitch.
Finish off with a long tail for attaching to the hat.

You have the choice to hot glue the batman symbol or sew it onto the yellow oval. Then attach the oval to the front of your hat.

Filed Under: Boys, Costumes, Free Patterns, Hats

Infant Bow Tie – Free Crochet Pattern

November 11, 2015 By stitch11 13 Comments

Infant Bow Tie - Free Crochet Pattern - Design by Stitch11

Infant Bow Tie Crochet Pattern

Stitches Used 
CH – Chain
Slip Stitch
SC – Single Crochet
HDC – Half Double Crochet
DC – Double Crochet

Supplies
Medium/worsted weight yarn
5 MM crochet hook
Yarn needle
Small button (about 1 CM)

The Bow
Row 1: CH 25. Turn. Skip 1 CH. **DC in next 3 stitches. HDC in next 2 stitches. SC in next 2 stitches. HDC in next 2 stitches. DC in next 3 stitches. Repeat from ** one more time.
Row 2: CH 1, turn. **DC in next 3 stitches. HDC in next 2 stitches. SC in next 2 stitches. HDC in next 2 stitches. DC in next 3 stitches. Repeat from ** one more time.
Row 3: CH 1, turn. **DC in next 3 stitches. HDC in next 2 stitches. SC in next 2 stitches. HDC in next 2 stitches. DC in next 3 stitches. Repeat from ** one more time.
Finish off leaving a long tail. Weave the ends together. The SC stitches from each row should fold over to be on top of one another in the center of the bow.  Leaving the DC stitches on the sides of the bow.
Weave your yarn end towards the center of the bow. Wrap it around the center of the bow a few times.. Do not cut the remaining yarn off. You will use this to attach the bow to the band.
The Band 
Make a CH that is 12-13 inches long. If you need to adjust the size, measure the neck and add about 2 inches. Keep in mind that this band will be adjustable. The button can slide between any stitch.
Turn, skip 1 CH and HDC into each of the remaining chains.
Finish off leaving a long enough tail to attach a button to the end.
Attach the bow to the center.

Filed Under: Boys, Costumes, Free Patterns, Newborn

Child Size Leg Warmers and Fingerless Gloves

October 5, 2015 By stitch11 Leave a Comment

Child Size Leg Warmers and Fingerless Gloves - Free Crochet Pattern

In addition to my daughters Rainbow Pony Hat, she now has matching leg warmers and fingerless gloves. The next part of her costume will be the rainbow tail! Make sure you are following me on Facebook to see all the updates to the free Halloween costume patterns!

Don't want to wait? Check out this Halloween Post! 

Medium/WW Yarn – (Red Heart, Crafters Choice, or I Love This Yarn will each work great for this pattern) –
Yarn needle – for weaving in ends
J-6.00 MM crochet hook

[Read more…]

Filed Under: Boys, Costumes, Free Patterns, Girls

The Perfect Rainbow Pet Net Hammock

July 30, 2015 By stitch11 24 Comments

This pretty pattern isn't only lovely to look at. It also has a lot of other purposes, including keeping those messy toys off the floor. It's also one of the best ways to make use of those yarns you want to get rid off! See it come to life with the free pattern below or get the ad-free printable PDF pattern here.

This Toy Net Hammock crochet pattern is a cute hammock where you can place all the sweet stuffies. Instead of the stuffed toys hogging the space on your child's bed, shelves, or floor - you can rest them all on this pretty rainbow hammock! #crochet #crochetlove #crochetlife #crochetaddict #crochetpattern #crochetinspiration #ilovecrochet #crochetgifts #crochet365 #addictedtocrochet #yarnaddict #yarnlove

A few days ago, my daughter came to me and asked me to “please get rid of my creepy dolls.” She was quick to explain that she didn't need creepy dolls because she has so many stuffed animal babies.  Within twenty minutes she comes back to inform me…. she needs *another* crocheted toy net hammock.

I was quick to jump at this request because I desperately needed to update my previous crochet hammock. So really, this is *Take Three* of attempting the perfect hammock. I feel as if I finally did it! One that I am truly proud of designing and sharing with all of you…. for FREE! 🙂

The Perfect Rainbow Pet Net Hammock Crochet Pattern has now arrived.

Before we get to the pattern, if you enjoy crocheting things for the little people in your life, check out these incredibly cute stuffies in the Crochet Anything with Hexagons class.

[Read more…]

Filed Under: Boys, Free Patterns, Girls, Toys Tagged With: crochet pattern, hammock, pattern, toy hammock, toy hammock crochet pattern

Rainbows for Love -Free Crochet Patterns and Other Rainbow Tutorials

June 27, 2015 By stitch11 Leave a Comment

Rainbows for Love - Free crochet patterns and tutorials


Let's take a moment to sit back, take a deep breath…. and smile. The right to LOVE is sweeping across the states! Let's keep sharing the love! The more we love, the less room there is for hate. <3 <3

Here are 19 rainbow tutorials. Most of these tutorials are crochet, but some are cooking and some are crafty. Share the love!


Hood For Tots
– Design by Stitch11

SPSD3-Simply-Pampered-Basket-The-Hooked-Haberdasher
Simply Pampered DIY Crisco Candle Recipe and Basket Crochet Pattern
– Design by The Hooked Haberdasher

sweetheart-love-flowers
Sweetheart Love Flower
– Design by Stitch11

Simply-Pampered-Spa-Day-2-The-Hooked-Haberdasher
Simply Pampered Lacy Round Washcloth and Bath Salts
– Design by The Hooked Haberdasher

How-to-make-Rainbow-Jello
Rainbow Jello
– Design by Stitch11

9880993
Flower Child Bag
– Design by Trifles N Treasures

Crochet-Lalaloopsy
Lalaloopsy Doll
– Design by Stitch11

Rainbow-Daze-Washcloth-e1429812502111
Rainbow Daze Washcloth
– Design by Simply Collectible Crochet

1150153_10152113236157713_299595242_n
Boutique Bow
– Design by Stitch11

A-Very-Good-Hat-FB
Good Hat
– Design by Moogly

Kaleido-Dreams_medium
Kaleido Dreams Square
– Design by Stitch11

magic-rainbow-baby-fb-1
Magic Rainbow Baby Blanket
– Design by Moogly

024_medium
Curly Q Hat
– Design by Stitch11

Eloise-Girls-Folded1
Eloise Sweater
– Design by Moogly

000_1077_medium
Baby Robot
– Design by Stitch11

bfeff8b658dfc62497bb6249d902d503
Rainbow Fan
– Tutorial by DIY Home Tips and Tricks

6-12_month_leg_warmers_medium
6-12 Month Leg Warmers
– Design by Stitch11

4da853e32097d038ee536a60f82c65dc
Rainbow Wings
– Tutorial by Katie Kupcake

Crochet_Ninja_Mask_medium
Ninja Mask
– Design by Stitch11


Filed Under: Boys, Costumes, Crafts, Free Patterns, Girls, Inspired, Round Ups

Crochet Hemp Bracelet – Free Crochet Pattern

June 24, 2015 By stitch11 Leave a Comment

Crochet Hemp Bracelet - free crochet pattern

This bracelet is designed for a 6 inch wrist. I made mine 6.5-7 inches around for comfort. This bracelet is designed so you can easily make them smaller or larger. You may not need to adjust the pattern though.. this bracelet fit's my small wrist, my husbands huge wrist, and my 4 year olds ankle.

Supplies
2 colors of hemp cord. 10 yrds each.
4.25 MM crochet Hook
Yarn needle

Stitches
CH – Chain
SC- Single Crochet
Slip Stitch

Step 1: CH 5. Slip stitch into first CH.
Step 2: CH 1. 3 SC into loop you just made. Do not join.
Step 3: CH 1. SC into each of the 3 SC.
Repeat step 3 to desired length. I repeated step 3 twenty six times.
Step 4: CH 10. Finish off.
Change colors
Step 5: CH 9. Slip stitch into the starting SC of your last step 3 repeat. Slip stitch up the side of the bracelet… through the center of each SC. Slip stitch into each CH (of the loop you made from step 1). Slip stitch back up the other side of the bracelet. Finish off when you reach the last repeat row of step 3.
Weave in your ends and finish off.

You use the CH ends to tie through the loop end. Making this bracelet custom fit to many wrists.

Filed Under: Boys, Free Patterns, Girls

Newborn Skull Knot Hat

May 27, 2015 By stitch11 2 Comments

Newborn Skull Knot Hat

My latest order is for a dear friend who wanted to welcome her new baby home in a custom made crochet hat.
As soon as she messaged me on Facebook, I knew the Crochet Newborn Knot Hat by Repeat Crafter Me would be perfect!

I told her I could put any applique on the hat that she wished.. and she requested a skull. Which is really ideal for their family since her daughters love Monster High!

To make the skull I followed the Day Of The Dead Skull Applique by KristinsKrazyKnits. I found this free pattern through one of Moogly's wonderful round ups that you can check out HERE!

For the hat I used Red Heart With Love and for the skull I used Cascade Cherub DK weight.

Filed Under: Boys, Costumes, Free Patterns, Hats, Newborn, Pattern Reviews

Pokémon Ball – Free Crochet Pattern – Review

April 30, 2015 By stitch11 Leave a Comment

Pokemon Balls - Free Crochet Pattern - Review

My stepson, Brennan and my daughter, Ella have WILD imaginations. They defeat giant trolls in the back yard, adventure through wild jungles in the living room and slay dragons on the staircase.
I remember being young and having such a strong imagination. When using it, it feels like the world around you really changes… and your sibling who becomes a witch can actually terrify you- when she finds you hiding behind the waterfall (chair).
It didn't take long for Ella to want to watch all of her brothers favorite tv shows- including Pokemon. They have been begging me to make some Pokemon items for months now.. and these balls are just the beginning. Not only do they want these, but also the characters. I am also contemplating on making the larger version of poke'balls for them.

Oh yeah – the review! These little Poke'balls are designed by Denton Foreman. Get the FREE pattern >>>HERE<<<

The pattern was very easy to follow and very quick too. It took me about 5 minutes to complete each ball. Instead of sewing the felt button on, I used my hot glue gun. I am always for simple and quick… and this pattern gave that to me. Thank you so much Denton Foreman for the easy pattern!

If you are looking for the larger (and still free) version – Click >>>HERE<<<


Filed Under: Boys, Free Patterns, Pattern Reviews, Toys

16 FREE Stitch11 Crochet Patterns for Babies!

April 18, 2015 By stitch11 Leave a Comment

16 FREE Stitch11 Crochet Patterns for Babies

I have spent the last week on a new pattern. Just when I realized I was almost finished, I looked at the weather to see we have rain in our forecast for the entire coming week! I really want to get an outdoor photo. So, I decided to put the new pattern release on hold and put together a few Stitch11 round ups!

Here is a list of 16 free crochet patterns that I designed for sweet lil' babies! They are listed from the photo, working left to right and top to bottom.

Curtain Huggy Bear 
0-3 Month Frog Hat 
Owl Cuddle Lovey 
Puff Bonnet 
Newborn Sleepy Owl Hat 
Weight Set (photo prop) 
The Chloe – Newsboy Beanie 
Princess Hat 
Robot  
Turtle Photo Prop 
Witch/Wizard Hat 
Overalls 
Sock Monkey Hat 
Welcome Home Beanie 
Flower Photo Prop Cocoon 
Princess Crown 

Filed Under: Boys, Free Patterns, Girls, Newborn, Round Ups

Bunny Hat – Free Crochet Pattern – Review

March 24, 2015 By stitch11 Leave a Comment

Bunny Hat - free crochet pattern - review


I decided to follow the free “One Hour Bunny Hat” (<–link to pattern) by Moogly – because I wanted a quick and simple pattern to add to my Easter crochet stash… well, my daughters. 😉

After working up the base of the hat, Ella asked me if the ears would stick up like a “real bunny”. I told her I will see what I can do…

I decided to make two layers of each ear before doing the trim around the ears. I used one white layer and one blue layer for each ear. I then joined them together while doing the trim directed by the pattern. I also lightly stuffed them.
When attaching them, they wanted to flop straight forward. To solve this issue.. I just kept securing them, over and over. I also attached them a little bit together at the bottom of the ears. I would put the hat on, check to see if they stood up, and if not, I would go back and secure them to the base of the hat a little more. Then suddenly, they stayed straight up!

Ella was so excited, as you can see from the photos! This fun and quick pattern made my daughter so happy! Thanks Moogly!!!

Filed Under: Boys, Costumes, Free Patterns, Girls, Hats, Pattern Reviews

Free Crochet Robot Pattern

March 16, 2015 By stitch11 2 Comments

Free Robot Crochet Pattern

Supplies
E/ 3.5 mm crochet hook
Med/worsted weight yarn (gray, blue, dark green, light green, yellow, orange, red, black and white)
Yarn needle

Stitches
Magic Circle
CH – Chain
SC – Single Crochet
SC DEC – Single Crochet Decrease
HDC – Half Double Crochet

Feet and Legs
Starting with gray yarn.
Round 1: Magic Circle. Ch 1, 7 SC into magic circle. Pull ring tight and join to first SC. (7 SC)
Round 2: CH 1. 2 SC into each SC. Join to first SC. (14 SC)
Round 3: CH 1. 2 SC into the first SC. 1 SC into the next SC. **2 SC into next SC. 1 SC into next SC. Repeat from ** 5 more times.  Join to first SC. (21 SC)
Round 4: CH 1. 2 SC into first SC. 1 SC into each of the next 2 SC. ** 2 SC into the next SC. 1 SC into each of the next 2 SC. Repeat from ** 5 more times. Join to first SC. (28 SC)
Round 5: In back loops only- CH 1. 1 SC into each back loop around. Join to first SC. (28 SC)
Round 6: In back loops only- CH 1. **SC DEC. SC into each of the next 2 back loops. Repeat from ** 6 more times. Join to first SC. (21 stitches)
Round 7: CH 1. **SC DEC. SC into next stitch. Repeat from ** 6 more times. Join to first SC. (14 stitches)
Round 8: CH 1. SC DEC around. Join to first SC DEC. (7 stitches)
Finish off and weave in your yarn ends. When doing this, weave your starting end on the top.. so the piece wants to stay flat (it will hold the top and bottom together). Be sure not to mess up your last row of stitches, as you will be crocheting in them in your next round.

Join red yarn to a front loop.
Round 9: CH 1. 2 SC into each front loop around. Join to first SC. (14 SC)
Round 10-12: CH 1. 1 SC into each SC around. Join to first SC. (14 SC)
Round 13: CH 1. SC DEC around. Join to first SC DEC. (7 stitches)
Finish off. Add a small amount of stuffing/batting.

Tip: When you changing colors, work over your yarn ends the entire way around. Once you are done with the new color, pull those yarn ends tight. Then stuff them into the leg. This will just make even more definition of the crease between colors.

Repeat rounds 9-13 two more times with the colors listed below. 
-Orange
-Yellow

Repeat for second leg. 

Arms
Starting with dark green yarn 
Round 1: Magic Circle. CH 1. 7 SC into magic circle. Pull magic circle tight. Join to first SC. (7 SC)
Round 2: CH 1. 2 SC into each front loop around. Join to first SC. (14 SC)
Round 3-5: CH 1. 1 SC into each SC around. Join to first SC. (14 SC)
Round 6: CH 1. SC DEC around. Join to first SC DEC. (7 stitches)
Finish off. Add a small amount of stuffing/batting. 

Repeat rounds 2-6 two more times with the colors listed below. 
-Light Green
-Yellow

Claw
With gray yarn
Round 1: Magic Circle. CH 1, 5 SC into magic circle. Pull magic circle tight. Join to first SC. (5 SC)
Round 2: CH 1. SC into each of the back loops around. Join to first SC. (5 SC)
Round 3-9: CH 1. SC into each stitch around.

Finish off leaving long tail.
Weave your tail around each stitch around and pull tight. Secure yarn end to keep the whole closed. With your yarn needle. Pull the yarn through the center of the peace so you can attach it from the middle, to the end of the dark green piece of the arm. You may want to pull the yarn through both sides of the claw to help bring each end closer together while you are attaching. This will make it look like a claw.

Repeat for second arm and claw.  

Robot Body Walls
Using blue yarn 
Row 1: CH 15. Turn. Skip one CH. SC into next 14 CH.
Row 2-14: CH 1. Turn. SC into next 14 SC.

Row 15: CH 1, Turn. SC into each front loop across.
Row 16-28: CH 1, Turn. SC into next 14 SC.

Row 29: Repeat row 15.
Row 30-42: Repeat rows 16-28.

Row 43: Repeat row 15.
Row 44-56: Repeat rows 16-28.

Finish off leaving long tail. Using yarn needle and yarn tail, Attach both ends of your piece through the back loops of row 56. The back loops that were left at each edge of the square will be on the outside of your piece. Now you have the walls of the body.

Robot Body Top and bottom
Using blue yarn. 
-make two-
Row 1: CH 15. Turn. Skip one CH. SC into next 14 CH.
Row 2-14: CH 1. Turn. SC into next 14 SC.
Finish off leaving long tail for attaching to the body walls.

Attach one square to the robot body walls. Attach all but one side of the other square…. stuff the cube and finish attaching the square.

Attach the legs and the arms.

Robot Head Walls
Using blue yarn
Row 1: CH 13. Turn. Skip one CH. SC into next 12 CH.
Row 2-12: CH 1. Turn. SC into next 12 SC.

Row 13: CH 1. Turn. SC into each front loop across.
Row 14-24: CH 1. Turn. SC into next 12 SC.

Row 25: Repeat row 11.
Row 26-36: Repeat rows 12-20

Row 37: Repeat  row 11.
Row 38-48: Repeat row 12-20

Finish off leaving long tail. Using yarn needle and yarn tail, Attach both ends of your piece through the back loops of row 48. The back loops that were left at each edge of the square will be on the outside of your piece. Now you have the walls of the head. 

Top and Bottom of Head
Using Blue Yarn
-Make Two- 
Row 1: CH 13. Turn. Skip one CH. SC into next 12 CH.
Row 2-12: CH 1. Turn. SC into next 12 SC.

Attach one square to the robot head walls. Attach all but one side of the other square…. stuff the cube and finish attaching the square. Set aside.

Robot Neck
Using gray yarn. Leaving a long starting tail. 
Round 1: Magic Circle. CH 1. 8 SC into magic circle. Pull circle tight. Join to first SC. (make sure your starting tail is on the nice side of the crochet.. you will need this for attaching)
Round 2: CH 1. 2 SC into each stitch around. Join to first SC.
Round 3-4: CH 1. 1 SC into each SC around. Join to first SC.
Round 5: CH 1. SC DEC around. Join to first SC.
Finish off leaving long yarn tail for attaching.

Lightly stuff the neck.
Using your long starting tail attach the neck to the center top of the body. Using your finishing off tail, attach the neck to the center bottom of the head. Make sure you attach the neck really well!!!! Weave in your ends.

Moon Applique
Using yellow yarn
CH 11. Turn. Skip first CH. Slip stitch into next CH. 2 SC into next CH. 2 HDC into next CH. DC into next CH. 2 DC into each of the next 2 CH. DC into next CH. 2 HDC into next CH. 2 SC into next CH. Slip Stitch into next CH.

Robot Antenna
Starting with gray yarn
Round 1: Magic circle. CH 1. 4 SC into magic circle. Pull yarn end through the hole so its on the outside. You will want to use this when attaching it to the robot head. Pull circle tight. Join to first SC.
Round 2: CH 1. 2 SC into each SC around. Join to first SC. (8 SC)
Round 3-4: CH 1. 1 SC into each SC around. Join to first SC. (8 SC)
Round 5: CH 1. SC DEC 4 times. Join to first SC DEC. (4 stitches)
Round 6: CH 1. In back loops only. 2 SC into each SC around. Join to first SC. (8 SC)
Round 7-8: CH 1. 1 SC into each SC around. Join to first SC. (8 SC)
Round 9: CH 1. SC DEC 4 times. Join to first SC DEC. (4 stitches)
Change to red yarn. 
Round 10: CH 1. In back loops only. 2 SC into each SC around. Join to first SC. (8 SC)
Round 11: CH 1. 2 SC into first stitch. 1 SC into next stitch. **2 SC into next stitch. 1 SC into next stitch. Repeat from ** 2 more times. (12 SC)
Round 12-13: CH 1. 1 SC into each SC around. Join to first SC. (12 SC)
Round 14: CH 1. SC DEC 6 times. Join to first SC. (6 stitches)
Finish off leaving long yarn end. Lightly stuff the end of the antenna. Weave yarn end back and forth around. Pull end tight. Weave in your end. 
Attach to the top of the robot head.  

Robot Mouth 
Starting with white yarn 
Row 1: CH 7. Skip 1 CH. HDC in next 6 CH.
Row 2: CH 1. Turn. HDC in next 6 HDC.
Finish off and weave in your ends. 
Join black yarn.
CH 1 and SC around the entire outside of the piece. Doing 1 SC into the side of each HDC while working up and down the sides of the mouth. 2 SC into the corner stitches. Join to first SC.
Finish off leaving long tail. Using yarn needle.. embroider the lines for the robot teeth. Attach to robot face. 

Robot Eyes
Starting with black yarn
-Make Two-
Row 1: Magic Circle. CH 1. 9 HDC into magic circle. Pull ring tight. Join to first HDC. (9 HDC.
Finish off leaving a long tail for attaching. Before you attach, take your white yarn and your yarn needle and embroider a sparkle in the eye. 


Filed Under: Boys, Free Patterns, Toys

Crochet Your Blues Away!

February 6, 2015 By stitch11 Leave a Comment

Crochet Your Blues Away - Ten Free Crochet Patterns

Feeling the Winter blues? Here is a list of 10 free crochet patterns that will help you not only downsize your blue yarn stash, but the act of crocheting can also be an antidepressant! Getting your mind off the negative, and focusing on your creative love for crochet can only be healthy, right? 😉

1. Simply Perfect Coaster 
2. Dog Puppet 
3. 6 Month Owl Hat, Leg Warmers, and Diaper Cover Set 
4. The EveryBeanie 
5. 3 Month Infant Overalls 
6. Free Coaster Crochet Pattern 
7. So Easy and So Perfect – The Three Step Bow 
8. Grouchy Bear (baby blanket yarn) 
9. Size Small Dog Sweater 
10. Bobble Leg Warmers (Toddler, Child, Adult) 

Filed Under: Boys, Free Patterns, Round Ups

  • 1
  • 2
  • 3
  • 4
  • Next Page »
  • Email
  • Facebook
  • Pinterest
  • RSS

Stitch11 is a Red Heart Blogger!

unnamed

.

Grab My Button

Archives

Privacy Policy

Copyright © 2026 Stitch11.com · All Rights Reserved · Log in