I designed this free crochet pattern for an Owl Cuddle Lovey to be ideal for children of all ages. It is perfect for cuddles and comfort. Get creative with your colors, yarn, texture, and pattern. No lovey should ever be the same!
Supplies
Medium Weight Yarn
A Yarn Needle
K-6.5 mm Crochet Hook
E-3.5 mm Crochet Hook
Safety eyes (I used 12 mm)
Small amount of cotton/stuffing for head
Stitches
CH – Chain
SC- Single Crochet
HDC – Half Double Crochet
DC – Double Crochet
Puff Stitch
V Spike stitch
When doing the V spike stitch, you will be doing 2 Single Crochet into the stitch 2 rows BELOW the current round (forming a V.) Then, you will skip 2 stitches that are behind the V spike… keeping the stitches even. (no increase or decrease)
I used 5 colors
Pink- Color A
Blue- Color B
White- Color C
Purple- Color D
And a small amount of orange
Eyes (make two)
Using 3.5 mm hook
With Color C yarn
Round 1: Magic Ring, CH 1, 10 HDC inside magic ring. Pull magic ring tight, Join to top of first HDC. (10 HDC)
Round 2: CH 2, Puff stitch into each stitch around. Join to top of first Puff stitch. (10 puff stitches) *Tip* Each puff stitch is sealed with a CH.
Finish off leaving long tail for attaching. Weave in your starting tail.
Attach the safety eyes through the bottom of the CH 2 (its the thinnest area to get the best snap with the eyes)
Head
Using 3.5 mm hook
With Color A
Round 1: Magic Ring, Ch 1, 8 SC in magic ring, pull ring tight. Join into first SC. (8 SC)
Round 2: CH 1, 2 SC into same stitch and each stitch around. Join into first SC. (16 SC)
Round 3: CH 1, 2 SC into same stitch. SC into next stitch. ** 2 SC into next stitch, SC into next stitch. Repeat from ** around. Join into first SC. (24 SC)
Round 4: CH 1, 2 SC into same stitch. SC into next 2 stitches. **2 SC into next stitch, SC into next 2 stitches. Repeat from ** around. Join into first SC. (32 SC)
Round 5: CH 1, 2 SC into same stitch. SC into next 3 stitches. **2 SC into next stitch, SC into next 3 stitches. Repeat from ** around. Join into first SC. (40 SC)
Round 6-8: CH 1, SC into same stitch and each stitch around. Join into first SC. (40 SC)
Change to Color B
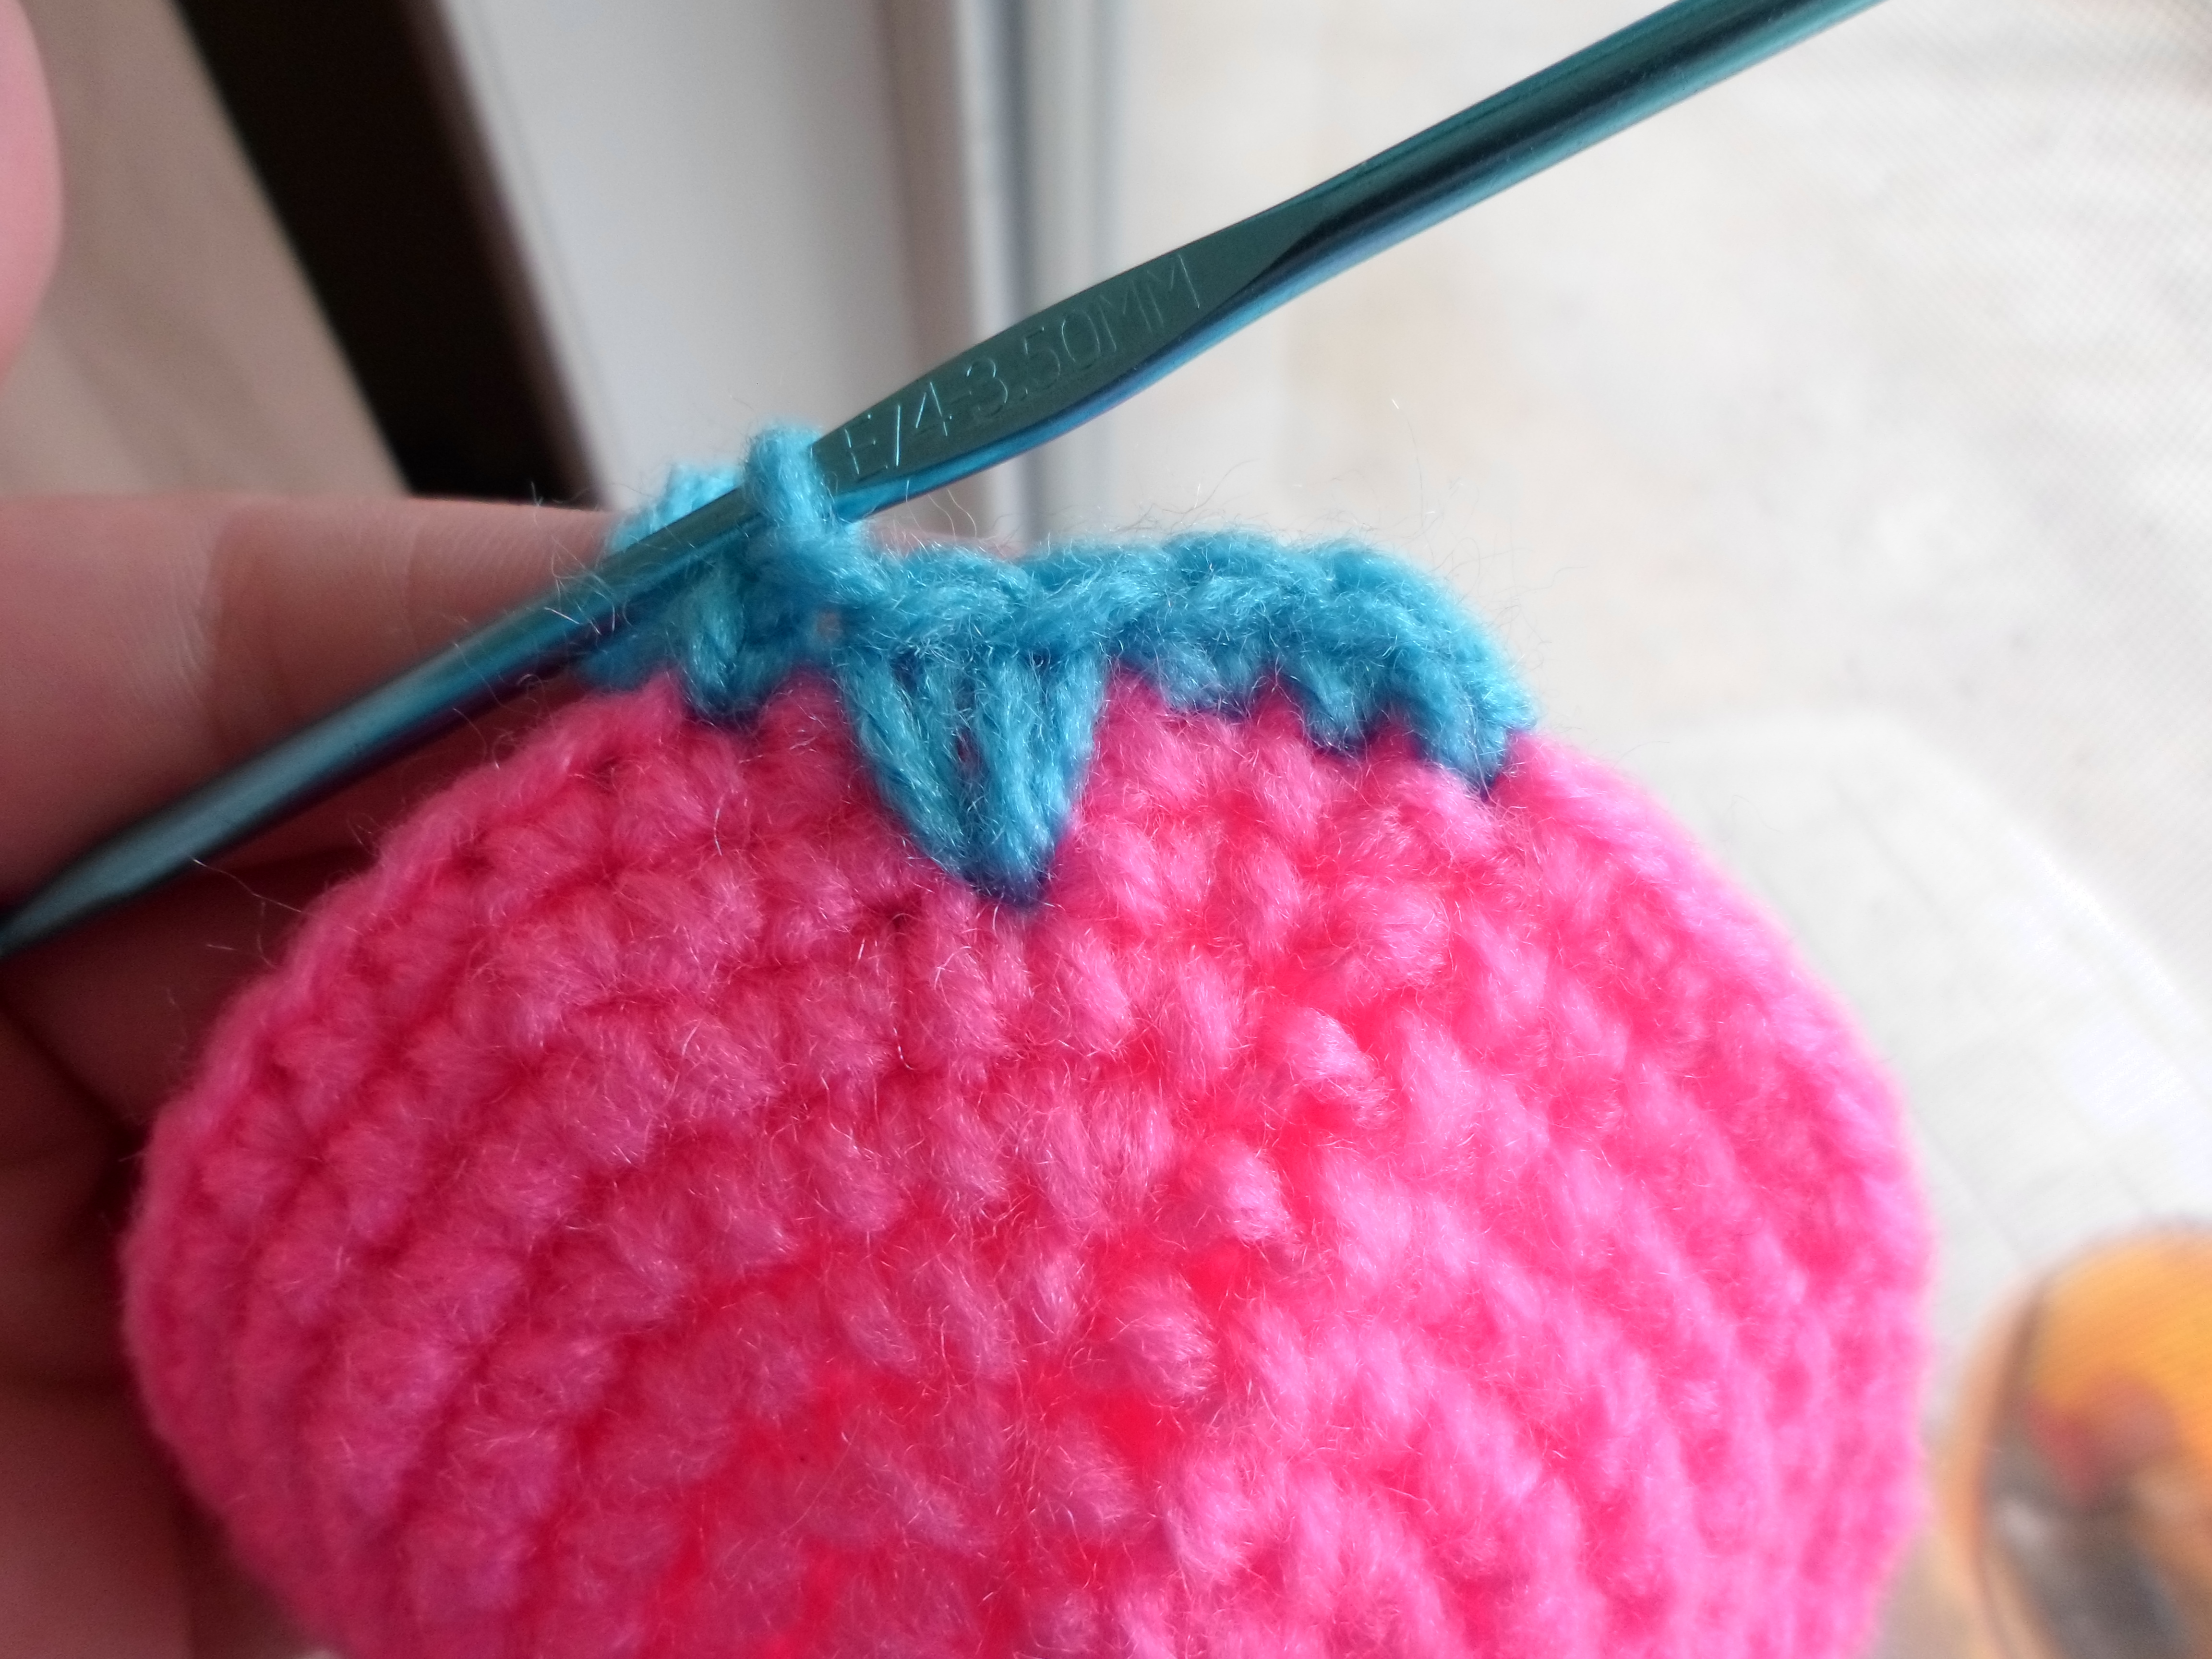
Round 9: CH 1, SC into same stitch and next stitch. V spike **SC into next 2 stitches. V spike. Repeat from ** around. Join to first SC. (40)
Round 10-11: CH 1, SC into same stitch and each stitch around. Join to first SC. (40 SC)
Change to Color C
Round 12: CH 1, SC into same stitch. V spike **SC into next 2 stitches. V spike. Repeat from ** around. SC into last stitch. Join to first SC. (40)
Round 13-16: CH 1, SC into same stitch and each stitch around. Join to first SC. (40 SC)
Change to Color D
Round 17: CH 1, SC into same stitch and next stitch. V spike **SC into next 2 stitches. V spike. Repeat from ** around. Join to first SC. (40)
Round 18-22: CH 1, SC into same stitch and each stitch around. Join to first SC. (40 SC)
DO NOT FINISH OFF
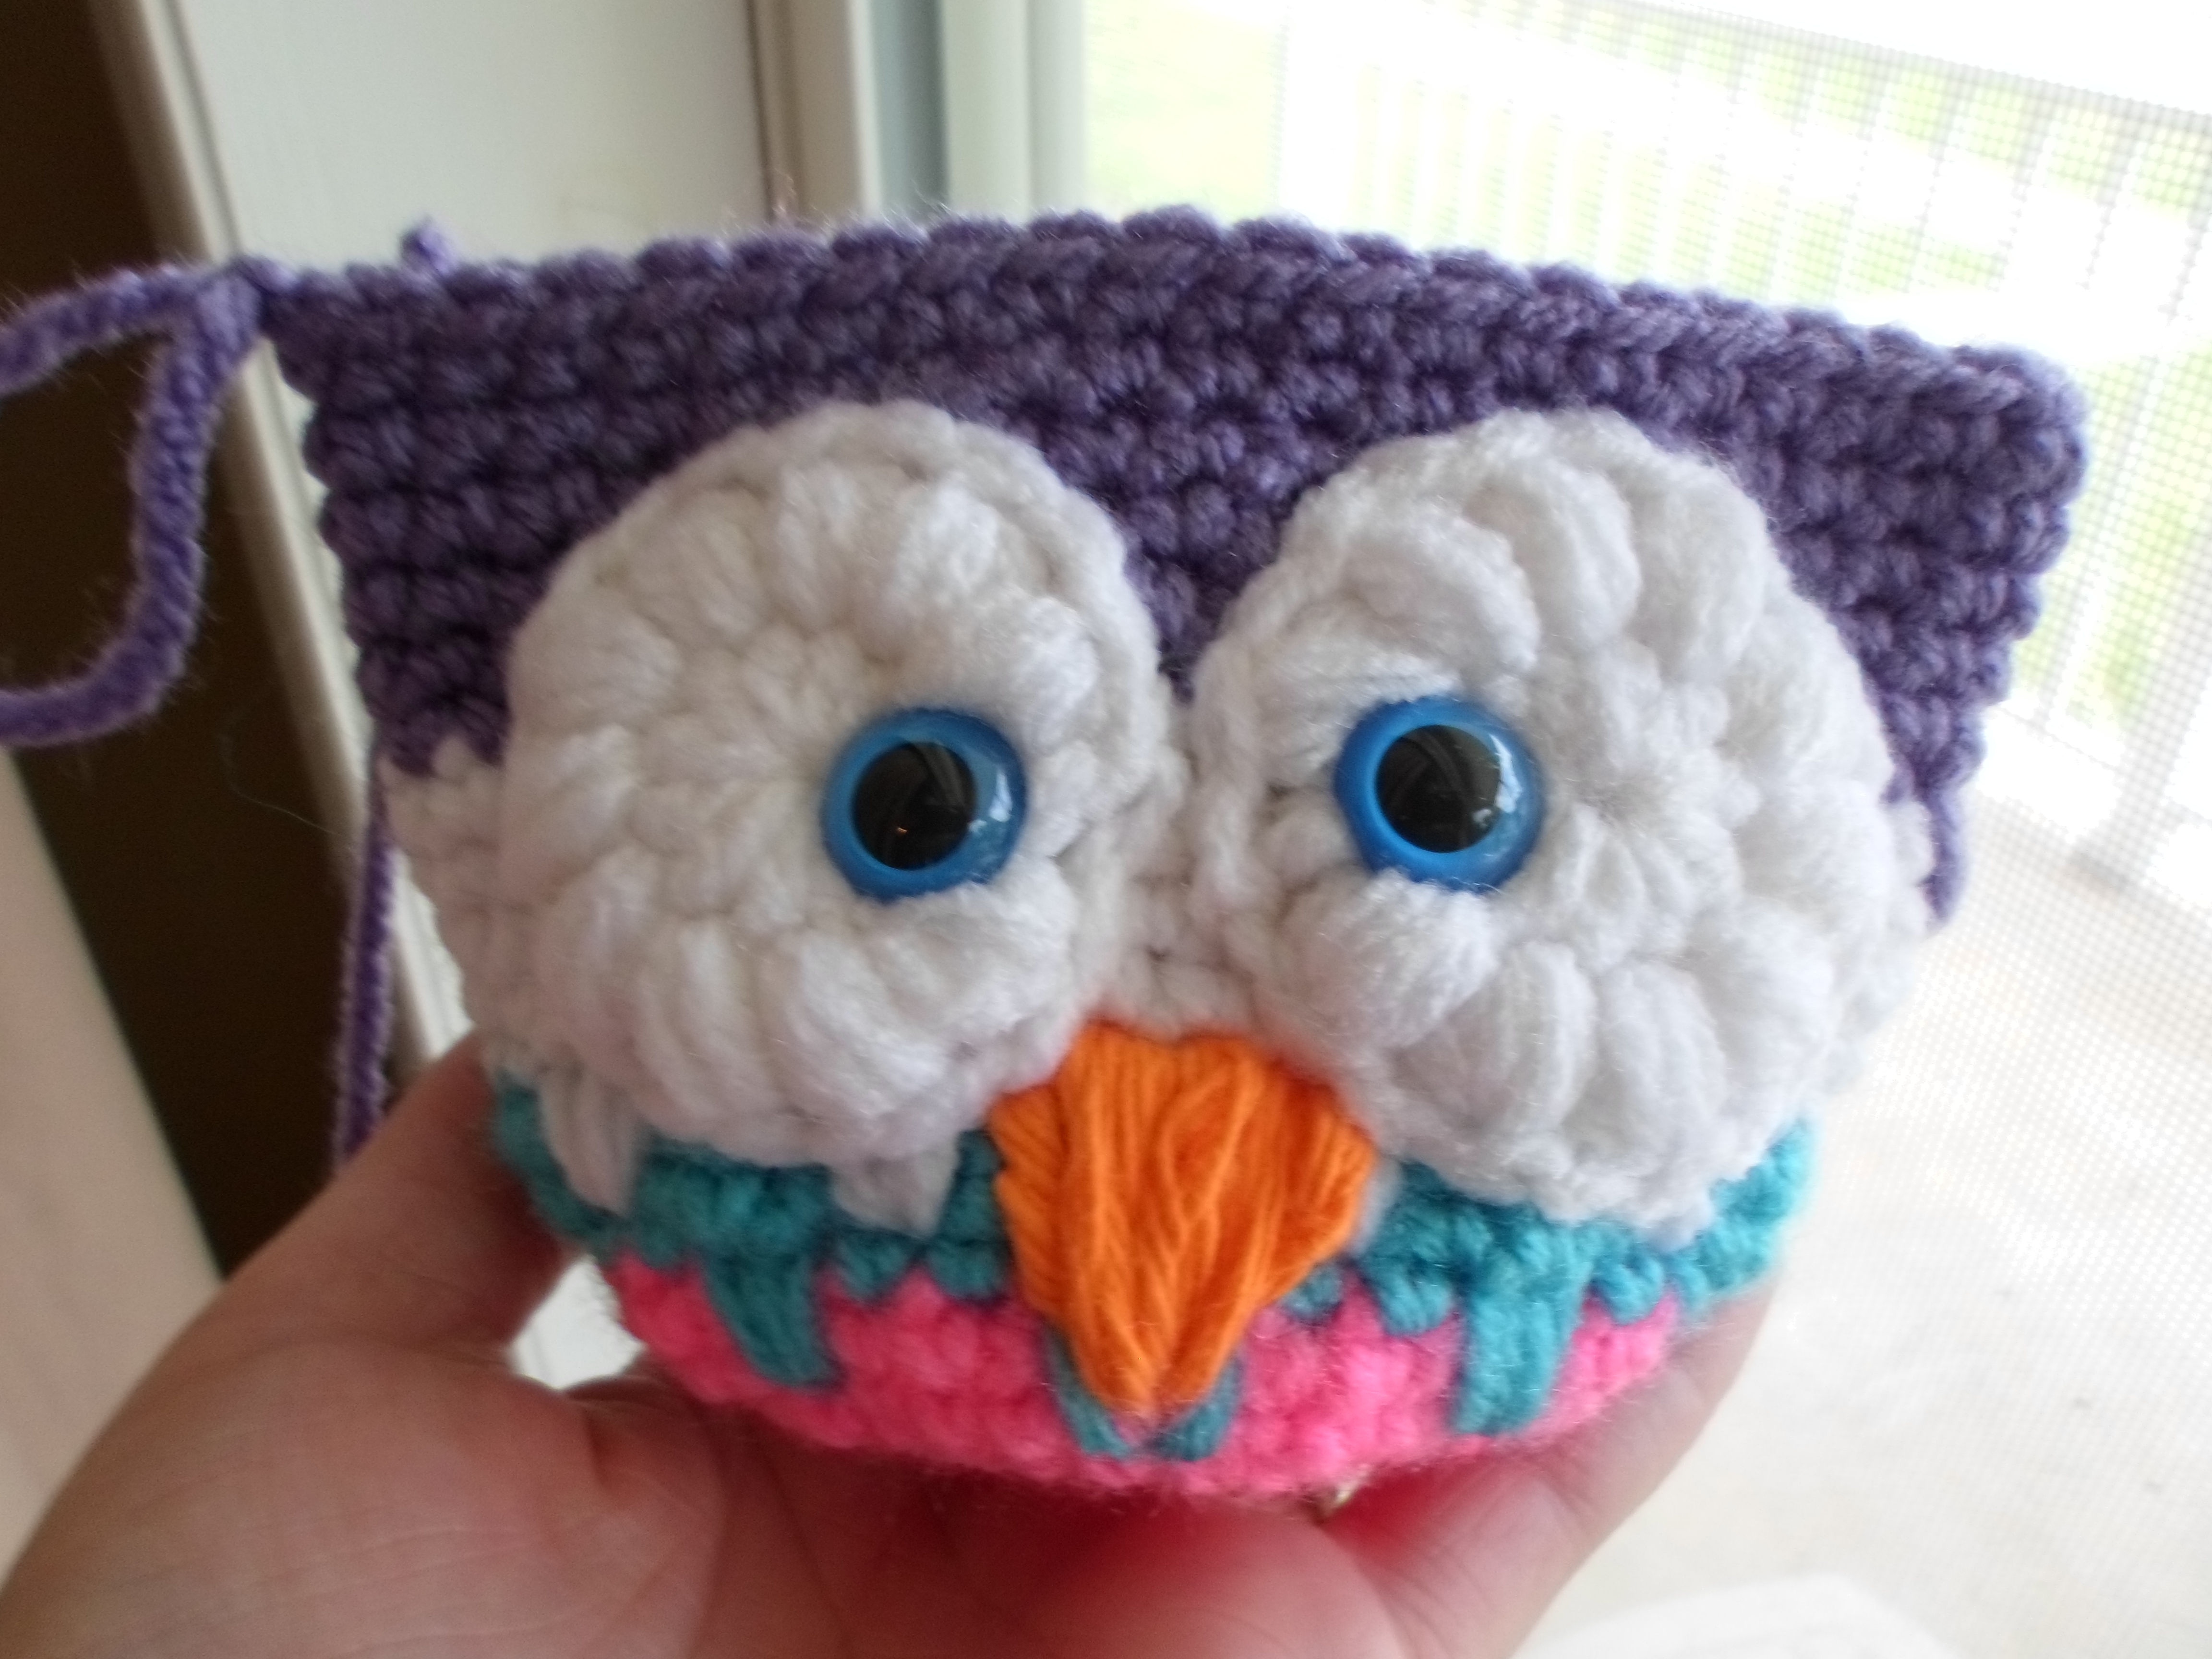
Weave in your ends on the inside of the head. Fold it so that where the seam left off is in the crease of the fold. Attach the eyes and stitch on the nose with yarn needle and orange yarn. Stuff the head.
Round 23: CH 1, Hold the top of the head together and join it by single crocheting across. (20 SC)
Round 24: CH 1, turn. 2 HDC into first SC, HDC into next stitch. SC into next 16 stitches. HDC into next stitch. 2 HDC into last stitch. (22 stitches)
Round 25: CH 1, turn. 2 HDC into first 2 stitches. HDC into next stitch. SC into next 16 stitches. HDC into next stitch. 2 HDC into next 2 stitches. (26 stitches)
Finish off and weave in your end.
Ear Hair (sounds gross but its cute!)
Cut a total of 10 strands of yarn measuring about 6 inches. Take 5 of those strands, fold them in half, Insert your hook from behind the tip of the ear to the front. hook the folded yarn and pull through the ear forming a loop. Take the yarn ends and pull them through the loop. tug on each yarn end. Now use the other 5 strands on the other ear. Trim the yarn to desired length.
The head is finished!
Granny Cuddle Blanket
Using your K-6.5 mm hook
With this blanket you will be able to change colors wherever you wish- as much or little as you want. Have fun!
The beginning CH 3 of each round- counts as a double crochet.
Step 1: Magic Ring, CH 3, 2 DC into magic ring, CH 1, **3 DC into magic ring, CH 1. Repeat from ** 2 more times. Join to top of CH 3.
Step 2: Slip stitch into next 2 stitches and into CH space. CH 3, 2 DC into same CH space, CH 1. 3 DC into same CH space. CH 1. ** {3 DC, CH 1, 3 DC CH 1}-all in next CH space. Repeat from ** around. Join to top of CH 3
Step 3. Slip stitch into next 2 stitches and into CH space. CH 3 Now I will explain to you how to do this step, its the same step you will use for each row here until the very last. Read this entire step before starting. In each corner CH space you will do {3 DC, CH 1, 3 DC CH 1}-all in each corner CH space. and each of the side CH spaces for each side of the blanket you will do 3 DC and CH 1. At the end of each round, you will Join to the top of CH 3
Repeat Step 3 until the blanket measures 1.5 square feet. I made a total of 13 rows before starting on Step 4.
*Tip* When you change colors, attach yarn into a CH space.
Step 4: Slip stitch into next stitch (center DC of the 3 DC). CH 1, SC into same DC. 3 DC into next CH space. **SC into center DC. 3 DC into next CH space. Repeat from ** around. Join to first SC. Finish off and weave in your ends.
Attach the head to the center of the blanket.
Have fun with this pattern! Get creative! 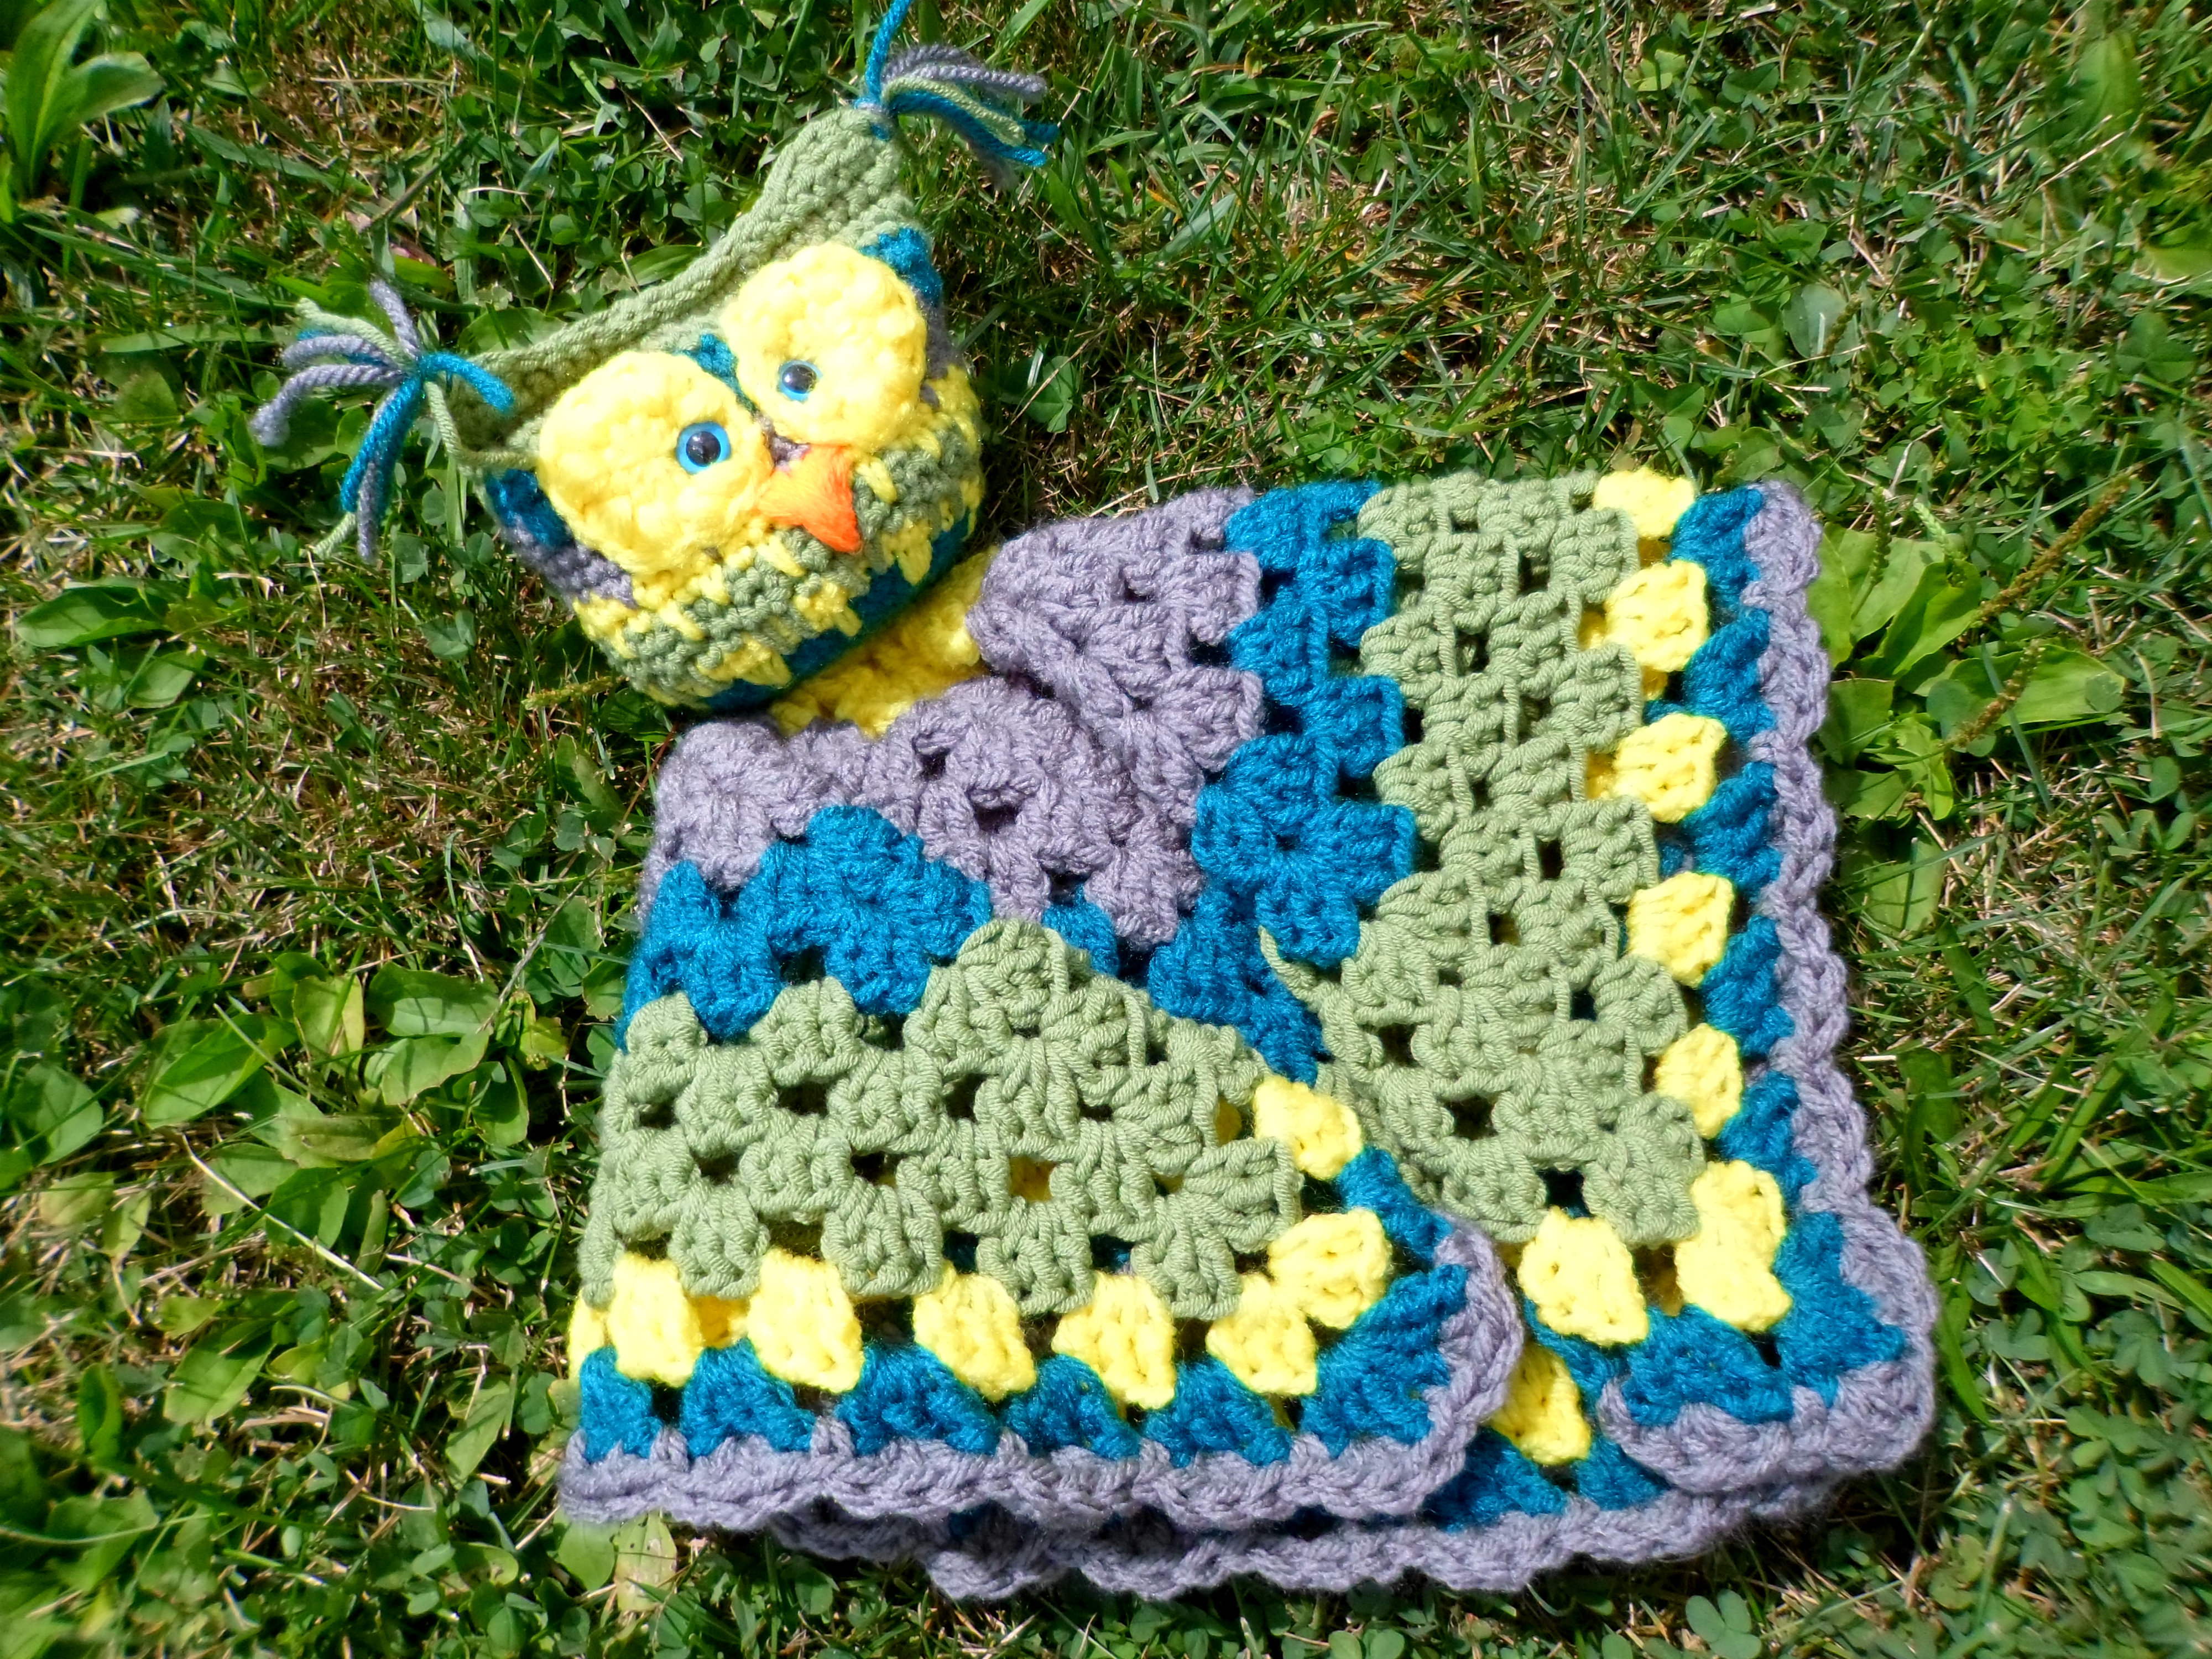

This cute and I love the pretty colors. love carol
I can’t seem to figure out how to download the pattern. i get it on my screen but can’t copy and paste it and the download buttons take me to the pdf thing that I already have. I love this and would really like to make it for a little girl at church. Can you tell me how to get the pattern? Thank you!
Try out the “clean print” button at the bottom of the post. You can even get it in pdf. 🙂
Not only is this pattern precious, but adding the “clean print” button is awesome! I’ve never seen it before. It would be wonderful if more sites added this! Thank you/1
I love that button for saving & putting them to PDF’S I wish all the free patterns had it but I get by with out it also! But THAT BUTTON IS A LOVE OF MINE!!!!! ;}
Thanks for the printing help Corina. 😀
That little owl is just too precious! I’m ever so slightly obsessed with owls at the moment and this is now on my list of must makes. 😀
I <3 this… But i can not seem to understand the v spike stitch… I was wondering if you had to do that stitch?
No you do not 🙂 You can just do rows of straight SC 🙂
Love it!! Thank you
I love the pattern and the stitches…I got all of them…except for how to put the head together….I just can’t figure out how to fold the head in a way that makes it look neat and flawless….help?
Its a little tricky. I just tried to squeeze it down the middle from left to right. I do think using a large yarn needle helps compared to the smaller ones.
THANK YOU for this free pattern! I love it, so cute! By using the tips in this pattern, I was able to turn a circle shape into a square! I am SO EXCITED about learning this new concept!!!, I started out with a different kind of animal head, but am working on your granny square blankie now in green and white.
This is such a great pattern. I had fun making it today for a friend’s daughter.
I made this lovey for my son when he was a baby, he loved to chew on it! Then he lost interest, as kids do when they start to grow up. He’s 3 now and I recently found this lovey in the bottom of his toy box. I was going to give it to his baby sister, but my son fell right back in love with it as soon as he saw it! He’s been talking to it and petting its ear tufts all day. So my son has his friend back and now I get to make another one for my daughter. So glad I found this pattern again!
This is so sweet! Thank you so much for sharing!
I know I’m late to the party, but I just love this!!
I made one for a friend’s granddaughter!
Thank you for sharing!
An