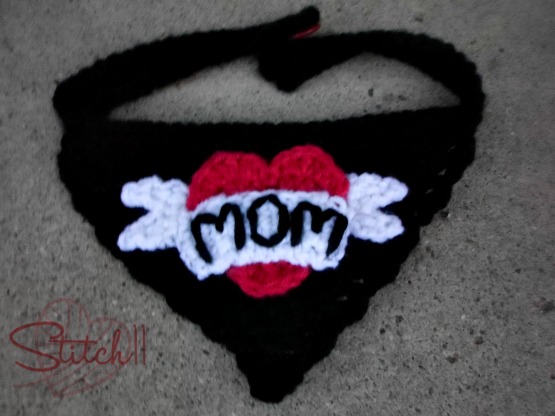
My sister recently sent me a link to a dog sweater that had the “I <3 Mom” tattoo picture on it. She really wanted one for her new dog, but couldn't let herself pay the ridiculous amount they were asking. I told her not to worry- I can hook it up! But now the weather is starting to get warmer… so I figured a bandana would get more use.
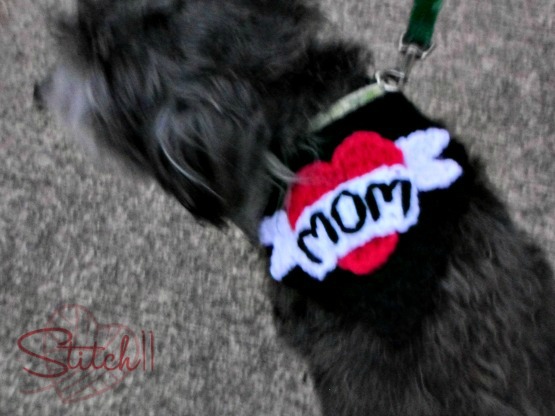
The photo at the very bottom of this post is actually my dog.. but I will be adding another picture right under these paragraphs of her beautiful dog modeling it- once she gets a good pic.
The greatest thing about this free bandana is that it is very adjustable! Using two buttons and having button holes the entire way around the collar, it would fit *most dogs…. just maybe not if you have a giant K9! 🙂 Happy hooking!
Step 1
First you will need to crochet the bandana. I used this quick and easy pattern by CrochetNMore.
I used black “I Love This Yarn” and a G-4.25 mm crochet hook.
Step 2
Second you will need to make the heart. I used this beautiful heart pattern by Cre8tionCrochet.
I used Rouge(dark coral) “I Love This Yarn” and a G-4.25 mm crochet hook.
Step 3
Using white WW yarn and a G-4.25 mm hook. (I used Red Heart)
Row 1: CH 5. Skip 1 CH. SC into each of the next 4 CH. CH 1, Turn.
Row 2: SC into each of the 4 stitches. CH 1, turn.
Row 3: DC into the first stitch. CH 2, slip stitch into the top of the DC you just made. CH 1, slip stitch into the next stitch from round 2. Slip stitch into the next stitch. CH 1. DC into the next stitch. CH 2, slip stitch into the top of the DC you just made. CH 1, Slip stitch into the same stitch you put your DC into.
Finish off leaving long tail for attaching. Repeat for other end of ribbon piece.
Step 4
Using white WW yarn and a G-4.25 mm hook. (I used Red Heart)
Row 1: CH 5. Skip 1 CH. SC into each of the next 4 CH. CH 1, Turn.
Row 2-10: CH 1, SC into each of the 4 stitches. CH 1, turn.
Finish off leaving long tail for attaching.
Step 5
-It is time to attach everything. If you haven't already wove your ends in for the bandana and attached your buttons- do it now.
-Now line up all the parts so you get an idea of where everything will go. First you will need to attach the pieces of ribbon that will be coming out from behind the heart.
-Attach the heart.
-Stitch the word “MOM” on the white piece from step 4. Then attach it over the heart. You can curve this peace slightly so it looks like it wraps the heart.

I saw your pattern through Moogly and thought that it would be so cute to make for my dog. When I saw the picture at the end of your instructions, I just knew I had to make it. Your dog looks a lot like my dog! Mine is a mix of four sheep dog breeds, but she looks like your dog. I am excited to get started on this soon.
Aaaaw! If you get the chance, share the photo with me on my facebook page. And if you do the entire “I <3 mom" I would LOVE to have more photos to post on my blog. The ones I have so far are horribly blurry! 🙂
THANK YOU SO MUCH FOR SHARING YOUR PATTERN! I FELL IN LOVE WITH IT INSTANTLY! YOU’RE VERY TALENTED AND VERY KIND. YOUR INSTRUCTIONS ARE SPOT ON AND EASY TO FOLLOW! ~♥~
SOOOO ADORABLE!!!!! ❤