While crocheting the Sophia's Mandala, I knew I wanted to create more mandalas. Just looking at one is an inspiration for crochet.
Although this pattern does not have step by step photos for directions, I tried to explain it as well as I could with my words. Happy Hookin'!
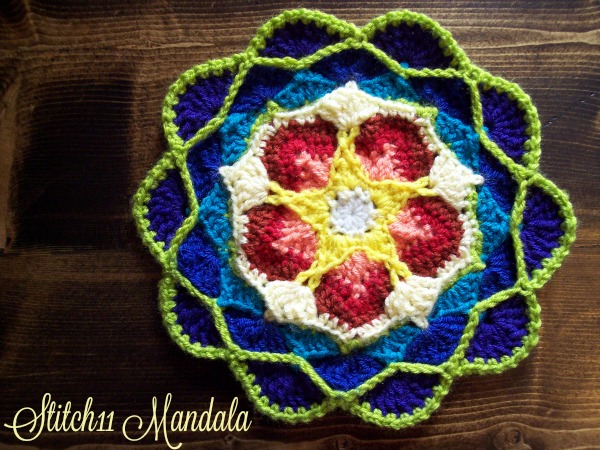
Stitch11 Mandala Crochet Pattern
Supplies
G – 4.25 mm crochet hook
Medium/Worsted weight yarn
Yarn Needle for weaving in your ends.
Stitches Used
Magic Circle
Slip Stitch
CH – Chain
SC – Single Crochet
HDC – Half Double Crochet
DC – Double Crochet
TRE – Treble Crochet
The Stitch11 Mandala measures to be 10 inches.
I changed colors after every round.
Round 1: (white) Magic Circle. CH 1, 10 HDC into magic circle. Join to first HDC. (10 HDC)
Round 2: (light yellow) Starting in any SC.
CH 1, SC into same stitch. * CH 1. SC into next SC. Repeat from * 9 more times. Join to your first SC. (10 SC + 10 CH 1 spaces)
Round 3: (yellow) Starting in CH 1 space.
CH 1. SC into same CH space. {SC, DC, TRE, CH 6, Join to first CH , TRE, DC, SC}- all into next CH space. *SC into next CH space. {SC, DC, TRE, CH 6, Join to first CH , TRE, DC, SC}- all into next CH space. Repeat from * 3 more times. Join to your first SC. You will have 5 points.
Round 4: (peach) Starting in TRE that's on the left side of the CH 6 space.
For this round you will be working in back loops only.
You will be pushing the points from round 3 towards the front. You will NOT be crocheting into them yet.
CH 1. *SC into 1st stitch. HDC into next stitch. DC into next stitch. TRE into next stitch. CH 4, slip stitch into first CH. TRE into same stitch. DC into next stitch. HDC into next stitch. SC into next stitch.
Repeat from * 4 more times. Join to your first SC.
Round 5: (Red) Starting in CH 4 space from round 4.
Still leaving CH 6 spaces unworked and pushed towards the front of your piece.
CH 1. *5 HDC into CH 4 space. HDC into each of the next 8 stitches. Repeat from * 4 more times. Join to your first HDC.
Round 6: (Rusty Orange) Starting in 3rd HDC/ the center HDC of the 5 HDC that are worked into the CH 4 space.
CH 1. {SC, CH 2, SC} into same stitch. HDC into next 3 stitches. DC into next 6 stitches. HDC into next 3 stitches. *{SC, CH 2, SC} into next stitch. HDC into next 3 stitches. DC into next 6 stitches. HDC into next 3 stitches.
Round 7: (Light Yellow) Starting in CH 2 space.
CH 1. * SC into CH 2 space. CH 2. SC into same CH 2 space. HDC into next 3 stitches. Skip 3 stitches.
Crocheting through the point of the star from round 3 (the CH 6 space) and through the next stitch at once- crochet 3 TRE, CH 4, slip stitch into first CH, 3 TRE into same stitch.
Skip 4 stitches. HDC into next 3 stitches. Repeat from * 4 more times.
Round 8: (Green) Starting in TRE next to and to the left of a CH 4 space.
For this round you will be working in back loops only.
Ch 1. *SC into next 7 stitches. {SC, CH 2, SC} into CH 2 space. SC into next 7 stitches. Skip CH 4 loop and push it towards the front of the piece. Repeat from * around and join into your first SC. (80 SC)
Round 9: (Teal) Starting in Ch 2 Space from round 8.
Ch 1. * SC into CH 2 space. Skip 3 stitches. 3 DC into next stitch. CH 4. Slip stitch into first CH. 3 DC into next stitch. SC into CH 4 space from round 7. Skip 6 stitches. 3 DC into next stitch. CH 4. Slip Stitch into first CH.3 DC into next stitch. Skip 3 stitches. Repeat from * around. Join to first SC.
Round 10: (Blue) Starting in a CH 4 space from round 9.
Ch 1. *SC into CH 4 space. Skip 3 stitches. 4 TRE into next stitch. CH 4, slip stitch to first CH. 4 TRE into same stitch. Repeat from * around. Join to first SC.
Round 11: (Purple) Starting in CH 4 space from round 10.
Ch 1, *SC into CH 4 space. 9 TRE into next SC. Repeat from * around. Join to first SC.
Round 12: (Green) Starting in any stitch.
Ch 1. SC into first stitch. CH 1. *SC into next stitch. CH 1. Repeat from * around. Join to first SC.
Round 13:(Green) Starting in a SC that is above a CH 4 space from round 10.
You will be making a CH zig zag from CH 4 spaces between rounds 10 and 11.
CH 1. SC into the SC that is worked above the CH 4 space from round 10. CH 5. Slip stitch over next CH 4 space from round 9. CH 5. * SC into next SC that is worked above the CH 4 space from round 10. CH 5. Slip stitch over next CH 4 space from round 9. Ch 5. Repeat from * around. Join to first SC.
Weave in all your ends.
Mine finishes a little wavy but lays flat easily. If yours doesn't lay flat, blocking your mandala will do the trick.

I really like this mandala! Thanks for the pattern.
Beautiful! I will definitely make a few.
Beautiful! Can it be used as a potholder?
Double it up and I bet it could. 🙂
These are beautiful! How would one keep going and make this an afghan?
Thanks!
Ooh I have no idea but get creative!!! If you figure something out, I would love to see the outcome! Sounds like a good time to freehand you heart out. <3
I would love to know how to make this into a square so I could add to others to make an afghan. Any idea’s ?