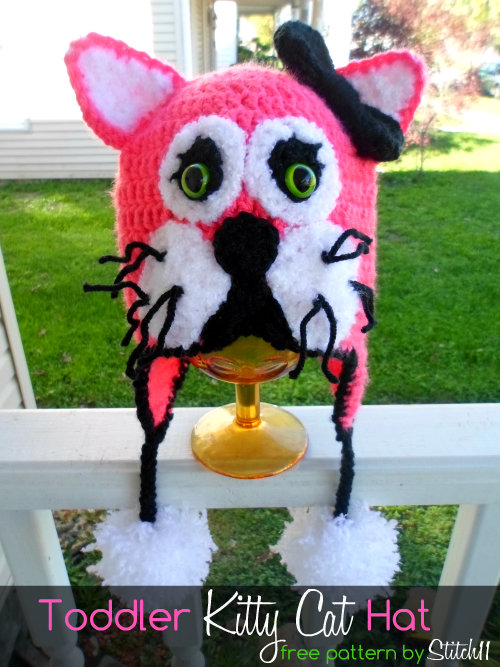
My daughter Ella had many ideas for what she wants to be for Halloween. It all started in spring when she said she wanted to be a bunny for Halloween. She kept this idea until a month ago when it was time to really get started on planning out how to put it together. She quickly bounced around ideas like a “pirate bird” until she settled with the idea of a pink cat. PINK CAT? I thought to myself “How will I pull this off without her looking like the Pink Panther. Last thing I want is to take her to see the neighbors and everyone upset her by calling her a panther 😉 But, after drawing up about 20 cat hats she was really drawn to this one.
I thought I was in the clear once I finished the cat face. She was getting so excited. But then I crocheted ears. The cat looked like it was part fox :O I quickly posted a picture in the Facebook crochet group Yartists to ask for opinions and advice. Everyone was so quick to help me figure out what I did wrong. I slept on the ideas I had going through my head and finally got the cat ears perfected.
I want to add more to this costume idea and I will share with you what I come up with along the way. Until then, save this free Toddler Kitty Cat pattern!
Supplies
I/9-5.5 mm crochet hook
Yarn needle (for attaching, weaving in your ends, and embroidery)
Cat Eyes -safety eyes- I bought mine at Hobby Lobby. I have also seen them at Joaans.
I used 3 yarns -Medium Weights
-Tropical Pink – I Love This Yarn
-Black- I Love This Yarn
-White-Baby Bee – Baby Boucle – Angel (this is actually a #3 light weight but it worked up the same as the medium weight I Love This Yarn)
Stitches
DC – Double Crochet
HDC – Half Double Crochet
SC – Single Crochet
Slip Stitch
Magic Circle
Crab Stitch (optional)
Start Hookin!
I started with “Tropical Pink” I Love This Yarn
You will be working in continuous rounds. You will not join to starting stitch of any round. You may want to use a stitch marker to help you keep count. ( I use my starting tail as a stitch marker at the start of each round)
Round 1: Magic Circle. 1 HDC inside magic circle. 9 DC into circle. Pull ring tight. (10)
Round 2: 2 DC into each stitch. (20)
Round 3: **2 DC in next stitch. 1 DC into next stitch. Repeat from ** 9 more times. (30)
Round 4: **2 DC into next stitch. 1 DC into each of the next 2 stitches. Repeat from ** 9 more times. (40)
Round 5: **2 DC into next stitch. 1 DC into each of the next 3 stitches. Repeat from ** 9 more times. (50)
Round 6: ** 2 DC into next stitch. 1 DC into each of the next 9 stitches. Repeat from ** 4 more times. (55)
Round 7-10: 1 DC into each DC around. (55)
Now you will start crocheting so that the lip of the cat face will curve up. It is small and nice touch to add to the cat face… and curves well with the cat cheeks.
Round 11: 1 DC into the next 10 stitches. 1 HDC into next stitch. 1 SC into next stitch. 1 HDC into next stitch. 1 DC in next 42 stitches. (55)
Round 12: 1 DC into next 9 stitches. 1 HDC into next stitch. 1 SC into each of the next 3 stitches. 1 HDC into the next stitch. 1 DC into next 41 stitches. (55)
Round 13: 1 DC into each of the next 10 stitches. 1 HDC into next stitch. 1 SC into the next stitch. 1 HDC into the next stitch. 1 DC in next 42 stitches. (55)
Round 14: 1 HDC into next stitch. 1 SC into each of the next 9 stitches. Slip stitch into next 3 stitches. 1 SC into each of the next 42 stitches. (55)
Round 15: 1 SC into each of the next 10 stitches. Slip stitch into next 3 stitches. 1 SC into each of the next 41 stitches. Slip stitch into next 3 stitches. (57)
First Earflap
Row 1: CH 1, turn. SC into same stitch and next 11 stitches (12)
**From here on you will not CH 1 before turning and you will not crochet into same stitch**
Row 2: Turn, SC in next 11 stitches
Row 3: Turn, SC in next 10 stitches
Row 4: Turn, SC in next 9 stitches
Row 5: Turn, SC in next 8 stitches
Row 6: Turn, SC in next 7 stitches
Row 7: Turn, SC in next 6 stitches
Row 8: Turn, SC in next 5 stitches
Row 9: Turn, SC in next 4 stitches
Finish off
Keeping the hat upside down, count 11 stitches to the right of the ear flap and attach yarn. The first row of the song earflap will be worked with the nice side of the stitches on the inside of the hat… just like the first earflap.
Second Earflap
Row 1: CH 1, turn. SC into same stitch and next 11 stitches (12)
**From here on you will not CH 1 before turning and you will not crochet into same stitch**
Row 2: Turn, SC in next 11 stitches
Row 3: Turn, SC in next 10 stitches
Row 4: Turn, SC in next 9 stitches
Row 5: Turn, SC in next 8 stitches
Row 6: Turn, SC in next 7 stitches
Row 7: Turn, SC in next 6 stitches
Row 8: Turn, SC in next 5 stitches
Row 9: Turn, SC in next 4 stitches
Finish off
Trimming – I used “Black” I Love This Yarn and did the Crab Stitch around the edge. (If you do not like the crab stitch you can use SC)
Weave in your ends.
Cheeks –Make two
I used the white Baby Bee – Baby Boucle
Round 1: Magic Circle, 10 HDC inside circle. Join to first HDC. Pull ring right. (10)
Round 2: CH 1, 2 HDC into same stitch and next 9 stitches. Join to first HDC. (20)
Round 3: CH 1, 2 SC into same stitch and each stitch around. Join to first SC. (20)
Finish off leaving long tail.
Whiskers
Cut 6 – 6 inches long strands of yarn
Fold yarn in half (attaching one folded strand at a time)
Put your hook through the cheek- from the outside to the inside of the cheek. Hook onto folded strand, pull loop through, (leaving loop on hook) insert hook over the next stitch. Hook yarn, pull it though and pull it through loop that is already on the hook.
,Tug on all strands to make sure its nice and tight. Repeat for a total of 3 strands on each cheek… making 6 whiskers on each cheek. Trim whiskers to make them nice and neat. ( I trimmed mine to about 2 inches long.)
Attach cheeks to cat face. Attach them close together and with the curve of the front of the hat. The closer together they are the less embroidering you will have to do between them.
Nose
If you have never embroidered onto a crochet project, check out this tutorial by Fiber Flux!
I used my black yarn and yarn needle and embroidered between the cheeks. Finish off. Weave in ends.
Magic circle. CH 1, 10 HDC inside magic circle. Join to first HDC. Finish off leaving long tail and attach it to the cat face.
Eyes
We will be doing the eyes in layers. Doing this will make it so the back of the safety eyes will have padding under them so our toddlers do not get their forehead scratched.
Make two black circles.
Magic circle, CH 1, 8 HDC inside magic circle. Join to first HDC. Pull ring tight. Finish off leaving tail.
-Attach the safety cat eyes onto the black spots.
Make two white circles.
Magic circle, CH 3, 9 DC inside magic circle. Join to top of CH 3. Pull ring tight. CH 1, 2 SC into same stitch and each stitch around. Join to first SC. Finish off leaving tail.
-Attach the eyes/black circles onto the white circles. Attach the white circles onto the cat face.
-With yarn needle and black yarn, embroider eyelashes for a girl cat.
Ears
Make two white ears and two pink ears.
Row 1: CH 9.Turn,skip 1 CH. SC in next 8 stitches (8)
Row 2: CH 1, Turn, SC into same stitch and next 7 stitches (8)
Row 3: Turn, (do not SC into same stitch)SC in next 7 stitches (7)
Row 4: Turn, (do not SC into same stitch) SC in next 6 stitches (6)
Row 5: Turn, (do not SC into same stitch) SC in next 5 stitches (5)
Row 6: Turn, (do not SC into same stitch) SC in next 4 stitches (4)
Row 7: Turn, (do not SC into same stitch) SC in next 3 stitches (3)
Row 8: CH 1, Turn, SC into same stitch and next 2 stitches (3)
Row 9: Turn, (do not SC into same stitch) SC into next 2 stitches
Finish off
Using pink yarn. Attach the white ears over the pink ones with a SC around the edge. Then attach the ears onto the hat.
Bow
Next I found this beautiful and free bow tutorial from The Yarn Box. Craftiness is Not Optional even shares a photo tutorial you can find HERE. After you finish making the bow, attach it with your yarn end.
Braids
Cut six 3 ft long strands of yarn for each braid. Attach yarn to the bottom & center of the earflap (folded yarn makes 12 strands per braids) Braid tightly your desired length. Tie at the end of the braid and repeat for other braid.
Pom Poms
To make your pom poms follow this secure pom pom tutorial. Attach the pom poms with yarn needle to the end of the braids.

What a great pattern! It’s so adorable.
Really cute hat! I really like that shade of pink, the eyes, and the whiskers!
Navy Wifey Peters @ Submarine Sunday Link Party
Thanks!
Awww! Too cute!
I am making the toddler kitty cat hat by corina. I have worked through Round 13, and discovered that Round 14 is missing. Unless there is a error in the numbering. Could you please liook at This problem and let me know what to do.
Thank you
Diane
It was just a numbering error. 🙂 Thanks for pointing it out! I fixed it right away.
Great pattern! What size eyes did you use?
Funny you should mention the name Ella! I am going to make this for my great niece Ella Jade! Thanks for the pattern!