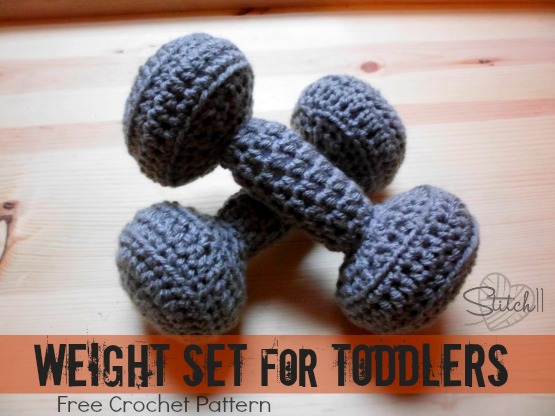
If you have ever had children, you will understand why I crocheted this weight set. Every-single-time I try to work out, my toddler wants to climb over, under and around me. She does her best to trip me… even if it means using her head.
Recently, she discovered my small weights. I told her she isn't allowed to use them because I was scared she would drop them on my toe. Yes, I said MY toe. Chances are- I would get hurt waaaaay before she actually would.
So here we have it, a free crochet pattern for weights. Now maybe she will be occupied long enough to let me work out for more than 5 minutes at a time. I can dream right? 😉
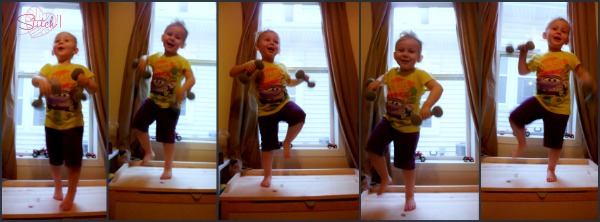
Here is a photo of her demonstrating how to use the weights for the most outcome. I sure wish I had her energy!
Supplies
Medium Weight yarn (I used I love This Yarn)
G/6 -4.25 mm crochet hook
Yarn needle
Stitches
Magic Circle
CH- Chain
SC – Single Crochet
HDC – Half Double Crochet
SC DEC – Single Crochet Decrease
HDC DEC – Half Double Crochet Decrease
Get Started!
Round 1: Magic Circle. CH 1, 11 HDC into magic circle. Pull ring tight. Join to first HDC. (11 HDC)
Round 2: CH 1, 2 HDC into each HDC around. Join to first HDC. (22 HDC)
Round 3: CH 1, 2 HDC first HDC. 1 HDC into the next HDC. **2 HDC into the next HDC. 1 HDC into the next HDC. Repeat from ** around. Join to first HDC. (33 HDC)
Round 4: CH 1, SC into each stitch around. Join to first SC. (33 SC)
Round 5: CH 1, SC into the back loop of each stitch around. Join to first SC. (33 SC)
Round 6: CH 1, HDC into each stitch around. Join to first HDC. (33 HDC)
Round 7: CH 1, SC into each stitch around. Join to first SC. (33 SC)
Round 8: CH 1, In the back loops only- **SC DEC, SC into the next stitch. Repeat from ** around. Join to the first SC DEC. (22 stitches)
Round 9: CH 1, HDC DEC around. Join to first HDC DEC. (11 stitches)
Round 10: CH 1, SC into each stitch around. Join to first SC. (11 SC)
Finish off and weave in your ends. Stuff with fiberfill or scrap yarns.
Repeat rounds 1-10 for other end of weight.
Now it is time to crochet the middle of the weight.
Round 1: Start with a long tail. You will use this tail for attaching one of the ends. CH 11. Join to first CH. (11 CH)
Round 2: CH 1, HDC into each CH around. Join to first HDC. (11 HDC)
Round 3-8: CH 1, HDC into each stitch around. Join to first HDC. (11 HDC)
Finish off leaving long tail for attaching to the other end.
Stuff the middle before attaching both ends.
Repeat for second weight.

Love this!!!!!
I think I might just have to make some for bub with bells in it – a weight shaped baby rattle! Sure to entertain bub AND daddy who works out with weights!
http://www.mysplendidfamily.com/
Love the idea of adding noise to them, I think I’ll do the same! Thanks!
Very clever! I must make some for my grandsons. Your daughter is very photogenic!
Thank you for sharing,
Cathy the Bagg Lady
That is the cutest picture of your little one with her weights. She looks so happy and fit!!!
Thanks for sharing.
Roe
So how do you connect all the pieces together?
Using a yarn needle and your yarn ends.
How did you make it so seamless!
So cute! What a great idea. And these will be perfect for a project I have to do for my Early Childhood Education class. Thanks!