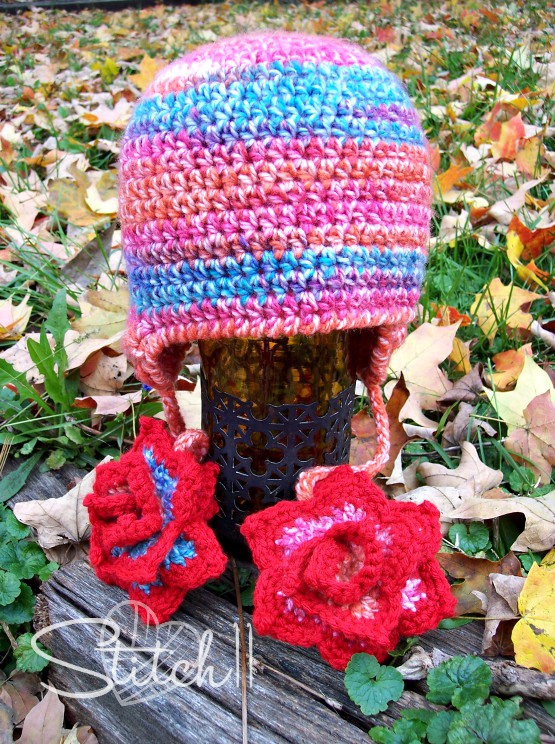
Getting tired of pompoms on your hats? Well, do we have the alternative for you! This pattern gives your ol' hats a twist and it's one anyone who sees the hat will truly love. See it for yourself with our free pattern below or get the ad-free printable PDF pattern here.
It's that time of year again! I will admit, the only reason I get excited about the colder air flowing through, is because it means it's CROCHET SEASON and an excuse to wear cute hats!
My mini-boss is at it again…giving me all her demands! This little 6-year-old firecracker has the most amazing mind and creative ideas! I don't know what I would do without her.
This year she has requested a hat with roses. She didn't like the idea of a rose just being attached to the hat, no… she wanted roses to replace the pom poms! Brilliant!
For this crochet pattern, the hat portion is designed by me and is supplied below for free. The rose crochet pattern is not mine and is a low-cost paid pattern found on Ravelry.
The Noso Rose is designed by Cynthia L. Green and can be found HERE. Read more about my experience with the rose during the rose portion of this pattern.
If you enjoy crocheting simple shapes like rectangles, you may want to check out our Crochet Anything with Rectangles class where you'll take the basic shape you already have down pat and turn it into useful, practical, and beautifully professional projects.
NOTE: This pattern is for the hat only and does not include the flower embellishments.
Skill Level: Easy
Materials:
Yarn:
250 yds worsted weight yarn
Hook:
US size I/9 (5.5mm) crochet hook or size needed to match gauge
Notions:
Scissors
Yarn needle
Crocheted flowers, pom poms, tassels, or other embellishment for ties. (optional)
Gauge: 12 hdc x 8 rows = 4”
Sizes:
To fit head circumference: 20”
Height: 8”
Pattern uses US crochet terms.
ABBREVIATIONS DESCRIPTION ch Chain hdc Half double crochet hdc2tog Half double crochet next 2 stitches together rnd Round RS Right side(s) sc Single crochet sl st Slip stitch st(s) Stitch(es)
Note: Join rnds where indicated with a sl st in the first st of the rnd.
Get the ad-free printable PDF pattern here
Make a magic circle.
Rnd 1: Ch 1, 10 hdc in magic circle, join. (10 hdc)
Rnd 2: Ch 1, 2 hdc in each st around, join. (20 hdc)
Rnd 3: Ch 1, 2 hdc in first st, hdc in next st, [2 hdc in next st, hdc in next st] around, join. (30 hdc)
Rnd 4: Ch 1, 2 hdc in first st, hdc in each of next 2 sts, [2 hdc in next st, hdc in each of next 2 sts] around, join. (40 hdc)
Rnd 5: Ch 1, 2 hdc in first st, hdc in each of next 3 sts, [2 hdc in next st, hdc in each of next 3 sts] around, join. (50 hdc)
Rnd 6: Ch 1, hdc in each st around, join.
Rnd 7: Ch 1, 2 hdc in first st, hdc in each of the next 4 sts, [2 hdc in next st, hdc in each of the next 4 sts] around, join. (60 hdc)
Rnds 8-18: Ch 1, hdc in each st around, join.
Do not fasten off.
First Ear Flap
Row 1 (RS): Ch 1, hdc in first 11 sts, leaving remaining sts unworked. (11 hdc)
Row 2: Ch 1, turn, hdc2tog, hdc in each of next 7 sts, hdc2tog. (9 sts)
Row 3: Ch 1, turn, hdc2tog, hdc in each of next 5 sts, hdc2tog. (7 sts)
Row 4: Ch 1, turn, hdc2tog, hdc in each of next 3 sts, hdc2tog. (5 sts)
Fasten off.
Second Ear Flap
Continuing on hat, skip to 26 sts before the end of the rnd. Join yarn with a sl st in the next st (26th st to the right of the first ear flap).
Repeat rows 1-4 as for first ear flap.
Do not fasten off.
Crab Stitch Edging
Note: Working in the reverse direction will cause your stitches to twist, creating the rope like edging. This is called crab stitch or reverse sc.
Edging rnd: Ch 1, turn, sc in first st, working in the reverse direction (from left to right, if you are right handed), sc evenly spaced around entire edge of hat and ear flaps, join.
Fasten off.
Get the ad-free printable PDF pattern here
Ear Flap Ties
Join yarn with a sl st at the bottom center of either ear flap.
Ch 23.
Row 1: Sl st in 2nd ch from hook and in each ch across, sl st in same st on hat where you joined the yarn. (23 sl sts)
Fasten off; repeat for the other ear flap.
Finishing:
Sew crocheted flowers, tassels, pom poms, or other embellishments to the ends of the ear flap ties if desired.
Weave in all ends.
Note: The side of the hat with the seam is the back. The portion of the hat with the larger opening is the front.
Roses
For the large roses on both of the ear flap ties, I used the NoSo Rose by Cynthia L. Green. The rose is simply perfection! The instructions are easy to follow and she supplies photo's for assistance! Get the pattern HERE.
I had searched the web for hours and hours to find a beautiful realistic-looking rose with a flat back. I was so happy when I found this one by Cynthia. When you follow her pattern, you will see just how genius her mind is!
I made 4 roses.
Yarns Used
Red Heart Yarn – Hopscotch, Hula Hoop – Medium weight
Red Heart With Love – Red – Medium Weight
and I used a size G hook.
Get the ad-free printable PDF pattern here
I attached the bottom of the ear flap tie behind one rose, then attached the other rose onto the back of the first rose. When attaching, I attached on the edge of the outer petals. Repeat for the other side.
If you enjoyed this pattern, please check out some of the other patterns on my blog:

The cutest! So keen to give this a go asap, thankyou for such a comprehensive pattern 🙂
Is this pattern worked using two yarns together or a single strand?
love the roses on the bottom