
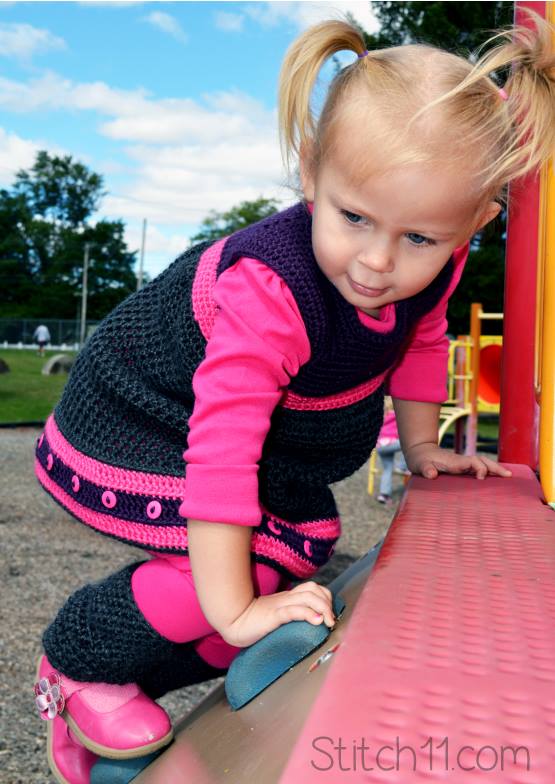
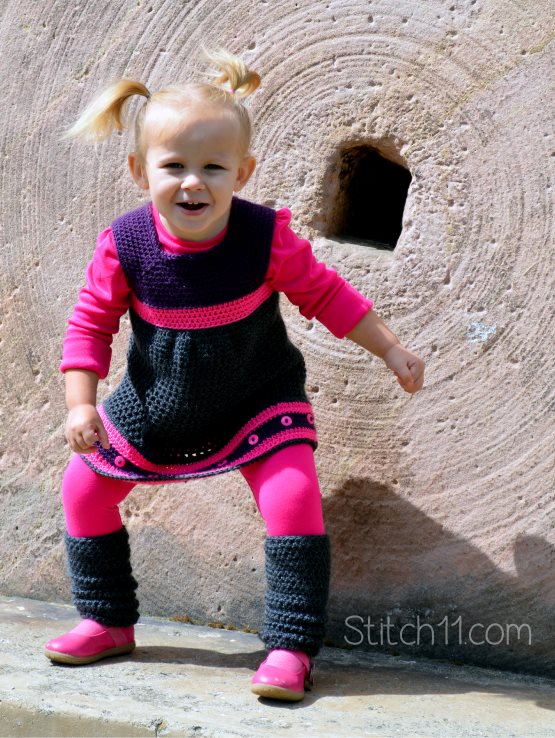
Are you looking for a spring or summer crochet pattern? Then this adorable toddler dress crochet pattern is for you.
A few weeks ago I decided to venture out into designing a dress. When I told Ella I was going to make her a dress, she didn't waste any time to tell me the details she was expecting. She wanted the dress to have lots of pink buttons. While drawing up the dress ideas I had, she also told me she didn't want a long dress… she wanted it to be small. Which was really a great idea because she could move freely without worrying about the dress getting caught under her knees.
Ella and I are both thrilled with the outcome of this dress and I am very excited to share it with you for free! This dress fits toddler sizes from 2t-4t. To help you get an idea of how it will fit, my daughter is 2 years old and wears 3t and 4t clothes. Also, be sure to check out the free toddler leg warmer pattern!
Ella's Request – Toddler Dress Crochet Pattern
Supplies
Caron Simply Soft Yarn – I used one skein of gray, half skein of pink. and a half skein of purple.
G/6-4.25 mm crochet hook
H/8- 5mm crochet hook
Yarn needle
Pack of 20 buttons (optional) -I bought these at Walmart for 88 cents
Stitches
Slip Stitch
CH – Chain
SC – Single Crochet
HDC – Half Double Crochet
FSC – Foundation Single Crochet
*Tip 1* you will want to take the time to learn the FSC if you do not already know it. Check out this fantastic tutorial by Moogly. Because of using this stitch, the neck of the dress will be able to stretch over all of those big headed toddlers like mine!
*Tip 2* your chains do not count as stitches.
Using G/6-4.25 mm crochet hook. (and I used purple yarn)…
Row 1: 68 Foundation Single Crochet. Join to first FSC. (68)
Row 2: CH 1, SC into the same stitch and each stitch around. Join to first SC. (68)
Row 3: CH 1, HDC in same stitch and next 16 stitches. CH 2, HDC in the same stitch. **HDC in next 17 stitches. CH 2, HDC in the same stitch. Repeat from ** two more times. Join to first HDC. (72)
Row 4: CH 1, HDC into same stitch and next 16 stitches. {HDC, CH 2, HDC} into chain space. **HDC into next 18 stitches, {HDC, CH 2, HDC} into CH space. Repeat from ** two more times. HDC into the last stitch. Join to first HDC. (80)
Row 5: CH 1, HDC into same stitch and next 17 stitches. {HDC, CH 2, HDC} into chain space. **HDC into next 20 stitches, {HDC, CH 2, HDC} into CH space. Repeat from ** two more times. HDC into last 2 stitches. Join to first HDC. (88)
Row 6: CH 1, HDC into same stitch and next 18 stitches. {HDC, CH 2, HDC} into chain space. **HDC into next 22 stitches, {HDC, CH 2, HDC} into CH space. Repeat from ** two more times. HDC into last 3 stitches. Join to first HDC. (96)
Row 7: CH 1, HDC into same stitch and next 19 stitches. {HDC, CH 2, HDC} into chain space. **HDC into next 24 stitches, {HDC, CH 2, HDC} into CH space. Repeat from ** two more times. HDC into last 4 stitches. Join to first HDC. (104)
Row 8: CH 1, HDC into same stitch and next 20 stitches. {HDC, CH 2, HDC} into chain space. **HDC into next 26 stitches, {HDC, CH 2, HDC} into CH space. Repeat from ** two more times. HDC into last 5 stitches. Join to first HDC. (112)
Row 9: CH 1, HDC into same stitch and next 21 stitches. {HDC, CH 2, HDC} into chain space. **HDC into next 28 stitches, {HDC, CH 2, HDC} into CH space. Repeat from ** two more times. HDC into last 6 stitches. Join to first HDC. (120)
Finish off and attach the same color into CH space.
Row 10: CH 1, 2 HDC into CH space. CH 11. 2 HDC into next CH space. HDC into next 30 stitches. 2 HDC into CH space. CH 11. 2 HDC into CH space. HDC into next 30 stitches. Join to first HDC. (68)
Row 11: CH 1, HDC into same stitch. HDC into each stitch and each CH around. Join to first HDC. (90)
Finish off and attach same color yarn into one of the stitches around the armhole.
Row 12: CH 1, SC into the same stitch and each stitch around the armhole (1 SC for each HDC, 2 SC into the side of the HDC and 1 SC for each CH (46)
Repeat Row 12 for another arm whole.
Finish off and weave in your ends.
Attach new color (I used pink) to bottom of the piece. -In the back loop only- Attach to the center under the armpit.
Row 13: In back loops only for this round. CH 1, 2 HDC into the same stitch. HDC in next 44 stitches. 2 HDC into next stitch. HDC in next 44 stitches. Join to first HDC. (92 HDC)
Row 14-16: CH 1, HDC in same stitch and each stitch around. Join to first HDC (92)
Finish off
Change color (I used gray) and attach yarn to the bottom of the stripe of row 16. -Attach into the center stitch under the armpit. IN BACK LOOP ONLY
Now using H/8- 5mm crochet hook
Row 17: Crochet in back loop only for this row. CH 1, SC into same stitch and each stitch around. Join to top of first SC. (92)
Row 18: CH 1, HDC in the same stitch and in next 9 stitches. *2 HDC into next stitch HDC into next stitch. repeat from * 12 more times. HDC into next 20 stitches. **2 HDC into next stitch HDC into next stitch. repeat from ** 12 more times. HDC into next 10 stitches. Join to first HDC. (118)
Row 19: HDC in same stitch and next 9 stitches. *2 HDC into next stitch. HDC into next 2 stitches. Repeat from * 12 more times. HDC into next 20 stitches. **2 HDC into next stitch. HDC into next 2 stitches. Repeat from ** 12 more times. HDC into next 10 stitches. Join to first HDC. (144)
Row 20: CH 1, SC in the same stitch. CH 1. Skip one stitch. * SC into next stitch. CH 1. Skip one stitch. Repeat from * around. Join to first SC. (72)
Row 21-22: CH 1, SC in same SC. CH 1. Skip CH. * SC in next SC, CH 1. Skip CH. Repeat from * around. Join to first SC. (72)
Row 23-43: CH 1, HDC into same stitch. CH 1. Skip CH. *HDC into next stitch. CH 1. Skip CH. Repeat from * around. Join to first HDC. (72)
Row 44: CH 1, HDC into the same stitch. HDC into each chain and each stitch around. Join to first HDC. (144)
Finish off. Change colors (I changed mine to pink) Attaching to back loops only
*Tip* I actually counted and attached the yarn 11 stitches left of the seam… to help the seam stay on the side of the dress.
Row 45: Crochet into back loops for this row. CH 1, HDC into same stitch and each stitch around. Join to first HDC. (144)
Row 46: CH 1, HDC into same stitch and each stitch around. Join to first HDC. (144)
Finish off. Change colors (I changed mine to purple) Attaching to back loops only
Row 47: Crochet into back loops for this row. CH 1, HDC into same stitch and each stitch around. Join to first HDC. (144)
Row 48-49: CH 1, HDC into same stitch and each stitch around. Join to first HDC. (144)
Finish off. Change colors (I changed mine to pink) Attaching to back loops only
Row 50: Crochet into back loops for this row. CH 1, HDC into same stitch and each stitch around. Join to first HDC. (144)
Row 51: CH 1, HDC into same stitch and each stitch around. Join to first HDC. (144)
Finish off. Change colors (I changed to gray yarn) Attaching to back loops only.
Row 52: Crochet into back loops for this row. CH 1, SC into same stitch and each stitch around. .Join to first SC. (144)
Finish off and weave in your ends. This is where I attached my buttons. I attached them about 7 stitches apart. Counting 7 HDC between each button. I ended up having one extra button left from the pack of 20.

I love this little dress can you tell me about what size this makes.
Yes, it fits sizes 2T-4T. It is custom to my daughters current size which is between 3T and 4T.
Adorable! Thanks for sharing!
I may just have to make this set for my little niece, it’s just too cute
I love the design and the colours are wonderful. The buttons really make a difference.
This is just adorable Corina! Thanks for sharing your pattern with us.. I can’t wait to make it for my grandaughter that just turned 2.. Blessings.. BTW–your daughter is just adorable!!
I just love Ella’s dress and matching legwarmers, and she is so cute.
This is lovely! I love the buttons and she just looks adorable 🙂
Very cute! You did a great job. I’ve been thinking about designing a toddler dress for a while, but I don’t have a cute model like you have!
Corina you did an amazing job designing this dress!! It is absolutely the Cutest! Thank you so much for being generous and sharing this pattern with us. I have a 3 year old daughter that wears a 4t as well and she is going to Love this dress and leg warmers. Looking forward too making this for her soon~
Love this design. im trying to make one for my daughters birthday outfit but im stuck on row 3. i follow the directions to a point but i always come out with 80 stitches instead of 76. can you help me figure out where i went wrong?
Can you send me a photo on my facebook page of it? Especially the CH space areas? maybe I can see what is going wrong. https://www.facebook.com/stitch11page
Love this! Thanks for linking up on Hookin On Hump Day Corina!
Can you share some measurements? Chest and length, particularly? Or a gauge swatch? My gauge is my biggest problem! I’ve got a little cousin this would be gorgeous on!!!
It is just over 19 inches from top to bottom. The pink strip is 12 inches wide. (laying dress flat) 8 HDC = 2 inches wide. 7 rows of HDC equals 2 inches. Hope that helps. 🙂
I’m looking for clarification on the pattern. In row 4-9, after repeating the ** section it says to HDC into the last stitch, last 2 stitches, etc… with each new row. Is this in addition to the 20, 22, 24, etc… stitches? So technically I should be increasing by 1 stitch and the end of each round? I hope this question makes sense. Love the dress and hoping I can complete it in time for Christmas for my daughter. Thanks!
You are actually increasing more than one stitch, you increase in each corner. But the reason you have to crochet additional stitches at the end of the round is because of the seam moving. I bet you can get it finished really quick! Would love to see it after!
Thanks! I was getting the increases at the corner, but I noticed the seam was becoming off center and looking funky so I figured I was missing something. I’m newer to doing crochet dress patterns and I’ve already started over a couple of times so you may get more questions from me, but I’m determined to have it ready for Christmas. Thanks again!
You are more than welcome to contact me on my facebook too! I might receive your msg quicker. 🙂 https://www.facebook.com/stitch11page I should have some progress pics on my computer also if you would like to compare them.
Is there a way to get the pattern without downloading your driver?
Ann
The only way to get the patterns on Stitch11 is to select the “clean print” icon at the bottom of the pattern. It will also give you the option for PDF.
Hi, I’m in the process of making this dress. Started over a few times now because I am not getting the counts right according to your pattern. It starts going south in row 4. In row 4 I count 84 st. So of course all the rows that throws off all the other rounds. Are there any corrections to this pattern? What am I missing? I’ve been crocheting for years, and this seems like a really simple pattern for a cute dress. Thanks
Hey Gabby, I thought the same thing. I went back to that round and still… when I read the pattern I wrote I logically think it should have 8 increases in that round. but when I pull the calculator out, I only count 80 stitches. My dress had 80 stitches as well as my tester.
Are you counting the ch 2 as 1 st?
I CH 1 in the start of these rows and then HDC into the same stitch.. when I get to the end of the round, I slip stitch into the first HDC and skip the CH. You can CH 2 if you like, just do not HDC into the same stitch if you do… and then at the end of the round you will need to join to the top CH of CH 2.
This is absolutely adorable, and exactly what I was looking for — a non-fussy crochet dress pattern that I can adapt to suit both of my granddaughters. One has a mom who loves girly-grrl stylish dressup clothes, and the other is determined to be gender-neutral. This will be ideal for both of them – I’m finishing off the outfit with a matching newsboy cap. They’re wearing 6 months and 9 months sizes, so I’m going to experiment with yarn thickness and needle size to get the smaller size/gauge. Best of all, though, is that my younger granddaughter is named Ella… I didn’t even notice the name at first, but once I saw it, I knew this was the perfect dress for her.
Thank you so much Deb! Please come back and share how your work with the sizing! I would love for you to share photo’s with me on Facebook as well. Feel free to message me through the process. 😀 https://www.facebook.com/stitch11page?bookmark_t=page
This dress is adorable!!! 🙂 Unfortunately I have run into a slight problem. In row 19, I keep getting an end count of 136, not the 144. Up until this point, my count has been right on. When I added the stitches together (first 10 stitches)+48 (for the 2hdc in one stitch and 2 hdc in next 2 stitches, 12 times) +20 hdc+48+ 10 (last hdc) = 136. Can you tell me what your end count on row 19 is. And possibly what I am doing wrong. 🙂 thank you!!!
You are absolutely right. I broke out the calculator 🙂 I made a few changes. Only to the stitch counts. The pattern is exactly the same. So sorry for the troubles and thank you for letting me know! 🙂
Hi, I love this dress but I’m stuck on row 10, the rest of the pattern has been easy to follow but after the ‘hdc into next 30 stitches. 2 hdc into ch space. Ch 11’, do I then join to the remaining chain space? And I have 30 stitches, not 22, to complete the round after the last chain space, where have I gone wrong as both sides have 30 stitches. Do I make any sense?
After chaining you will skip to the next CH space. This is just to make the arm holes.
I love this dress! I’m stuck on this same row, though, 10. The way it’s written is a bit confusing. I did one arm hole, hdc in the next 30 stitches, chained 11, but why hdc in the next 22 stitches? Even if I skip to the next ch space, there are still 30 stitches remaining after that second arm hole :/
I believe I fixed this issue… I am sorry to anyone I had confused. Round 10 now says “Row 10: CH 1, 2 HDC into CH space. CH 11. 2 HDC into next CH space. HDC into next 30 stitches. 2 HDC into CH space. CH 11. 2 HDC into CH space. HDC into next 30 stitches. Join to first HDC. (68)”
My daughter LOVES this dress. She managed to talk her way out of a bath a couple of nights (mommy was sick and too tired to fight) and wore it for 3 days straight.
Thank you so much for making a pattern for older toddlers. It is so easy to find patterns for up to 24 months, but then it becomes so hard to find patterns for 3T and up.
<3 Thanks for the feedback!!! I'm so glad she loves it. My daughter wore hers again just a couple days ago. I would love to see a photo! You are more than welcome to send it to me on my facebook. https://www.facebook.com/stitch11page
Corina, I’m having problems with row 10. I just recently learn to read patterns, still having problems deciphering some instructions.
Is there a tutorial that I can watch? Thanks!!
I do not have a video tutorial.. but maybe if I explain the row it will help.
This is the row that you will be creating the arm holes. You will have a row of Half Double Crochet for both the front and the back of the dress. But from the front corners to the back corners you will be making a chain space.
Help I really want to make this for a child who wears 18 month clothing cn I use a smaller hook like 3.75 and 4.25 instead of the sizes indicated to make t smaller?what do you think?
Honestly, I bet it would fit her great. The dress was made to be short on my daughter.. but I bet it would look great on an 18 month old too, and they would get to wear in an extra year. But, If you want to keep the look but with a slightly smaller size, you could just change the hooks down a size.
thanks so much for your quick response
Hi! I absolutely LOVE this dress!! I have just started it but like Helena, I am stuck on Row 10. would say that I am an experienced crocheter and I understand creating the armholes but after the 2nd CH 11 you don’t have a “join to next CH space” and I have 30 HDCs across the front and back (not the 22). Am I over-thinking this? Help!!! I absolutely ADORE this and I am making it for my great-niece for Christmas. Thank you so much and thank you for sharing your pattern.
Never mind. I worked it out. Thank you 🙂 I am surprised at how quickly this works up! I love it!!!! Thank you, again, for sharing your pattern.
Christine, how did you work it out? I’m still stuck, and I’ve been crocheting for a couple of years! Lol
Hi, thanks for sharing this lovely pattern! Only one question so far- for row 12, couls I just sl st across rather than cutting and rejoining at the arm holes? I’m going to try it your way this time, just curious for future reference. Making mine for my 2.5 year old Stella 🙂
Whoops, I realized my own answer!
Hi. I just started the pattern and I seem to be coming out with an extra stitch at the end of row three. I counted 77 instead of 76. I even started over just to be sure and i came out with 76 again. Can you please help me?
I meant to say I came out with 77 again not 76.
Well never mind I re-did row three again and I got the count right. If I am not mistaken, I did not realize that the chain two space was being accounted for one stitch in the end count. If I am not wrong, I sort of figured it out when I read two of the other comments; which turned out to be very helpful because I did not realize that there was a increase stitch at the end of the row either. I can truly appreciate the comments page that follow a pattern. I’ve been crocheting on and off for a while now and technology has helped because I’m used to finding patterns I’m interested in and if it had an error, then I would be out of luck. Now a days you can actually “speak” to the designer. I think that’s pretty cool.
Love the dress! Is there some way I can print off this pattern? I don’t have a tablet or laptop so that I can follow the pattern while I crochet. Trying to work while at the computer is not a viable option either. Could this be converted to a PDF for download? Thanks so much for sharing your patterns. I want so much to try several of them but, as stated above, I can’t get them in format I can print. Thanks again!!
Try the “cleanprint” button at the bottom of the pattern. If that doesn’t work you could try selecting ctrl P.
I’m just finished row 19 with 144 stitches and can’t get the pattern to reduce to 72 stitches for row 20. it says ch 1, sc in same stitch. ch 1, skip one stitch. *sc into next stitch. ch 1. skip one stitch. repeat from * around. join to first c (72) it appears that when I ch1 and then skip one I’m just adding the stitch back in. HELP!!! I’m going crazy.
Are you counting the Chain as a stitch?
please note there is an error in the PDF at row 10. Currently it says to HDC in 30 stitches and then2 HDC in chain space, chain 11 then the it says 22 HDC stitches again – but should be 30. This had me chasing my tail for some time as a beginner.
Hmm, it is showing 30 instead of 22 for me. Wonder why it’s showing that for you.
I love this dress and leg warmers set. Too cute. My daughter is older, almost six. I want to modify it to be bigger. Would that most likely involve starting with more stitches to make the dress bigger around, and then just adding rows to the bodice and skirt sections.It seems like it shouldn’t be too difficult, if I’m checking it on her as I go.
Thats what I would do. Start with a few more stitches and maybe make a few more increases after the the color change band is crocheted. It is a really simply design and should be simple enough to adjust 🙂
Thanks for the advice. When I get to this project, I’ll let you know how it goes and share a pic.
Thank you so much for sharing this pattern! I was so happy to finally see someone using the Caron Simply Soft yarn! I absolutely love your pattern and this yarn drapes just perfect for it. I am going to make several of them, I’m in the process of trying to sell at our local Christmas booths and this is going to be a hit! Once again, thank you and happy hooking! :o)
You comment just made my day! Thank you so much for coming here and letting me know <3 I would LOVE to see some photo's of your dresses! You can share them with me anytime on my Facebook pager -> https://www.facebook.com/stitch11page
You are welcome. I am now working on my second dress and have noticed a couple things I would like to point out (nothing big). At the beginning of row 19 it does not say to CH 1 at the beginning. Is this an omission? I added the CH 1 to my dress. Everything else works up just fine. Except, at the top of the dress where you increase I can’t seem to make it flat. I get a slight rise in the arm hole when I lay it flat. It appears that I’m making a mistake in Row 4 at the end where you finish with one HDC then on Row 5 you finish with 2 HDC, so on and so on. When I get to this part, I am forcing my stitch into the CH from the previous round and then joining. Is this correct? I will try to post my first dress on your facebook page, but my camera has been acting up. I really do love this dress pattern a lot. I also decided to not put the buttons on the bottom (thought about those knees hitting them) but instead will embellish them at the top with flower buttons. Once again, thank you for the free patterns. Happy Hooking! :o)
Thank you so much for posting this free pattern! It’s so pretty, as is your daughter! I just wanted to let you know that I just used the bodice part of the pattern to make the top of my daughters bumble bee costume, and it’s perfect! I’m still working on it though, have to get it done by Friday 🙂 Just wanted to drop a thank you note! Happy Halloween to Ella and your family!
-Elizabeth & Dylan
Hi there! This dress is so cute. I have been trying to figure out row 3 for a while… I am not sure how you are supposed to end up with 76 st…. I am only counting 72. I keep going over the pattern and recounting and it looks like I’ve done everything but I must be getting something wrong. I am not counting the chain space areas (should I?)…where do those other 4 stitches come from? If you have any ideas or tips and could get back to me I’d really appreciate it! Thanks and thank you for the pattern!
Are you skipping stitches before or after the CH spaces? People have came to me for this before and that ended up being what happened.
Thanks so much for getting back to me so quickly! I don’t think I am skipping stitches but must be missing something… Do you have an email where I can send you a picture? I made a chart to show what I have been doing to end up with only 72st.
Okay. I realize what is wrong now. The pattern is correct.. but I should have that actually say 72 stitches. I have edited this in the past and must have missed that. Thank you so much for letting me know. Please let me know if you come across any other errors.
Something is still off. Originally I was starting with a round 1 foundationSC of 68 st and when I got to the end of round three I was counting 72 st when I was supposed to get 76st.
Then after my original question the pattern was revised changing the starting chain to 72 st instead of 68. I re-worked the project starting with 72 st in rounds 1 and 2 but now round 3 is not working out…I get done with all I am supposed to do in round 3 and still have 8 unworked stitches.
Sry to be a bother!
I think maybe you are supposed to start with 68 st for rds 1 & 2 and that you maybe meant to change the 76 to 72 at the end of round 3? Just a guess? Not sure at this point… Brain fried…. Lol
I’m looking it over. I will get back with you.
This pattern has had my head spin >.< And it's something so simple!! I am very sorry for this. I hope you continue to work the pattern. I made more updates. Please let me know if it works for you.
I am crossing my fingers that this is the last of the errors. <3 It is really a very simple dress... I can hardly believe I have had to edit this one so many times. Again, I am very sorry for this.
Thanks! Yes, I’ll keep at it! 🙂
This dress is very cute. I have completed up to row 11 and everything has worked out perfectly but I’m not understanding row12. Not sure where to start first SC ? It says one of the stitches “around” arm hole? Is this the inside of the arm hole? Not sure what this means either (2 SC into the “side” of the HDC ) Please help. I can’t wait to get started again
Yes, I say around the arm hole in any stitch. Just join wherever you want your seam to be, I did it under the armpit area.
What a beautiful little model you have! My daughter is 2 and 1/2 and I just finished up a semester at college and have the summer off!
I am a novice; however I attempted and completed a beach cover up last year for her.
Can’t wait to start on this dress. Thank you for sharing!