A couple weeks ago, my husband came home from work to tell me he found a Mercury Mountaineer for sale super cheap. The only thing was, the vehicle didn't have a key… and the inside looked like it had been chopped up by Edward Scissor Hands and then Edward tried to cover some of the damage up with bright green duct tape. >.<
I knew instantly I would need to cover a lot of the inside with yarn.. this console had to be the first thing. I couldn't lean against it without getting stuck to it… and then gagging because I have no idea what else has been stuck to it.
I am not complaining though, because not only did I get this for a really really good price, but it gives me another reason do do what I love, which is crochet. 🙂
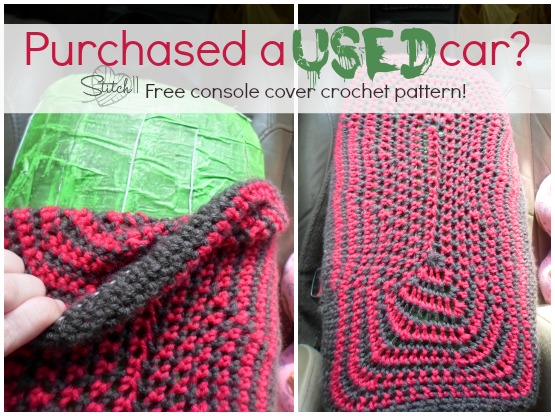
This is fitting for the console of a 2001 Mercury Mountaineer. The console measurements are 7 inches wide and 14.5 inches long. This is made to fit snug.
Supplies
Elastic (I used a thin elastic cord… but to be honest, I would have just used whatever elastic I found first in the craft drawer)
First, I cut a piece of elastic cord to tie into a 22″ inch circle. It stretches a lot, so you will want to make sure it is small enough to not just pop right back off the console.
5 MM Crochet Hook
2 Colors of Med/WW Yarn ( I used I Love This Yarn)
Stitches
SC – Single Crochet
SC DEC – Single Crochet Decrease
SC 3 TOG – Single Crochet Three Together
Gray yarn = Color A
Red yarn = Color B
Attach your Color A yarn to the elastic.
Round 1: 140 SC around the elastic cord. Make sure the crochet isnt twisted, then join to first SC. (140)
Round 2-4: CH 1, SC into each SC around. Join to first SC. (140)
Do NOT finish off.
Attach Color B to next stitch.
You will not be joining at the end of rounds, they will be continuous to give the spiral look.
Round 5: With Color B, SC into the next 140 stitches. Drop this yarn.
Round 6: With Color A, *SC into next 12 stitches. SC DEC. Repeat from *9 more times. (130)
Round 7: With Color B, *SC into the next 11 stitches. SC DEC. Repeat from * 9 more times. (120)
Round 8: With Color A, *SC into the next 8 stitches. SC DEC. Repeat from * 11 more times. (108)
Round 9: With Color B, *SC into the next 7 stitches. SC DEC. Repeat from * 11 more times. (96)
Round 10: With Color A, *SC into next 6 stitches. SC DEC. Repeat from * 11 more times. (84)
Round 11: With Color B, *SC into next 5 stitches. SC DEC. Repeat from * 11 more times. (72)
Round 12: With Color A, *SC into next 4 stitches. SC DEC. Repeat from * 11 more times. (60)
Round 13: With Color B, * SC into next 18 stitches. SC 3 TOG. SC into next 6 stitches. SC 3 TOG. Repeat from *1 more time. (52)
Round 14: With Color A, Sc into next 17 stitches. SC 3 TOG. SC into next 4 stitches. Sc 3 TOG. SC into next 16 stitches. SC 3 TOG. SC into next 4 stitches. Now in order to do you next stitch, you will need to go ahead and do a SC with the Color B yarn. Then pick back up your Color A and do your SC 3 TOG.
Round 15: With Color B, SC into next 15 stitches. SC 3 TOG. SC into next 2 stitches. SC 3 TOG. SC into next 14 stitches. SC 3 TOG. SC into next 2 stitches. Now in order to do you next stitch, you will need to go ahead and do a SC with the Color A yarn. Then pick back up your Color B and do your SC 3 TOG.
Round 16: With Color A, SC into next 13 stitches. SC 3 TOG two times. SC into next 12 stitches. Now in order to do you next two stitch, you will need to go ahead and do TWO SC with the Color B yarn. Then pick back up your Color A and do your SC 3 TOG two times. Slip stitch into next stitch. Finish off.
Round 17: With Color B. SC into the next 12 stitches. Finish off leaving long tail. Use a yarn needle and attach both sides of this hole together.. closing the spiral. Weave in your ends.

I was wondering you did one for the console the steering wheel, I have seen seat covers tool. Have you made one for the dashboard? I have tried and it just doesn’t come out just right.
I haven’t but it would be really cool to figure it out!!
do you have a dash board cover patteren?
No, but that’s a nifty idea! Good luck!
How did you figure out to use a 22″ piece of elastic?
I want to make one for my husband’s 2001 Ford Explorer Sport Trac, and one for my daughter’s 2013 Jeep Grand Cherokee SE.
It’s me again. The console measures 9 wide by 15 long. Please help me with how you knew how long of elastic you needed. Thank you in advance.