• Home
  • Free Patterns
    • Toys
    • Costumes
    • Bags
    • Flowers
    • Hats
    • Pattern Reviews
    • Household
    • Newborn
    • Scarves
    • Sports
  • Disclosure
  • Contact
  • Yummy Food
  • Round Ups

Stitch11

A Yarntastic Life!

  • Girls
  • Boys
  • Hats
  • Newborn
  • Flowers
  • Household
  • Costumes
  • Toys
  • Pattern Reviews
  • Grannys
You are here: Home / Archives for Inspired

Plaid Bucilla – Weaving Loom – Review

August 16, 2017 By stitch11 Leave a Comment

Owl Purse - Weaving Loom - Review

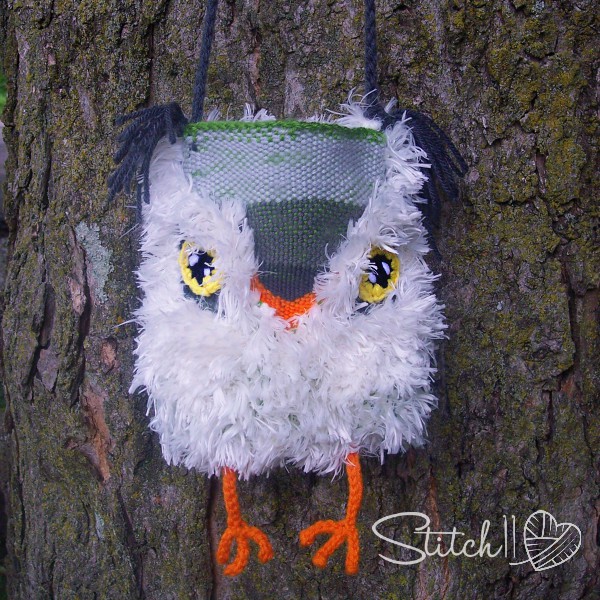
I was approached by Red Heart Yarns to review an adjustable weaving loom by Plaid.  I have never used a loom, let alone a WEAVING loom! I was a bit intimidated by the idea and felt like a complete rebel when I volunteered to do a review.
I did NOT write a “pattern” but I took lots of photos! I want to share with you my process, and what was going through my mind the entire time!

All supplies for this project was supplied by Red Heart Yarns and Plaid.

[Read more…]

Filed Under: Crafts, Inspired, Pattern Reviews, Uncategorized

Stitch11 is learning to SEW!

July 4, 2016 By stitch11 2 Comments

Stitch11 is learning NEW stitches!

I've been facing a battle with my own creative mind. I LOVE crochet… but am getting jaded. I keep trying to mix it up so I can get my crojo back, but I finally realized that I just need to open my world to new stitches!
After a few day hunt, I located my dusty sewing machine. The one I BEGGED my mother to buy me years ago… not realizing how different it was compared to the one I used growing up.
I packed it away, with hate for it… because I just-couldn't figure the darn thing out.
FINALLY! I am breaking the chains in my own mind, and I am determined to conquer this machine once and for all!
I decided to start small, and repurpose some old clothes. Check it out!

13600125_1097637270275185_5695978483460883160_n

I used a pair of yoga pant's my daughter had grown too tall for, and the bottom of a dress that she also had grown too tall for. SO CUTE!

Next, I used the bottom of one of my old dresses, and for the waste band I used my daughters T-shirt she had outgrown. She loves it so much that she wants to wear it on her first day of school. She said “It's PERFECT!” with the biggest smile. <3 Warmed my heart!

100_8265

Do you sew? Are you trying to learn? Tell me your own experiences, battles, and advice for someone like me who just can't seem to keep the tension right. 😉

Filed Under: Crafts, Inspired

Pikachu – Free Crochet Pattern – Stitch11 Review

March 23, 2016 By stitch11 1 Comment

I'm not sure how many of you remember the Pokemon Balls I made a year ago, but ever since, my daughter has been begging me to make her a Pikachu.
I finally agreed to make this little monster. He is small, adorable, and very lovable. The pattern is very easy to follow and well written.
I did have confusion with the tail. I don't know what I did wrong, but whatever it was, it still worked out just fine.
Instead of felt cheeks, I just used some acrylic paint.
You can find your copy of this free Pikachu crochet pattern here.

Pikachu - Free Crochet Pattern - Stitch11 Review

Filed Under: Boys, Free Patterns, Inspired, Pattern Reviews, Toys, Uncategorized

Another Child Mouse Hat

December 16, 2015 By stitch11 Leave a Comment

Child Size Minnie Mouse Hat - Free Crochet Pattern

Each time I make something… I tend to want to do things a little differently.
I decided to use Caron Simply Soft this time.
In order to get the correct size, instead of using the original Minnie Mouse Hat for Preschoolers or the Child Size Minnie Mouse Hat, I used the Hat Pattern from the Batman Hat.
I paired the hat with the ears from the Preschool Minnie Mouse Hat. I used two strands of caron simply soft held together to make sure they would be strong. (instead of making 2 layers for each ear) I still crocheted the edging around the ear.
For the bow, I held 3 strands of Red Heart Soft together and followed the free Boutique Bow pattern.

Filed Under: Costumes, Free Patterns, Girls, Hats, Inspired, Pattern Reviews, Uncategorized

Free DIY Rainbow Pony Costume Tutorial

October 24, 2015 By stitch11 Leave a Comment

Free DIY Rainbow Pony Costume Tutorial

It's finally finished and ready to share! The last touches included using RIT DYE for the sweater and shoes. I was able to find pants at JC Pennys the correct color. I  Hot glued the rainbow lightning to the sweater and added a button to the back of the pants for attaching the tail.
Free Pony Hat Crochet Pattern
Free Rainbow Tail Crochet Pattern
Free Leg Warmer and Fingerless Gloves Patterns 
Free Lightning Bolt and Cloud Crochet Pattern 
How To Make Wings (no sew & no crochet) 

You may also like last years FOX COSTUME TUTORIAL!

Filed Under: Costumes, Crafts, Free Patterns, Inspired, Toys

Rainbow Lightning Applique

October 19, 2015 By stitch11 Leave a Comment

Rainbow Lightning - Free Applique Crochet Pattern

The crocheted Rainbow Lightning shooting out of a cloud is the latest piece to my daughters Halloween costume. Check out the previous Rainbow Pony costume patterns; The Pony Hat, Rainbow Tail and the Fingerless Gloves and Leg Warmers!
Next I will be figuring out the wings!

Supplies
F/G- 3.75 mm crochet hook
White, Purple, Blue, Green, Yellow, Orange, and Red Med/Worsted Weight Yarn
Yarn needle.

[Read more…]

Filed Under: Costumes, Free Patterns, Inspired, Toys

Rainbow Tail

October 10, 2015 By stitch11 Leave a Comment

Rainbow Tail free crochet pattern by Stitch11

I wanted to share with everyone how to make your own rainbow tail!
If you love this, you will also love the Rainbow Pony Hat and the matching legwarmers and fingerless gloves.
Keep watching for the next pieces of the costume!

Stitches
Magic Circle
HDC – Half Double Crochet
HDC DEC – Half Double Crochet Decrease

Supplies
Medium/Worsted Weight yarn (yellow, green, blue, purple, red, and orange.)
6 mm crochet hook
Yarn Needle

[Read more…]

Filed Under: Costumes, Free Patterns, Inspired, Toys

Rainbows for Love -Free Crochet Patterns and Other Rainbow Tutorials

June 27, 2015 By stitch11 Leave a Comment

Rainbows for Love - Free crochet patterns and tutorials


Let's take a moment to sit back, take a deep breath…. and smile. The right to LOVE is sweeping across the states! Let's keep sharing the love! The more we love, the less room there is for hate. <3 <3

Here are 19 rainbow tutorials. Most of these tutorials are crochet, but some are cooking and some are crafty. Share the love!


Hood For Tots
– Design by Stitch11

SPSD3-Simply-Pampered-Basket-The-Hooked-Haberdasher
Simply Pampered DIY Crisco Candle Recipe and Basket Crochet Pattern
– Design by The Hooked Haberdasher

sweetheart-love-flowers
Sweetheart Love Flower
– Design by Stitch11

Simply-Pampered-Spa-Day-2-The-Hooked-Haberdasher
Simply Pampered Lacy Round Washcloth and Bath Salts
– Design by The Hooked Haberdasher

How-to-make-Rainbow-Jello
Rainbow Jello
– Design by Stitch11

9880993
Flower Child Bag
– Design by Trifles N Treasures

Crochet-Lalaloopsy
Lalaloopsy Doll
– Design by Stitch11

Rainbow-Daze-Washcloth-e1429812502111
Rainbow Daze Washcloth
– Design by Simply Collectible Crochet

1150153_10152113236157713_299595242_n
Boutique Bow
– Design by Stitch11

A-Very-Good-Hat-FB
Good Hat
– Design by Moogly

Kaleido-Dreams_medium
Kaleido Dreams Square
– Design by Stitch11

magic-rainbow-baby-fb-1
Magic Rainbow Baby Blanket
– Design by Moogly

024_medium
Curly Q Hat
– Design by Stitch11

Eloise-Girls-Folded1
Eloise Sweater
– Design by Moogly

000_1077_medium
Baby Robot
– Design by Stitch11

bfeff8b658dfc62497bb6249d902d503
Rainbow Fan
– Tutorial by DIY Home Tips and Tricks

6-12_month_leg_warmers_medium
6-12 Month Leg Warmers
– Design by Stitch11

4da853e32097d038ee536a60f82c65dc
Rainbow Wings
– Tutorial by Katie Kupcake

Crochet_Ninja_Mask_medium
Ninja Mask
– Design by Stitch11


Filed Under: Boys, Costumes, Crafts, Free Patterns, Girls, Inspired, Round Ups

Cute Cat – Why I Follow Crochet Patterns

March 29, 2015 By stitch11 15 Comments

Cute Cat - Why I follow crochet patterns.


I often see/hear people say “I do not follow patterns.” I know there are many reasons a person will say this.. but I want to share with everyone why I choose to follow patterns.

Sometimes I feel like I can make anything that I put my mind to… and at this moment, I still feel this way. Not that I think I can design or freehand anything I put my mind to, or that I can find a pattern for anything I wish. I just know that between the patterns and techniques that are out there for me to discover, I can learn how to make anything that I need/want to. And really, so can you.

For this cat, I knew I wanted to make something better than my first experience with crocheting kittens. After all, it has been a few years since I made them, why wouldn't I be able to make something better?

After searching online with my daughter by my side, we were inspired by many patterns, photos and even a video! Here are the links that helped me create this adorable crochet cat pattern!

First of all, the kitten who started the idea…

This video has captured the hearts of everyone in my home. We have watched a few different ones.. but this one was the first. So cute!!!

Next, we attempted to find the perfect and most adorable cat pattern to use/base the creation off of. I knew I could design one, or wing it; but I think following other peoples patterns only increases my own skill. I learn new techniques that I would have never thought up on my own!

IMG_8356_rt_w


This blog
post captured my child's imagination and inspired the colors of the cat. But when I went to follow the pattern… I couldn't get it translated well enough without having to wing it anyways.

moko
Earth-Amigurumi

Next up, we found another pattern that my daughter said was her favorite- Moko The Cat.

So, using this, I crocheted the head. But instead of making the bottom half a different color, I changed colors using the techniques I learned from the little Earth I crocheted last year.

Grumpy-Cat-Beanie-For-Your-Pets
Baby-Fox-Pattern-Review

With the eyes, I knew I loved the look of the Grumpy Cat Hat I made last year. So I used techniques from that experience for this item.

For the ears, I knew I wanted the clean look- like the ones from the Baby Fox pattern!

Ella Bunny - pattern review

For the puffy cheeks above the mouth, I used the technique that I fell in love with last week while following the Sweet Bunny Hat!

PuppyDogLovey

For the paws, I googled “Crochet Amigurumi Paws” and found this fantastic and creative pattern by Repeat Crafter Me! It was perfect for the feet. And using what I learned from this pattern, I was able to make a smaller version for the front paws too.

For the body, I free handed something similar to the pattern I used for the head.
For the tail, I just started with 8 SC in a magic ring, and kept it at 8 SC the entire length. I will be honest though, there were a few cat patterns out there with amazing tails that I contemplated on using.

Why I follow Crochet Patterns

This cat is the outcome from putting the minds of many artists together into one piece. This is exactly why I love to follow patterns. I take what I learn from each one, whether it be their ideas, techniques, or actual patterns- and mix it all up with my own creativity. It is like the fire that sparks my own passion for art. Without everyone else sharing their work, patterns, and tutorials. It would have taken me longer than 2 years to go from the original cats I made…. to this latest. And wow, what a difference!!!

If you'd like more inspiration for crochet cat patterns, take a peek at some of my other blog pages here: 50+ Purr-fect Crochet Cat Patterns

Filed Under: Free Patterns, Inspired, Pattern Reviews, Toys

Child Size Fox Hat – free crochet pattern

October 19, 2014 By stitch11 Leave a Comment

Child Size Fox Hat - Free Crochet Pattern

If you haven't already made the Fox Tail, you must check the Fox Tail Tutorial out right away! I used the same pet brush to fluff this basic medium weight beanie!  You do not have to fluff the beanie you make, it looked beautiful with clean stitches- My daughter is just asking for a fluffy type of fox costume. As much as I would love to make every piece of her costume with super fluffy yarn… it just isn't practical for me at the moment. Basic medium weight yarn is much easier to buy in the colors I need.
There will be more pieces to my daughters costume. If you want to make sure you never miss a post, make sure you subscribe! You can find the option to subscribe on the right side of this site. Thanks!!

Also check out the matching Fingerless Glove pattern!

How To Crochet a Child Size Fox Hat – Free Crochet Pattern

[Read more…]

Filed Under: Boys, Costumes, Free Patterns, Girls, Hats, Inspired

Grumpy Bear – Free Crochet Pattern

October 6, 2014 By stitch11 19 Comments

Free Grumpy Carebear Crochet Pattern

Get the Ad-free PDF Pattern here!

Some of you may already know how much my daughter loves Care bears. A few months ago I made her the “Backpack to Care-A-Lot“. Ever since then, she has been begging me to make her a Grumpy Bear. Mr Grumpy has been pushed back on my list for too long! Finally, my most reliable customer came to me requesting one!  Of course this made my daughter happy because I would have to make a few of them during the pattern writing process. 😀  I hope you love this free Grumpy Care bear pattern as much as we do!!

If you enjoy crocheting toys for the little people in your life, check out these incredibly cute stuffies in the Crochet Anything with Hexagons class.

[Read more…]

Filed Under: Boys, Free Patterns, Girls, Inspired, Toys

Minnie Mouse in Preschool

August 20, 2014 By stitch11 35 Comments

This Minnie Mouse Hat Crochet Pattern is perfect for little ones who are big fans of Miss Minnie Mouse. Fits kids aged 3-5. #crochet #crochetlove #crochethat #crochetaddict #crochetpattern #crochetinspiration #ilovecrochet #crochetgifts #crochet365 #addictedtocrochet #yarnaddict #yarnlove

This Minnie Mouse Hat Crochet Pattern is perfect for little ones who are big fans of Miss Minnie Mouse.

When I was first learning how to crochet, a local mom came to me while shopping in the baby food aisle at Walmart. She told me she LOVED my daughter's hat (first and the only thing I had made at the time) She offered me 20 dollars to make her daughter a hat too! I was so shocked and excited!

Now 2.5 years later, she has come back! She wanted to know if I could make her daughter a Minnie Mouse hat. How exciting is this? We will both get to see how far I have come since that first sale. And… not to mention the fact that she came back in the first place 😉 I told her I felt sorry for all the people who paid me for hats when I was first learning to crochet. She was quick to tell me they still love and admire the hat, but that her beautiful daughter has simply outgrown it. So here we go!

This pattern is designed for 3-5 year olds.

Minnie Mouse Hat Crochet Pattern

Supplies
I/9 – 5.5 mm crochet hook
black med-worsted weight yarn (I used I Love This Yarn)
Yarn needle
You will also need…
#5 Pink Bulky Weight Yarn and a 6.5 mm crochet hook for the bow

Stitches Used
Magic Circle 
CH- Chain
SC- Single Crochet
HDC- Half Double Crochet
FPDC – Front Post Double Crochet 
FPSC – Front Post Single Crochet

You will also be using these stitches when making the bow
DC- Double Crochet
HDC-2-TOG
DC-2-TOG

The Beanie (Fits 3-5-year-olds)

You will be working in continuous rounds.

Round 1: Magic Circle. 10 HDC in the magic circle.  (10)
Round 2: 2 HDC into each of the next 10 stitches. (20)
Round 3: **2 HDC into the next stitch. HDC into the next stitch. Repeat from ** 9 more times. (30)
Round 4: **2 HDC into the next stitch. HDC into the next 2 stitches. Repeat from ** 9 more times. (40)
Round 5: **2 HDC into the next stitch. HDC into the next 3 stitches. Repeat from ** 9 more times. (50)
Round 6:  1 HDC into each of the next 50 stitches. (50)
Round 7: 2 HDC into the next stitch. 1 HDC into the next 5 stitches.  Repeat from ** 7 more times. HDC into each of the next two stitches. (58)
Rounds 8-13: 1 HDC into each of the next 58 stitches. (58)
Round 14: 1 HDC into each of the next 56 stitches. SC into the next stitch. Slip stitch into the next stitch. (58)
Rounds 15-19: CH 1, HDC into same stitch. FPDC over next stitch. ** HDC into next stitch. FPDC over next stitch. Repeat from ** around. Join to first HDC. (58)
Round 20: CH 1, FPSC into each stitch around. Join to first FPSC. (58)

Finish off and weave in your ends.

Ears

Round 1: Magic Circle. CH 1. 6 HDC into the magic circle. Do NOT join. Pull ring tight.(6)
Round 2: CH 1, turn. 2 HDC into each stitch across. (12)
Round 3: CH 1, turn. 2 HDC into the first stitch. 1 HDC into the next stitch. **2 HDC  into the next stitch. 1 HDC into the next stitch. Repeat from ** across. (18)
Round 4: CH 1, turn. SC into next 4 stitches. 2 SC into the next stitch. HDC into next 3 stitches. 2 HDC into each of the next two stitches. HDC into next 3 stitches. 2 SC into the next stitch. SC into next 4 stitches. (22)
Round 5: CH 1, turn. SC into next 6 stitches. 2 SC into the next stitch. HDC into next 3 stitches. 2 HDC into each of the next two stitches. HDC into next 3 stitches. 2 SC into the next stitch. SC into next 6 stitches. (26)
Round 6: CH 1, turn. SC into next 8 stitches. HDC into next stitch. 2 HDC into the next stitch. HDC into each of the next 6 stitches. 2 HDC into the next stitch. HDC into the next stitch. SC into next 8 stitches. (26)

Finish off and repeat for a total of 4 ears.

Layer 2 ears together and join from one side to the other with the slip stitch. No need to join the bottom, you will do that when attaching it. This will make it a thicker and stronger ear. Attach the ear to the hat and repeat for the other ear. I attached my ears across rounds 2-9.

Now all you need to do is make your Minnie Mouse Bow and attach it in front of your ears.
When I attached my bow, I used black yarn and not only attached the bottom center to the hat, but I also attached it to the ears a little bit.

Filed Under: Costumes, Free Patterns, Girls, Hats, Inspired Tagged With: crochet hat, hat, mini, minnie, minnie mouse, mouse

Crochet Butterfly – Free Crochet Pattern (linked)

August 9, 2014 By stitch11 4 Comments

Free Butterfly Crochet Pattern

My sister Miranda, from The Yarn Box, just bought a beautiful new home. In the excitement of transforming their new home, my niece's decided to decorate their rooms in butterflies.

I searched the web until I found the perfect crochet butterfly pattern for making into bunting. But after I finished crocheting the butterflies…I fell in love with them just the way they are.

Get the free crochet pattern HERE 🙂

Filed Under: Flowers, Free Patterns, Girls, Inspired, Pattern Reviews

Double The Fun – Double The Flop Hat

August 5, 2014 By stitch11 13 Comments

Double the fun - Double the Flop - Free Crochet Pattern Adult-Child-TOddler

Late Sunday night, I had an idea for a new way to make a double pom pom beanie. I stayed up til early morning writing out my idea so I wouldn't forget. Last night I finally had the chance to test it out! My daughter loves it! She requested I use a bunch of different pinks for the pom poms… she even picked out what pinks in my scrap yarn bin. Although I call this free pattern the “Double The Fun – Double The Flop” It could VERY easily be turned into a puppy hat. The flaps are PERFECT for puppy ears. My daughter calls this new hat her “Pink Poodle Hat” 😀 This free pattern is available in Adult, Child, and Toddler sizes. Have fun!!

Supplies
Bulky 5 (I used Lion Brand Tweed Stripes) I also used a bunch of random pink yarns for the pom poms… my daughters request 🙂
K/101/2 – 6.5 MM Crochet Hook
Yarn Needle

Stitches Used 
CH – Chain
SC – Single Crochet
HDC – Half Double Crochet 
DC – Double Crochet
FSC – Foundation Single Crochet
FPSC – Front Post Single Crochet
FPDC – Front Post Double Crochet

Sizes
Toddler (Child, Teen/Adult)

[Read more…]

Filed Under: Boys, Free Patterns, Girls, Hats, Inspired

Why a Pro-Vaccine Mother Would Change Her Mind

July 29, 2014 By stitch11 36 Comments

Why I am scared of vaccine

I am truly passionate about very few things. These things include my art, crochet, Faith, and my family. I always have and always will want the best for my child- just as every loving mother would. That is why I never missed a wellness visit until after that day. That is why I trusted my child's doctor.

[Read more…]

Filed Under: Inspired

Free Steering Wheel Cover Crochet Pattern

July 6, 2014 By stitch11 42 Comments

This Steering Wheel Cover crochet pattern will fit a wheel that's 47 inches around the outside with 4 inches in girth. You will need to adjust depending on the size of the steering wheel. #crochet #crochetlove #crochetlife #crochetaddict #crochetpattern #crochetinspiration #ilovecrochet #crochetgifts #crochet365 #addictedtocrochet #yarnaddict #yarnlove

If you follow my blog, you already know that I bought a new/used vehicle. I recently wrote out a free console cover crochet pattern.

Now it is time to cover the cut up steering wheel!
I did a quick search for free patterns but to my surprise, there really are not any to choose from. So here I am, with my yarn, hook, and the Moogly Griddle Stitch Tutorial pulled up. If you are not familiar with this stitch, go ahead and check it out before starting. (Yes, I write the posts as I crochet the item)  🙂

First thing is first, measure your steering wheel. I just took a piece of yarn and wrapped it around the outside of the wheel which measures out to be about 47 inches. Then measure how wide around the wheel is, mine is around 4 inches.

The trick to making your cover, is to make it so it has to stretch as big as you can stretch it to be the length you need. Don't worry, you will be able to get it onto the wheel easier than it seems. Your goal is to make it so it is stretched so tight, that it doesn't want to move once you put it on. I was intimidated by this idea.. but once I made it, I realize it is so much easier and more secure than I imagined beforehand.

So now that I know it is around 4 inches, I will make a band that stretches to be about 4 inches wide. And then I will crochet in length that the steering wheel is round.  I will share my pattern with you, just remember to make your own measurements just in case yours needs to be a few inches different than mine. Mine will fit to stretch into place.

Free Steering Wheel Cover Crochet Pattern

Supplies
Med/WW yarn (I used two colors of I Love This Yarn)
F/5-3.75 mm crochet hook
Yarn needle

Stitches
CH- Chain
SC- Single Crochet
DC- Double Crochet

Row 1: CH 12, skip 3 CH (counts as first DC) SC into next CH. **DC into next CH. SC into next CH. Repeat from ** across. (10)
Row 2-6: CH 3(Counts as first DC) SC into the next stitch. **DC into the next stitch. SC into the next stitch. Repeat from ** across.  (10)
Drop your original color of yarn.Do not finish off. Attach contrasting color.  You will pick up your original yarn after the next two rows.
Row 7-8: CH 3(Counts as first DC) SC into the next stitch. **DC into the next stitch. SC into the next stitch. Repeat from ** across.  (10)
Finish off. Pick up your original color yarn. Slip stitch up the side of the last two rows so that you are starting in the same place you finished off the contrasting yarn. 
Row 9-14: CH 3(Counts as first DC) SC into the next stitch. **DC into the next stitch. SC into the next stitch. Repeat from ** across.  (10)
Drop your original color of yarn.Do not finish off. Attach contrasting color.  You will pick up your original yarn after the next two rows.
Row 15-16: CH 3(Counts as first DC) SC into the next stitch. **DC into the next stitch. SC into the next stitch. Repeat from ** across.  (10) 
Finish off. Pick up your original color yarn. Slip stitch up the side of the last two rows so that you are starting in the same place you finished off the contrasting yarn.
Repeat rows 9-16 twelve more times.

Edging and Joining 
Step 1: CH 1. Turn and work up the side of the steering wheel cover. 1 SC into the side of each SC and 1 SC into the side of each CH 3.
Step 2: CH 1, Turn and work back down this same side. SC into the first stitch. SC DEC. **SC into the next stitch. SC DEC. Repeat from ** across.
Step 3: Repeat steps 1-2 but on the other side of the steering wheel cover.
Step 4. Finish off leaving long tail for joining the ends. Join the ends and stretch around the steering wheel. It will be a good secure and snug fit.

Filed Under: Free Patterns, Household, Inspired Tagged With: crochet pattern, pattern, steering wheel, steering wheel crochet pattern, wheel

Free Car Console Cover Crochet Pattern

July 2, 2014 By stitch11 6 Comments

Car Console Cover Crochet Pattern

A couple weeks ago, my husband came home from work to tell me he found a Mercury Mountaineer for sale super cheap. The only thing was, the vehicle didn't have a key… and the inside looked like it had been chopped up by Edward Scissor Hands and then Edward tried to cover some of the damage up with bright green duct tape. >.<

I knew instantly I would need to cover a lot of the inside with yarn.. this console had to be the first thing. I couldn't lean against it without getting stuck to it… and then gagging because I have no idea what else has been stuck to it.

I am not complaining though, because not only did I get this for a really really good price, but it gives me another reason do do what I love, which is crochet.  🙂

This is fitting for the console of a 2001 Mercury Mountaineer. The console measurements are 7 inches wide and 14.5 inches long. This is made to fit snug.

[Read more…]

Filed Under: Free Patterns, Inspired

Free Eyeball Crochet Pattern- Family Fun

June 21, 2014 By stitch11 5 Comments

Free Crochet Eyeball Pattern

I wanted to crochet something to have an excuse to not only get out and find fun ways to use it, but also to have a need to go back to the craft store for more safety eyes! 😉

I bought the safety eyes at Hobby Lobby. They come in packs of 4-8 for about 99 cents – $1.50 a package. These are 15 mm eyes.

To crochet the eyes I used Red Heart Super Saver (worsted) yarn. I used a size E hook (3.5 mm).

Step 1: 6 SC into a magic circle. (Do not pull your ring completely closed, you will want to put the safety eyes through the hole, just not yet)
Step 2: 2 SC into each of the 6 SC from previous step.
Step 3-4: 1 SC into each of the 12 stitches.
Step 5: Put your safety eyes on and pull your ring tight.
Step 6: Make a total of 6 SC DEC.
Stuff the eyeball with cotton or scrap yarn.  Weave in your yarn end!

So much fun and they work up within a minute or two each!

Free Crochet Eyeball Pattern

Free Crochet Eyeball Pattern

Free Crochet Eyeball Pattern

Free Crochet Eyeball Pattern

Free Crochet Eyeball Pattern

Free Crochet Eyeball Pattern

Free Crochet Eyeball Pattern

Free Crochet Eyeball Pattern

Free Crochet Eyeball Pattern

This last one is my favorite. I wish I could have sat around waiting for someone to go into it! Btw, I did NOT do this one, my husband did. I refuse to walk into those things… I am a wuss and always feel like a snake will fly out of it! haha!

Filed Under: Costumes, Free Patterns, Inspired, Toys

Natures Color Combos

May 23, 2014 By stitch11 11 Comments

I discovered a baby blue bird in my back yard yesterday. I was able to walk right up to it and get a photo!  When I shared the photo with you all on Facebook, the comments made me want to have a go at making some color combo pictures. 😀 It is so much  fun that I immediately had to go out and take a couple more photos.

I enjoyed making these so much! Don't be surprised if you keep seeing these from me!

If you want to have a go with your own photo's, I used picmonkey to create these.

Baby Bird Color Combo


[Read more…]

Filed Under: Inspired

Free Crochet Party Supply Patterns!

May 9, 2014 By stitch11 Leave a Comment

Free Crochet Party Supplies

As the days get longer and the nights get warmer, many of us will be invited to more and more celebrations.
One of my favorite things about crochet, is that the warmer weather brings out the creativity in many of us fiber artists. Just because it isn't snowing, doesn't mean we have to stop creating and sharing! Celebrate your art and throw a party!

Cupcake Hat – Design by Repeat Crafter Me
Party Hats – Design by Easy Makes Me Happy
Ninja Masks – Design by Stitch11
Amigurumi Crochet Balloons – Design by Little Things Blogged
Crochet Gift Bags – Design by Darlene Dale
Perfect Party Bunting (with free Alphabet available too!!) – Design by Moogly
How to Crochet a Tutu – Design by Stitch11
How to Crochet a Hawaiian Lei – Design by Stitch11
Kings Crown (with free princess crowns and Rapunzel hat available too) – Design by Stitch11

Filed Under: Free Patterns, Inspired, Round Ups

  • 1
  • 2
  • 3
  • 4
  • Next Page »
  • Email
  • Facebook
  • Pinterest
  • RSS

Stitch11 is a Red Heart Blogger!

unnamed

.

Grab My Button

Archives

Privacy Policy

Copyright © 2026 Stitch11.com · All Rights Reserved · Log in