Get the ad-free, printable PDF here
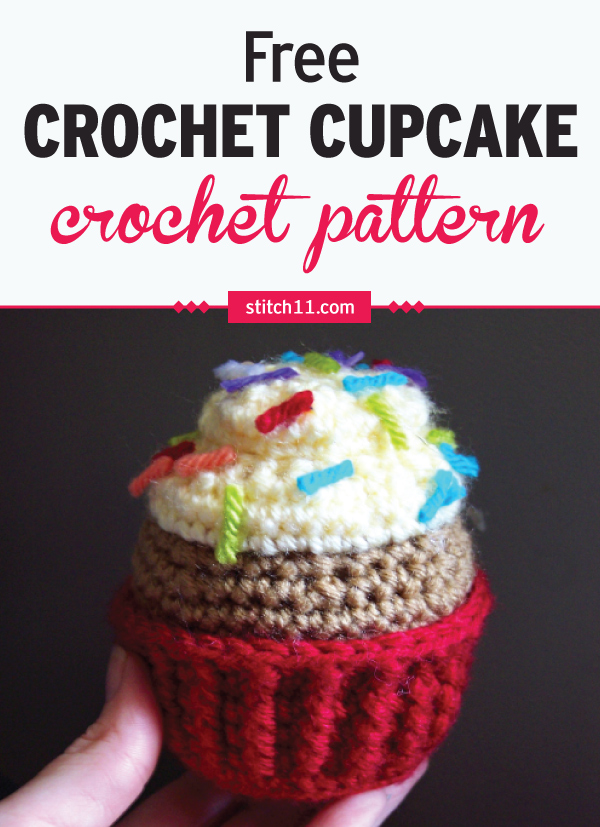
After hours of searching for the cupcake crochet pattern I had in mind, I decided I would have to design one myself!
I wanted it to look like it was on the cupcake paper, with a little cake showing, a nice swirl of frosting, and, of course, lots of sprinkles!
This is such a fun project to make for play food for kids or to celebrate a birthday or other special occasion with a treat longer lasting than a real cupcake.
And this is a perfect stash-busting crochet project because you can use any colors – and probably any weight – of yarn you have on hand to make this sweet surprise.
If you’re a lover of all things crochet toys, take a moment to learn how to make crochet toys from hexagons with the professionally filmed Crochet Anything with Hexagons video classes.
Cupcake Crochet Pattern
Skill Level: Easy
Materials:
• Hook:
– US Size I/9 (5.5 mm) crochet hook or size needed to obtain gauge
• Yarn: Worsted weight yarn
– 40 yds red (A)
– 20 yds brown (B)
– 20 yds white (C)
– Assorted color scraps for sprinkles
• Notions:
– Scissors
– Yarn needle
– Fiber fill
– Hot glue or craft glue for sprinkles
– Marker
Size:
• Circumference: 4 inches
• Height: 5 inches
Gauge:
12 sc x 15 rnds = 4 inches
blo Back loop only ch Chain flo Front loop only fpdc Front post double crochet rnd Round sc Single crochet sc2tog Single crochet next 2 sts together sl st Slip stitch st(s) Stitch(es)
Pattern
WRAPPER:
With A, make a magic circle.
Begin working in continuous rnds – do not join unless indicated. Mark the first st of each rnd.
Rnd 1: 8 sc in magic circle. (8 sc)
Rnd 2: 2 sc in each st around. (16 sc)
Rnd 3: [2 sc in next st, sc in next st] around. (24 sc)
Rnd 4: [2 sc in next st, sc in each of next 2 sts] around. (32 sc)
Rnd 5: [2 sc in next st, sc in each of next 3 sts] around. (40 sc)
Partial rnd: Sc in each of next 4 sts, sl st in next st.
Begin working in joined rnds. Join rnds where indicated with a sl st in first st of rnd.
Rnd 6: Ch 1, sc in blo of each st around, join.
Rnds 7-10: Ch 1, fpdc around first st, sc in next st, [fpdc around next st, sc in next st] around, join. (20 fpdc, 20 sc)
Rnd 11: Ch 1, fpdc around first st, sc in flo of next st, [fpdc around next st, sc in flo of next st] around, join. (20 fpdc, 20 sc)
Fasten off. Remove any markers. Weave in all ends.
CAKE:
Join B with sl st in blo of any st on rnd 11.
Begin working in continuous rnds – do not join unless indicated. Mark the first st of each rnd.
Rnd 12: Sc in blo of each st around. (40 sc)
Rnd 13: Sc in each st around.
Rnd 14: [Sc2tog, sc in each of next 3 sts] around. (32 sts)
Rnd 15: [Sc2tog, sc in each of next 2 sts] around. (24 sts)
Partial rnd: Sc in each of next 2 sts, sl st in next st.
Fasten off. Remove any markers. Weave in all ends.
ICING:
Join C with sl st in flo of any st on rnd 15.
Continue working in continuous rnds – do not join unless indicated. Mark the first st of each rnd.
Rnd 16: 2 sc in flo of each st around. (48 sc)
Rnd 17: Sc in each st around.
Rnd 18: Sc2tog around. (24 sts)
Rnd 19: Sc2tog around. (12 sts)
Rnd 20: 3 sc in each st around (36 sc)
Rnd 21: Sc in each st around.
Rnd 22: Sc2tog around. (18 sts)
Rnd 23: Sc2tog around, join with sl st in first st. (9 sts)
Fasten off leaving a long tail for sewing.
Sew the tail through each stitch then pull tight to close the top of the icing.
Weave in all ends.
SPRINKLES:
Cut scraps of yarn into 1/2 inch pieces. Glue to top of icing as desired.
If you like crochet desserts, check out the Ice Cream pattern and Donut pattern too!

Thank you for posting free patterns. I crochet “food” stuffed with fiber fill and catnip and donate them to animal rescue groups for fundraising. The bakery items are a huge hit. I am currently working on vegis because one of the groups I support is attending a Veggie Fest with a booth. I call my product Purrfect aMEWSments and my mission has always been to encourage other talented crafters to do the same. This has been the best volunteer gig ever. Netflix, tea, yarn and “magic wands” (crochet hooks). My labour of “love is a four-legged word” led to the Texas Chihuahua Rescue Ontario Canada Chapter, and you guessed it, I am currently a foster mom to Tyler a new arrival. Kindness counts.
I started with “hats furr cats”, “togs furr dogs” and after meeting the Chihuahuas, sombreros…
I would be happy to share any of my original patterns.
How awesome!!!!! I would love to see some of your work.
Hello! I was wondering how you fpdc over next stitch? The part I’m confused about is the over the next stitch part. Thank you so much:)
When you FPDC you are working around the stitch instead of into the top of it. If you have never done the FPDC I would suggest watching this video. https://www.youtube.com/watch?v=XYXKkSn8DJY
Hi Corina,
I’m struggling with the FPDC rounds, the pattern of ‘ridges’ has emerged as I complete the rounds, however they are spiralling up to the left. Do you know why this might be happening.
I’ve watched the video you posted and I am doing the FPDC correctly, but it doesn’t work!!
Any help would really be appreciated, I love the pattern!
Abbie
Going to try to make this right now! Wish me luck!
Thank you so much for sharing your pattern with all of us <3 It is so cute and definately the nicest one I have seen and it works just perfectly <3
Have a nice day!
Nicole from Germany
Perfect directions thank you!
Hello, I have a question about some of the instructions, I seem, while increasing the base of the cupcake, only to be able to increase from 32 to 40 rather than 32 to 45. What might be the issue? Is it a mistype?
Thanks :),
Sam
I was wondering the same, but think it must be a typo as Row 6 only has 40 stitches but with no decreases.
Please review row 5
Definitely doesn’t work out to 45 stitches
Please review row 6 as well
How did you get to 40 stitches when there were 45 in the previous round,no decrease mentioned
I belong to a group who make fidget mats for Alzheimer patients and I knit fidget sleeves. I crochet all the decorations for the sleeves and the bigger items for the mats, We are called the. Fidget Chicks
For those of you having trouble with rounds 5/6. Just do this..
Round 5- *2 SC into next stitch. 1 SC into each of the next 3 stitches. Repeat from * 8 times. (40 stitches)
Round 6 – SC into backloops of every stitch (40 stitches…
then you’ll be on track for the rest of the pattern
Hi! I have one question, I’m kind of stuck in round 7.. it says to do 1 chain before every FPDC so I did and I’m left with 60 stitches instead of 40… 🙁 I’m I doing something wrong? do i need to skip a stitch for the next sc?
Really cute pattern. I used cotton yarn and couldn’t get my cup to have the ridges like in the photo so I ended up doing FPDC and BPDC and it worked much better. I also used a 3.5mm hook, I tried with a 5mm and it was way too big. I didn’t get the definition of the full, clean edge between the cup and the cake, the instructions say to go into the back loop but I’m wondering if it should be into the back loop of the second row down so as to not distort the top chain. Anyways, with a few little tweaks super cute and easy 🙂
Thanks for the pattern!