Get the Ad-free PDF Pattern here!
Some of you may already know how much my daughter loves Care bears. A few months ago I made her the “Backpack to Care-A-Lot“. Ever since then, she has been begging me to make her a Grumpy Bear. Mr Grumpy has been pushed back on my list for too long! Finally, my most reliable customer came to me requesting one! Of course this made my daughter happy because I would have to make a few of them during the pattern writing process. 😀 I hope you love this free Grumpy Care bear pattern as much as we do!!
If you enjoy crocheting toys for the little people in your life, check out these incredibly cute stuffies in the Crochet Anything with Hexagons class.
Skill Level: Easy / Intermediate
Materials:
Hook: Size: N-9 MM Crochet Hook
Yarn:
- Less than two balls of Blue Bernat Baby Blanket Yarn. Each generation of care bears have a slightly different color. Match the yarn color to what generation you are going for.
- Half a ball of White Bernat Baby Blanket Yarn
Notions:
- Dark Blue Felt
- Red Felt
- Black Felt
- Hot glue gun
- 2 – 15 mm Safety eyes
- Fiber Fill – stuffing
| ABBREVIATIONS | DESCRIPTION |
|---|---|
| MC | Magic Circle |
| sc | Single crochet |
| hdc | Half double crochet |
| blo | Back loop only |
| HDC DEC | Half Double Crochet Decrease |
| SC DEC | Single Crochet Decrease |

Legs (Make Two)
Using the blue yarn
Round 1: Magic Circle. 3 SC into magic circle. 3 HDC into magic circle. 3 SC into magic circle. Join to first SC and pull ring tight. (9 stitches)
Round 2: CH 1. SC into same stitch. 2 SC into the next stitch. SC into the next stitch. 2 HDC into each of the next 3 stitches. SC into the next stitch. 2 SC into the next stitch. SC into the last stitch. Join to first SC. (14 stitches)
Round 3: For this round you will be working in back loops only. CH 1. SC in same stitch. SC in next 3 stitches. HDC DEC 3 times. SC in last 4 stitches. Join to first SC. (11 stitches)
Round 4: CH 1. SC in same stitch and next 2 stitches. HDC DEC. HDC into next stitch. HDC DEC. SC into last 3 stitches. Join to first SC. (9 stitches)
Round 5-7: CH 1. SC into same stitch and each stitch around. Join to first SC. (9 stitches) Finish off.
Belly & Body
Start with white yarn
Round 1: Magic Circle. 9 SC into magic circle. Pull ring tight and join to first SC. (9 stitches)
Round 2: CH 1. 2 SC into each SC. Join to first SC. (18 stitches)
Round 3: CH 1. 2 SC into first stitch. 1 SC into the next stitch. **2 SC into the next stitch. 1 SC into the next stitch. Repeat from ** 7 more times. Join to the first SC. ( 27 stitches)
Change to blue yarn
Round 4: CH 1. SC into each SC around. Join to first SC. (27 stitches)
Round 5: CH 1. SC into same stitch and next 3 stitches. 2 SC into next stitch. SC into each of the next 4 stitches. 2 SC into the next stitch. HDC in next stitch. 2 HDC into next stitch. HDC in next stitch. 2 HDC into next stitch. HDC into next stitch. 2 HDC into next stitch. HDC in next stitch. 2 SC into the next stitch. SC into next 4 stitches. 2 SC into the next stitch. SC into the next 4 stitches.Join to first SC. (34 stitches)
Round 6: CH 1. SC into each stitch around. Join to first SC. (34 stitches)
Round 7: CH 1. HDC in same stitch and in next 9 stitches. SC in next 14 stitches. HDC in last 10 stitches. Join to first HDC. (34 stitches)
Round 8: CH 1. HDC in same stitch and next 7 stitches. ** SC DEC. SC in next stitch. Repeat from ** 5 more times. HDC in last 8 stitches. Join to the first stitch. (28 stitches)
Round 9: CH 1. HDC in same stitch and next 7 stitches. ** SC DEC. SC in next stitch. Repeat from ** 3 more times. HDC in last 8 stitches. Join to the first stitch. (24 stitches)
Round 10: CH 1. SC DEC 12 times. Join to first stitch. (12 stitches)
Finish off leaving over 4 ft long tail. Stuff the body. Weave yarn end around and pull tight to close hole. Now to make the tail. Take your hook and insert it into a stitch below the yarn end. **CH 5. Slip stitch back into the butt of the bear. Repeat from ** 2 more times. Weave in your end.
Note: The HDC from rounds 7-9 is the bears butt.
Stuff the legs and attach to the body.
Nose
Using white yarn
Round 1: Magic circle. 7 SC inside magic circle. Pull ring tight and join to first stitch. (7 stitches)
Round 2: CH 1. 2 SC into each SC around. Join to first stitch. (14 stitches)
Finish off leaving long tail for attaching later.
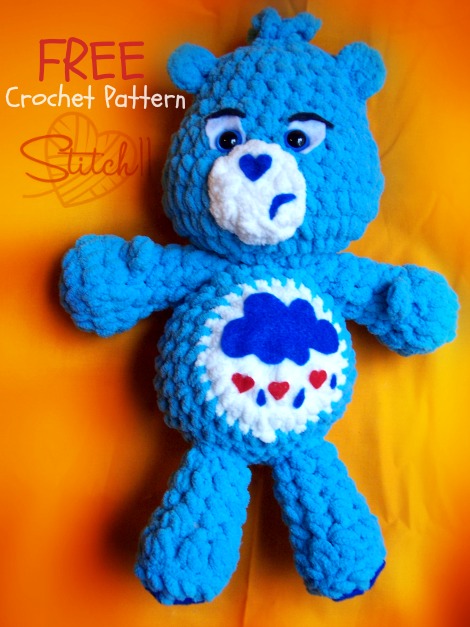
Make a small dark blue heart out of felt for the nose. Also cut out a grumpy frown. Hot glue the heart and frown onto the white nose piece.
Set aside.
Head
Using blue yarn
Round 1: Magic Circle. 9 SC into magic circle. Pull ring tight and join to first SC. (9 stitches)
Round 2: CH 1. 2 SC into each SC. Join to first SC. (18 stitches)
Round 3: CH 1. 2 SC into first stitch. 1 SC into the next stitch. **2 SC into the next stitch. 1 SC into the next stitch. Repeat from ** 7 more times. Join to the first SC. ( 27 stitches)
Round 4: CH 1. SC into same stitch and next 4 stitches. **2 SC in next stitch. SC into each of the next 3 stitches. Repeat from ** 3 more times. 2 SC in next stitch. SC in last 5 stitches. Join to first stitch. (32 stitches)
Round 5: CH 1. SC in same stitch and next 9 stitches. 2 SC in next stitch. SC in next stitch. 2 SC in next stitch. SC in next 6 stitches. 2 SC in next stitch. SC in next stitch. 2 SC in next stitch. SC in last 10 stitches. Join to first stitch. (36 stitches)
Round 6: CH 1. SC into each stitch around. Join to first SC. (36 stitches)
Round 7: CH 1. SC in same stitch and next 7 stitches. SC DEC. HDC in next 5 stitches. SC DEC. SC in next 2 stitches. SC DEC. HDC in next 5 stitches. SC DEC. SC in last 8 stitches. Join to first stitch. (32 stitches)
Round 8: CH 1. SC in same stitch. and next 5 stitches. SC DEC. SC in next stitch. HDC in next 5 stitches. SC DEC. SC in next stitch. SC DEC. HDC in next 5 stitches. SC in next stitch. SC DEC. SC in last 5 stitches. Join to first stitch.(28 stitches)
Round 9: CH 1. SC in same stitch and next 4 stitches. SC DEC. SC in next 4 stitches. SC DEC. SC in next 3 stitches. SC DEC. SC in next 4 stitches. SC DEC. SC in last 4 stitches. Join to first stitch. (24 stitches)
Round 10-12: CH 1. SC into each stitch around. Join to first SC. (24 stitches) DO NOT FINISH OFF.
Attach nose piece between the HDC of rounds 7 and 8. The top of the white nose piece should line up with the top of round 8 and the bottom of round 5.
Make two ovals out of the white felt. cut the bottom of the ovals into a straight line. Put a small slit at the bottom of the ovals so you can get the safety eyes through the felt.
Cut eyebrows with the black felt. The eyebrows are a stretched out S shaped line. Hot glue the white felt onto the face. (making sure to not put glue where the eyes will go through.) Attach the safety eyes. Hot glue the eyebrows onto the face.
Round 13: CH 1. **SC DEC. SC into next stitch. Repeat from ** 7 more times. Join to first stitch. (16 stitches.)
Stuff the head.
Round 14: CH 1. SC DEC 8 times. Finish off leaving over 4 ft long end. Weave in around and pull tight to close the hole. Take your hook and insert it into a stitch below the yarn end. **CH 5. Slip stitch back into the top of the head. Repeat from ** 2 more times. Weave in your end. Attach the head to the body. I attached the head between round 2 and 3. Giving it a secure connection.
Get the Ad-free PDF Pattern here!
Arms (make two)
Using blue yarn
Round 1: Magic Circle. 8 SC into magic circle. Pull ring tight and join to first stitch. (8 stitches)
Round 2: CH 1. 2 SC into each stitch around. Join to first stitch. (16 stitches)
Round 3: CH 1, SC into each stitch around. Join to first stitch. (16 stitches)
Round 4: CH 1. SC DEC 4 times. CH 2. Skip 1 CH. HDC into next CH. CH 1. Slip stitch into same CH that your HDC is in- (makes thumb). Continue with 4 more SC DEC. Join to first stitch. (8 stitches not including thumb)
Round 5: CH 1. SC into each stitch around. Be sure to skip the thumb, working behind it. Do not stitch into the thumb. Join to first stitch. (8 stitches)
Round 6-9: CH 1. SC into each stitch around. Join to first stitch. (8 stitches)
Finish off leaving long tail. Lightly stuff. Attach to the body. I attached mine into the crease between the body and the head.
Cut a cloud shape out with blue felt.
Cut 3 small rain drops out of blue felt.
Cut 3 small hearts out of red felt.
Cut a heart about the same size as the nose heart for his butt.
Cut 2 hearts for the bottom of the feet.
Using the photo or Google images for guidance, hot glue the pieces onto the bear. Now for the last part! The EARS (I almost forgot about them until my daughter asked where they were)
Make two
Magic Circle. 6 SC into the magic circle. Pull ring tight. DO NOT JOIN. Finish off and attach to the bear's head. And that's it, you're officially done crocheting Grumpy Bear.
And that's it, you're officially done crocheting Grumpy Bear.
Remember, if you enjoy crocheting toy animals, take a peek at the Crochet Anything with Hexagons class.

Thank you Thank you for this pattern. I grew up with the care bears in the 1980’s and 90’s and collected most of them. When my sister was sick and in the hospital she had to have some procedures the doctors let her keep her Grumpy Bear with her. Mind you she was 20 years old. Unfortunately she is no longer with us but her bday was this past Saturday the 4th so it’s a sign I have to make this in memory of her. Can’t wait.
I actually had the pattern together on the 4th! I decided to wait until I could make a couple more and correct any errors before posting. <3
I’m want to make your bear in pink an put the cancer ribbon on belly.
Great idea!
love trying new patterns; have a lot of kids that I do patterns for
how long did it take yu to make this??
Less than a day for each carebear I have made. That’s with being a house wife and momma all at the same time 🙂
If I download these patterns, will they still be saved to my computer after you delete them on the 1st? Not sure how that works. Great patterns, thank you!
yeah they will be.
Another question. Is hitting the download button supposed to download this pattern? I tried it and it downloaded a bunch of programs that I don’t want and messed up my computer.
Use the Print Friendly icon at the end of the post 🙂 It should give you a pdf option.
Though “grumpy” he is too cute. Again, thank you for sharing your expertise.
Cheers,
Lyric
Are you using 2 threads held together? I may have missed that instruction.
No, I was using baby blanket yarn.
Nice pattern, How big is the finished doll?
Is round 4, I’m only counting 30 stitches in your pattern. Where do the extra 2 come in?
I grew up with these guys and I love the pattern so much that I made all original 10 bears. I wish I could show you a picture of them, they are adorable! Thanks for sharing this easy pattern!
Is there a way to print this out?
I can hardly crochet a scarf !, would this be too hard for a beginner ? Also what is the magic circle ? I msy have to have my friend make him for me.