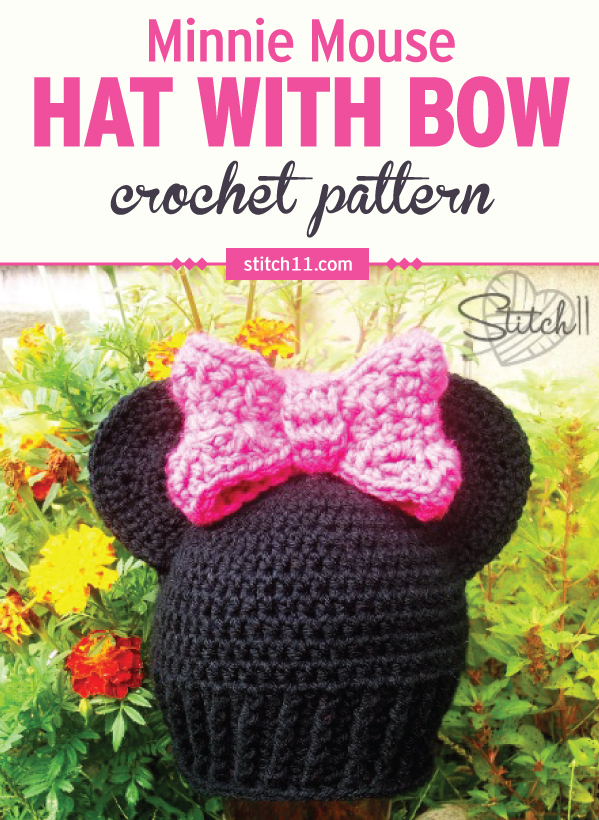
This Minnie Mouse Hat Crochet Pattern is perfect for little ones who are big fans of Miss Minnie Mouse.
When I was first learning how to crochet, a local mom came to me while shopping in the baby food aisle at Walmart. She told me she LOVED my daughter's hat (first and the only thing I had made at the time) She offered me 20 dollars to make her daughter a hat too! I was so shocked and excited!
Now 2.5 years later, she has come back! She wanted to know if I could make her daughter a Minnie Mouse hat. How exciting is this? We will both get to see how far I have come since that first sale. And… not to mention the fact that she came back in the first place 😉 I told her I felt sorry for all the people who paid me for hats when I was first learning to crochet. She was quick to tell me they still love and admire the hat, but that her beautiful daughter has simply outgrown it. So here we go!
This pattern is designed for 3-5 year olds.
Minnie Mouse Hat Crochet Pattern
Supplies
I/9 – 5.5 mm crochet hook
black med-worsted weight yarn (I used I Love This Yarn)
Yarn needle
You will also need…
#5 Pink Bulky Weight Yarn and a 6.5 mm crochet hook for the bow
Stitches Used
Magic Circle
CH- Chain
SC- Single Crochet
HDC- Half Double Crochet
FPDC – Front Post Double Crochet
FPSC – Front Post Single Crochet
You will also be using these stitches when making the bow
DC- Double Crochet
HDC-2-TOG
DC-2-TOG
The Beanie (Fits 3-5-year-olds)
You will be working in continuous rounds.
Round 1: Magic Circle. 10 HDC in the magic circle. (10)
Round 2: 2 HDC into each of the next 10 stitches. (20)
Round 3: **2 HDC into the next stitch. HDC into the next stitch. Repeat from ** 9 more times. (30)
Round 4: **2 HDC into the next stitch. HDC into the next 2 stitches. Repeat from ** 9 more times. (40)
Round 5: **2 HDC into the next stitch. HDC into the next 3 stitches. Repeat from ** 9 more times. (50)
Round 6: 1 HDC into each of the next 50 stitches. (50)
Round 7: 2 HDC into the next stitch. 1 HDC into the next 5 stitches. Repeat from ** 7 more times. HDC into each of the next two stitches. (58)
Rounds 8-13: 1 HDC into each of the next 58 stitches. (58)
Round 14: 1 HDC into each of the next 56 stitches. SC into the next stitch. Slip stitch into the next stitch. (58)
Rounds 15-19: CH 1, HDC into same stitch. FPDC over next stitch. ** HDC into next stitch. FPDC over next stitch. Repeat from ** around. Join to first HDC. (58)
Round 20: CH 1, FPSC into each stitch around. Join to first FPSC. (58)
Finish off and weave in your ends.
Ears
Round 1: Magic Circle. CH 1. 6 HDC into the magic circle. Do NOT join. Pull ring tight.(6)
Round 2: CH 1, turn. 2 HDC into each stitch across. (12)
Round 3: CH 1, turn. 2 HDC into the first stitch. 1 HDC into the next stitch. **2 HDC into the next stitch. 1 HDC into the next stitch. Repeat from ** across. (18)
Round 4: CH 1, turn. SC into next 4 stitches. 2 SC into the next stitch. HDC into next 3 stitches. 2 HDC into each of the next two stitches. HDC into next 3 stitches. 2 SC into the next stitch. SC into next 4 stitches. (22)
Round 5: CH 1, turn. SC into next 6 stitches. 2 SC into the next stitch. HDC into next 3 stitches. 2 HDC into each of the next two stitches. HDC into next 3 stitches. 2 SC into the next stitch. SC into next 6 stitches. (26)
Round 6: CH 1, turn. SC into next 8 stitches. HDC into next stitch. 2 HDC into the next stitch. HDC into each of the next 6 stitches. 2 HDC into the next stitch. HDC into the next stitch. SC into next 8 stitches. (26)
Finish off and repeat for a total of 4 ears.
Layer 2 ears together and join from one side to the other with the slip stitch. No need to join the bottom, you will do that when attaching it. This will make it a thicker and stronger ear. Attach the ear to the hat and repeat for the other ear. I attached my ears across rounds 2-9.
Now all you need to do is make your Minnie Mouse Bow and attach it in front of your ears.
When I attached my bow, I used black yarn and not only attached the bottom center to the hat, but I also attached it to the ears a little bit.

How would I make this larger? For a 7 year old.
I would just add one or two more rows to the length in the HDC rounds. The hat stretches really well and even stretches nicely over my head. 🙂
Round 6 is missing.
Thanks Harma for letting me know. It wasn’t really missing.. but the number was skipped >.< Haha! I fixed them. Thanks again.
Hi,
Love the pattern but I have a question . The hat in the picture is not the same – it body of the hat is like a basket weave. Is the one pictures above a smaller size version ? I like the appearance of the single crochet
Thank you
Lisa
You may like the hat portion better and sizes that Repeat Crafter Me has designed. I have her’s linked in the opening of this post.
Thanks for the pattern! Very beautiful work! I made it for my little cousin for her birthday and I just know she is going to love it!! Do you have other patterns somewhere else I could take a look at? Both free and paid patterns 🙂
Thank you! 😀
I have 145 free crochet patterns. No paid patterns. You can easily look through them on my Ravelry account. http://www.ravelry.com/designers/corina-gray
Does it flare out before you finish? Or I did something wrong…
It shouldn’t flare. The FPSC at the bottom of the beanie should make it thicker and stretchier just at the band.
Is row 15-19 supposed to be Front Post DOUBLE Crochet or should it be Front Post Double HALF Crochet???
Sorry if this is a dumb question i am new to crochet and am curious as to why we would use stitches of two different heights in the same row. I’m a little confused =S
Thanks.
Row 15 through row 19 use Front Post Double Crochet and the reason you would mix it with the HDC is because the height difference from doing a Double Crochet Post stitch makes it actually the height of a Half Double Crochet stitch. I hope I make sense?
I want to try to make this but the pattern doesn’t say how many to chain to make the magic circle. Thanks for your help.
There is a video linked for how to make the magic circle. If you don’t know how to make the magic circle, you can chain three and join to make a circle.
I’m having a tough time atraching the ears. How did you do it?
Hmm, Im not sure how else to explain it.. but maybe this will help? http://www.mooglyblog.com/whip-stitch-seaming/
the only i didn’t like about this pattern there no sl stitch till you to the end and that makes it hard to tell where my rows are ending .
Stupid question – What does the ** mean in your directions? Im a beginner. Like… just started YESTERDAY lol…. I accomplished the magic circle and have practiced all of the rest of the stitches in your directions – but just cant figure out what ** could mean. HELP!? lol
If you read on through that round, you will see it say “repeat from ** ” So really, it just marks the spot that you will go back to when repeating steps. 🙂 Most designers will only use one star, but I find two stars to be easier to spot when a pattern can seem so busy/chaotic 😉
I followed your Minnie mouse pattern. LOVE IT!!!! I used red not pink.. and added the ribbing of red at bottom.. and put polka dots on the bow… thank you for the pattern very much…
Pattern expired?
Yes, because of copyright laws on the Disney characters I decided to take most of my character patterns down until I know I can share them legally.
As long as you don’t make it to sell I would think you’re ok. I really do hate Disney. Even if you sold it I’m sure it would be pennies for them. I hate the greediness of these big companies.
Love the hat! I am wondering if I could get the pattern for the bow? Thank you!
Sure can! 🙂 https://stitch11.com/botique-bow/
Hi! I’ve made this hat once and my niece LOVED it. I had started another but paused while I was sick and all I need yet are the ears! I can’t remember how the were made and I prefer the partial ears over full circle pieces as they’re easier to attach (:
I will email you. 🙂
Lovely hats
Great hat! I love it and I’m making it now. Is round 20 supposed to be Front Post Double Crochet? If not, what does FSC stand for? Thanks so much =)
Thank you for letting me know. It is supposed to read “FPSC” Front post Single Crochet around.
in round 20, you have FSC, which is Foundation Single Crochet… How do you do that at the _end_ of a pattern??? They’ve always been used at the beginning of a pattern, so I’m really confused…
Oh wow! Thank you for letting me know. It is supposed to read “FPSC” Front post Single Crochet around. Thanks again for letting me know so I could correct it!
How can I make this for a 16 month old?
Thank you
I would skip the last increase round and maybe a round or so in the length. You can check measurements online too if you aren’t sure. Or, you can use your favorite beanie pattern and come back here for the edging and ears?
Is this pattern in US terms? As a beginner, It’s the thing I’m having the most difficulty getting my head around!