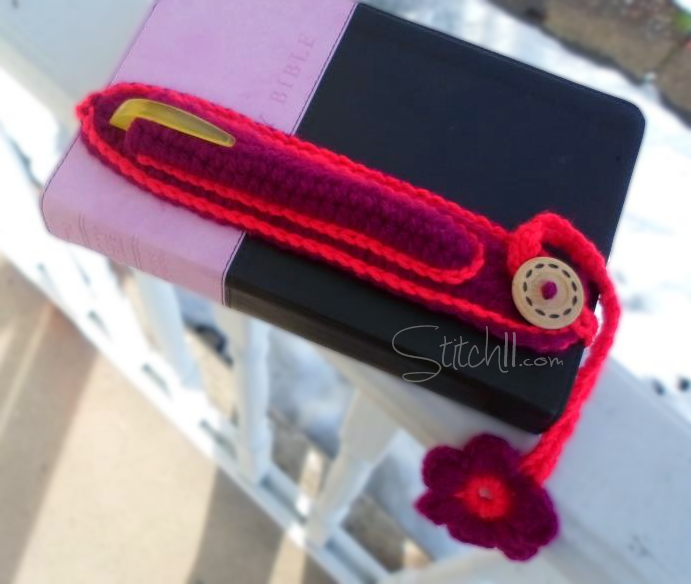
Once a week, a few members of my family and I meet up for a Bible study. It never fails, I always forget my highlighter and pen. This week, I had an *aaaah* moment when I realized I could design something to attach to my Bible that could hold and store my highlighter. Eliminating my problem of not knowing what to do with my highlighter when its not in use. I present to you “Penzy”– A FREE crochet pattern for a highlighter/Pen holder for books. Penzy has an adjustable strap making it perfect for all books no matter the size!
Supplies:
Medium weight yarn (I love this yarn)
F/5- 3.75 mm crochet hook
Yarn Needle
1 inch button
Stitches
CH-Chain
SC-Single Crochet
HDC- Half Double Crochet
Slip Stitch
Part 1:
Step 1: CH 30, turn, skip one CH, HDC down the CH. (29 HDC)
Step 2-3: CH 1, turn, HDC into each stitch. (29 HDC)
Step 4: *SC around the ouside edge* CH 1, SC into each stitch across —
SC into same stitch, SC into the side of row 3, row 2, and row 1, SC
2 times into the corner. SC between each stitch across (bottom of row
one) SC twice into the last stitch. SC into the side of row 1, row 2,
and row 3. SC into starting stitch. Join to first SC.
Finish Off and weave in ends.
Part 2:
Step 1: CH 25, turn, skip one CH, HDC down CH (24 HDC)
Step 2-3: CH 1, turn, HDC into each stitch. (24 HDC)
Finish off and weave in ends
Change Colors
Part 3:
Place part 2 centered on top of part 1.
Starting at top corner, slip stitch Part 2 onto part 1. Joining down
the side, across the bottom and back up the other side. LEAVING THE
TOP OPEN. ~~Tip: I started with my first stitch of Part two lined
with the 4th HDC of part one. I then slip stitched through the edge
of Part 2, butt hrough the HDC of part 1. Leaving the SC of part 1 on
the outside edge~~
Part 4:
Step 1: Atatch yarn to top center stitch, slip stitch around the
outside edge. Once you have slip stitched the entire way around, Slip
stitch back into the stitch you started in.
Step 2: CH 65, turn, skip one CH, SC into next CH. ** Skip 3 CH, CH
3, SC into next CH. Repeat from ** down the CH. You will have 3
chains left. CH 3, skip those 3 CH and slip stitch into the starting
stitch.
Finish off and weave in ends.
You can add anything you wish to the end of the button hole strand. I used this Puff Stitch Flower written by EasyMakesMeHappy. I had considered making a heart, a cross, or even just a pom pom to add to the end.

This is cute and awesome!!!! ^_^
Thank you for your creativity! I kinda have the same issue with my pen and highlighter 😛
Love the idea behind this. I Posted this and a few of your other patterns on crochetatplay.com.
We have over 22,000 free crochet patterns and growing!
Megan
Thank you Megan!!!
What a great idea! I love that you created a solution for your problem, using crochet! Thanks for sharing at Hookin On Hump Day!
Pure genius!! Thank you!