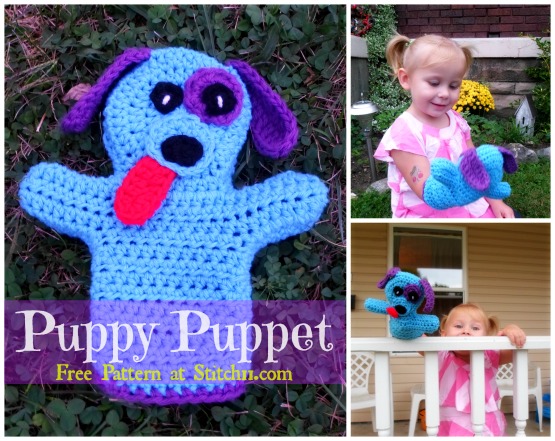
Last year I had written puppet patterns for a Snake and a Lion. My daughter loved them both so much that I knew I wanted to make more. I have finally sat down and figured out an even BETTER puppet than ever before 🙂 I made this one with cotton yarn so we can also use it during bath time! I hope you can give some smiles by using this free pattern too!
Stitches
Slip Stitch
CH – Chain
SC – Single Crochet
HDC – Half Double Crochet
DC – Double Crochet
Supplies
Medium weight yarn (I used cotton)
H-5 mm crochet hook
Yarn needle
Get Started!
Body (make 2) (I used blue Peaches and Creme Cotton)
Round 1: Magic circle, 10 HDC into magic circle. Join to first HDC. Pull ring tight. (10 HDC)
Round 2: CH 1, 2 HDC into each HDC. Join to first HDC. (20 HDC)
Round 3: CH 1. 2 HDC into first stitch. HDC into next stitch. **2 HDC into next stitch. HDC into next stitch. Repeat from ** around. Join to first HDC. (30 HDC)
Round 4: CH 1, 2 HDC into first stitch. HDC into next 2 stitches. **2 HDC into next stitch. HDC into next 2 stitches. Repeat from ** around. Join to first HDC. (40 HDC)
Now you will start working in rows.
Row 1: CH 1, HDC into same stitch and next 8 stitches ( 9 HDC)
Finish off.
Row 2: CH 8 And then slip stitch into the stitch where you finished off. Slip stitch into next 8 HDC. CH 9, turn. Skip 1 CH. HDC into next 8 chain. HDC into each of the 9 HDC. (over the slip stitch) HDC into next 8 CH. (25 HDC)
Row 3-4: CH 1, Turn, HDC into same stitch and next 24 stitches. (25 HDC)
Row 5: CH 1. Turn, Slip stitch into same stitch and next 6 stitches. CH 1, HDC the same stitch and into next 10 stitches. (11 HDC)
Row 6-14: CH 1, turn, HDC into same stitch and next 10 stitches. (11 HDC)
Row 15: CH 1, SC around the entire piece. (1 SC for each HDC. 2 SC on the corners. & when you get to the part of the arm that has slip stitches, SC right over the slip stitch- not into it) Join to first SC. Finish off. and weave in your ends.
Repeat steps 1-15 for the other side.
Dog Face Parts
Eye spot (I used Peaches and creme purple)
Round 1: Magic circle, 8 SC into magic circle. Join to first SC. Pull ring tight. (8 SC)
Round 2: CH 1, 2 SC into each SC. Join to first SC. (16 SC)
Finish off leaving long tail for attaching.
Nose snout (I used the same blue as the body)
Round 1: CH 3. Skip first CH. 2 HDC in next CH. 4 HDC into next CH. Work around the other side and put 2 more HDC into starting CH. Join to first HDC. (8 HDC)
Round 2. CH 1, SC into each HDC 2 times. Join to first SC. (16 SC)
Finish off leaving long tail for attching
Nose (I used black I love this cotton)
Round 1: Magic circle. SC, HDC, DC, HDC, SC, HDC, DC, HDC. All in magic circle. Join to first SC. Pull ring tight.
Finish off leaving long tail for attaching.
Eyes (make 2) ( I used black I Love This Cotton)
Round 1: Magic circle, 8 SC into magic circle. Join to first SC. Pull ring tight. (8 SC)
Finish off leaving long tail for attaching.
With a small amount of white and a yarn needle add a sparkle in the eyes
Tongue ( I used Red – Redheart)
Round 1: CH 6, Turn Skip first CH, HDC into next 4 CH. 5 HDC into last CH. Working up the other side of the CH, HDC into next 4 CH.
Finish off leaving long tail for attaching.
Ears (make 2) ( I used Purple Peaches and Creme)
Round 1: CH 11, Skip first 2 CH. DC into next 8 stitches. 5 DC into last CH. Working up the other side of the CH, DC in next 8 CH.
Finish off leaving long tail for attaching.
Ok, lets get to work! This is when I wove in my ends- not the tails we left for attaching- but all the other ends!
Next up, I attached the one eye onto the eye spot. Then attached both eyes onto the face.
Then I attached the tongue onto the back of the nose snout. The nose onto the nose snout… and attached the snout and nose onto the face. Leaving the tongue floppy.
Now hold the front and the back of the dog together… with the face on the inside.. (inside out) and SC around the edge of the two pieces to join and make it one pig puppet pocket.Make sure to start by the opening and finish on the other side of the opening to leave the hole for your hand to fit though.
Flip the piece right side out and attach the ears! Take your contrasting color and do a SC trim around the opening for a great finished look. Ta-Dah!

This is so cute. All your items are, of course and thank you for the wonderful patterns. I don’t think we thank people enough for all the wonderful things they think up. love Carol
Adorable! Great idea to make out of cotton:@)
I pinned the pattern. This so cute. Thanks for sharing it. I dropping in from hookin on hump day. Have a great day!
Thanks so much for this pattern! It was so easy to follow, and turned out perfectly. I made it for a Christmas present for my toddler boy. I am so proud of myself for making it, that i want to show it off to the world! Thanks again!
I would love to see! You are welcome to share it with me through my Facebook page https://www.facebook.com/stitch11page Thank you so much for sharing some feedback! <3
I read online that you made the Puppy hand puppet and I am starting it also. I am confused by the pattern. Where it tells you to “finish off” and then Chain 8 (Row 2) can you tell me what the Chain 8 is for? Also, at the middle of row 2 you are supposed to chain 9 and then turn and confused about the purpose of the chain 9 stitches are for also. Any heop is appreciated. Thanks. Kathy
You are making chains or both sides of the puppet to start the arms.
I love this dog puppet, he’s so cute, I think using cotton is a good idea, it makes it easier for regular washing.
Puppets are one of the most creative gifts that a child can receive. I love them! It is difficult to find such crochet patterns on line. So glad I came across your’s! I made the lion one and it turned out so cute. Now I will try this puppy one. I belong to a crochet ministry group. We make comfort items for hospitalized patients. I enjoy finding and making children’s items that can bring some cheer and company to them during what can be a scary time during their illness. Keep your patterns coming!
Thank you so much for the comment! It helps motivate me to keep sharing. Much love <3
Thank you for the adorable pattern, Corina. I look forward to making a cute puppy for a special little girl in my life very soon! Happy New Year 🙂