 About a year ago, a friend of mine took some amazing photos for me of the Chloe Hat and for my About Me. I promised her I would make her baby (who was still in her belly) a crochet item. I have started making things for her so many times in the past but never really loved anything enough to give her as a big “Thank You!” Last week I came across a pattern by Busting Stitches for a newborn suspenders and bow tie photo prop. That is the moment I decided I wanted to make clothing and a bow tie. I honestly wasn't wanting to write a pattern but after searching and searching for a free boy clothing pattern…. I had no choice but create something of my own.
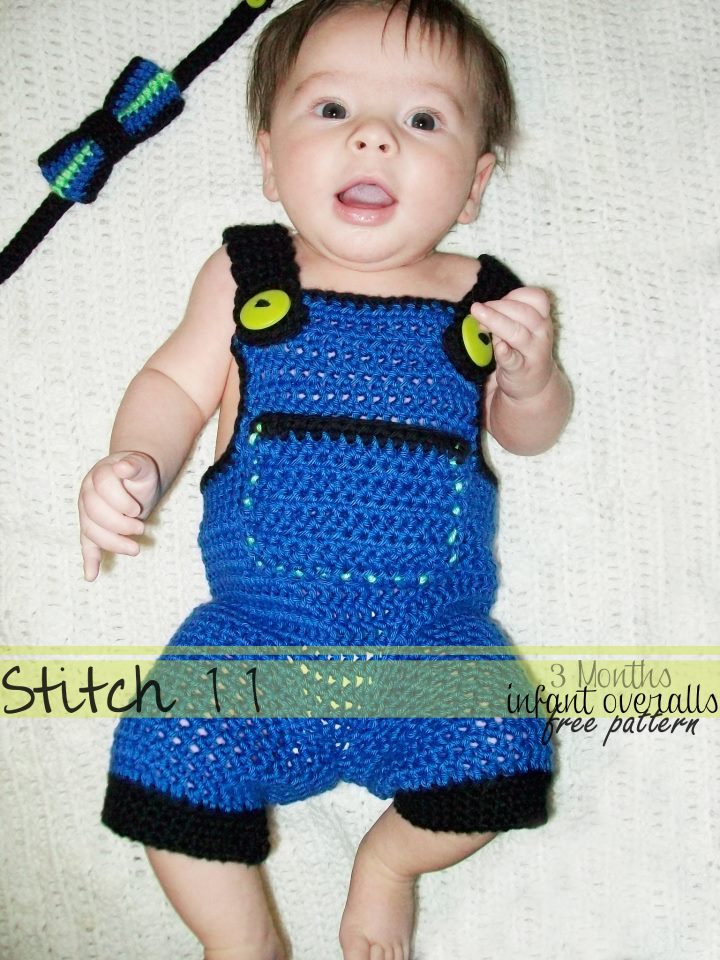
Wyatt (pictured above) is 13 lbs and is 4 months old. Since this is my first time really making clothing, I am not exactly sure if this outfit would be 0-3, 3-6, or 0-6 months in size- so “3 months” is what I will call it 😉 I did actually use measurements and 3-6 month clothing as a guide, but Wyatt is in 0-3 month clothing so “3 months” really seems safe.
This pattern is a very simple crochet pattern and ideal for even the crochet beginner. If you are not up for the “Foundation Chain” you can use the regular technique of chaining and shouldn't have any issues.
Crochet Supplies
1 Skein of blue “I Love This Cotton” Med Weight (4ply)
1/2 Skein of black “I Love This Cotton” Med Weight (4ply)
Small amount of green yarn Med Weight (4ply)
2 one inch green buttons
Yarn needle
5 mm Crochet Hook
Crochet Stitches Used
Foundation Chain
CH- Chain
SC- Single Crochet
HDC- Half Double Crochet
Slip Stitch
Here is a great video that I used to learn the Foundation Chain. It may look intimidating, but I promise you its easier than it looks and very much worth taking the time to learn.
Start Crocheting!
Starting on the trim of the legs. I used black yarn.
Round 1: Foundation Chain 37. Join to first Foundation Chain and make sure you do not twist the Chain.
Round 2-5: CH 1, SC into same stitch and each stitch around. Join to first SC. (37 SC)
I switched to blue yarn.
Round 6: CH 1, HDC in back loop of same stitch and into each back loop around. Join to first HDC. (37 HDC)
Round 7-12: CH 1, HDC into same stitch and each stitch around. Join into first HDC. (37 HDC)
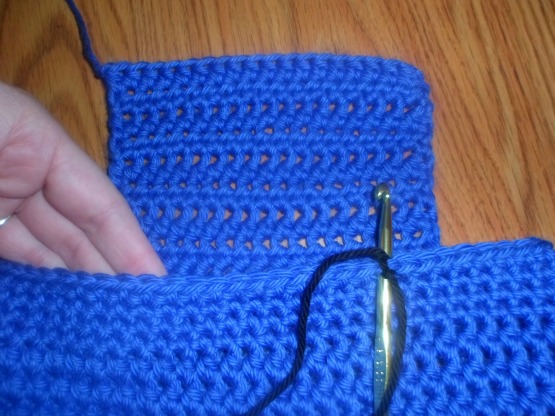
Finish off. Repeat steps 1-12 for second leg. Do not finish off second leg.

Round 13: Place the two pieces over each other, Slip stitch together the next 7 stitches like in the photo above. CH 1, HDC all the way around the outside, Join to first SC. (60 HDC)
Round 14-25: CH 1, HDC in same stitch and in each stitch around. Join to first HDC (60 HDC)
Round 26-29: CH 1, SC in same stitch and each stitch around. Join to first SC (60 SC)
Round 29-36: CH 1, HDC in same stitch and next 17 stitches. Turn. (18 HDC)
Finish off.
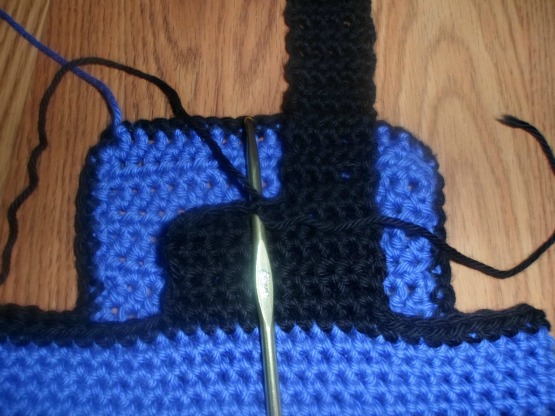
Laying the piece with the back facing you. Count left 15 stitches from the right side of the front piece just worked. Attach black yarn. Use the photo below as a guide.
Round 37: CH 1, SC into same stitch and into each stitch the entire way around the edge. Join to first SC. ((tip) When working up the side of the front flap, I SC once for ever HDC. And I SC twice into the corners)
Round 38-44: CH 1. SC into same stitch and next 10 stitches. Turn (11 SC)
Round 45-70: CH 1, SC into same stitch and next 4 stitches. Turn (5 SC)
Round 71: CH 1, SC into same stitch, CH 3, skip 3 stitches, SC into last stitch. Turn (2 SC)
Round 72-73: CH 1, SC into same stitch. SC 3 times into CH space. SC into last stitch. Turn (5 SC)
Finish off (Tip: I left a long tail. When weaving in my tail, I wove it back and forth the entire way around the button hole. Making the button hole more secure)
Attach yarn to the 7th stitch from the right. Like in the photo below.
Repeat rounds 45-73.
Finish off and weave in your ends
This is when I attached my two green 1 inch buttons.
Time to crochet a pocket!
Using the blue yarn.
Row 1: CH 16, Turn HDC into second CH from hook and each CH across (15 HDC)
Row 2-8 : CH 1, Turn, HDC into each stitch across (15 HDC)
Row 9: Change to black yarn. CH 1, Turn, HDC into each stitch across (15 HDC)
Finish off and weave in ends.
With yarn needle and green yarn, Weave back and forth through the left, bottom and right side of the pocket while attaching it to the overalls.

Optional Crochet Bow Tie
Following a pattern I discovered in The Yarn Box designed by Mollie Makes– using a 3.5 mm crochet hook. I made the neck band 44 stitches long. I figured since its adjustable.. the baby will get to use this for a few extra months.
Here is one a Stitch11 fan crocheted without the pocket… I LOVE it!!


Super cute Corina! Thanks so much for linking up on Hookin On Hump Day! 😀
Thank you so very much for taking the time to creat this website. I really appreciate te PDF ability.
Pat
i was wondering what hook to use & what i have to do to make this for a 3-6 month old baby. would appreciate hearing from you soon. LEILA
Use the hook I used. That is the size of this pattern.
Thank you, I’ve never made clothing, this will be my first attempt!
Usually I do hats, scarves, afghans, but not items to wear.
So um idk what I am doing wrong but when I go to do the front peice row 25-32 it isnt in the front its like off to the side…Where i started the stitches is like in the middle…what am i doing wrong?
I noticed that the front piece would be off to the side if the pattern is worked as stated. So I sl st’ed backward to the starting point of the front bib. I also used DC rather than HDC and I eliminated a lot of the rows that the pattern called for.
Thank you for the pattern tho, its super cute and my little hunters outfit (I made this with camouflage yarn) came out simply adorable!!
Here’s what I did for the bib:
Using an H hook and starting with row 21:
turn work, sl st in next 10 SC. Ch 1, turn work, HDC in each sl st. (when reaching the middle of the bib) then DC in next 10 st
This gave me a bib that was 20 sts wide rather than 17 but it worked out really well.
The pattern could use a little adjusting. It goes from round 7-12 and the next direction is round 8. Thankfully I have experience, but it may be difficult for someone beginning to read patterns.
Thank you so much for pointing that out. I am shocked it has taken this long for someone to notice! I fixed it right away.
How can u have such a big gap between straps at front, bib is 18sc and each strap is 11sc?
The straps aren’t 11 stitches. That is the back of the piece where the straps come off of that is 11 stitches. If you keep reading through the next couple steps you will see that each strap is actually only 5 stitches across.