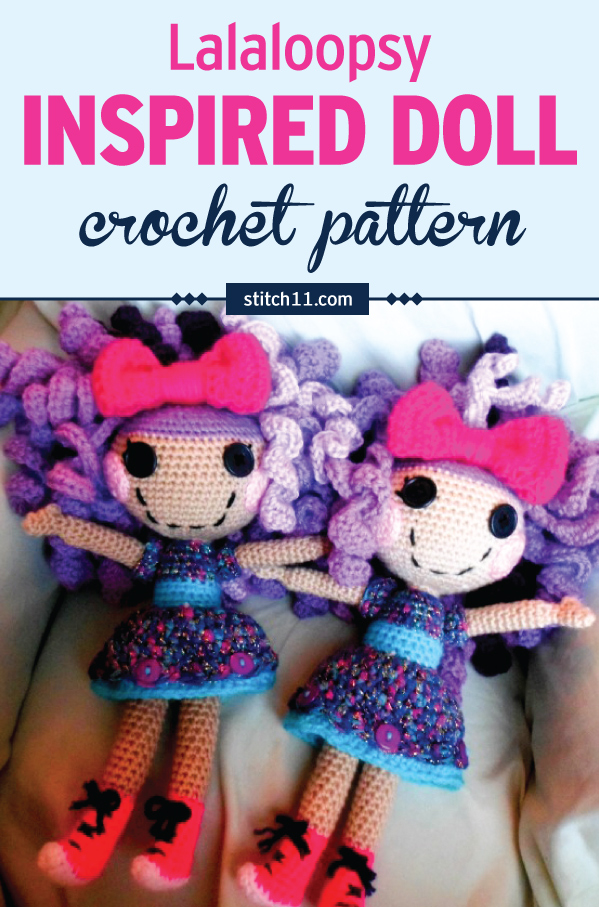
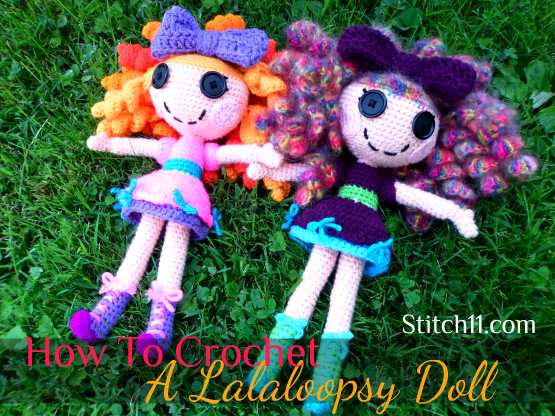
 Here she is! For the last few months, I have had so many requests for me to write this free Lalaloopsy crochet pattern. I tried to keep her simple and I did my best at explaining everything as well as I know how. This is not an “Easy” pattern…. mostly because it takes a little extra patience. This crochet pattern is loads of fun! I encourage you to be creative with your yarns. I used all medium weight yarns but mixed up the textures and brands of yarns and I LOVE it!!! Now go look through your scraps and find all those small amounts of beautiful yarn that you have been waiting to use! And I will warn you, the hair takes twice as much yarn and twice as much time as it appears.
This Doll measures 12 inches in length.
Lalaloopsy Crochet Supplies
Medium Weight Yarn. Lots of colors! You can custom choose your color for what lalaloopsy you are going for.
2 one inch buttons
3.5 mm crochet hook for entire lalaloopsy doll. 5 mm hook for lalaloopsy hair and bow
Yarn needle
Scissors
Stuffing
Crochet Stitches used
SC – Single Crochet
HDC – Half Double Crochet
DC – Double Crochet
SC DEC – Single Crochet Decrease
Slip Stitch
CH- Chain
SC into front (or) back loop only
Note – When “joining” to your first stitch, you will use the slip stitch. On the next round it will say to crochet into the same stitch, you will be crocheting into the SC you joined to (not the slip stitch).
Using 3.5 mm crochet hook
Crochet Lala Legs and Shoes (make two)
With your color choice for the sole of the shoes. (I used I Love This Yarn – Neon Purple)
Round 1: CH 8. SC in 2nd CH from hook. SC in next 2 CH. HDC in next 4 CH. HDC in same CH 3 more times. Turn and work into other side of CH. HDC into next 3 CH. SC into next 2 CH. SC 3 times into starting CH. Join to first SC (18 stitches)
I went ahead and wove my ends in now.
Change to your choice of color for the shoes (I used Red Heart with Love – Lilac) *Joining to back loop only*
Round 2: In back loops only. CH 1, SC into same stitch and into next 4 stitches. 4 SC DEC. SC into next 5 stitches. Join to first SC. (14 SC)
Round 3: CH 1, SC into same stitch and next 2 stitches. 4 SC DEC. SC into next 3 stitches. Join to first SC. (10 stitches)
Round 4-10: CH 1, SC into same stitch and each stitch around. Join to first SC. (10 SC)
Finish off.. I went ahead and wove my end in and stuffed the boots with scrap yarns.
Change to skin color yarn (I used I Love This Yarn – Light Peach) *Joining to back loop only and into the starting stitch of round 10 *
Round 11: In back loops only. CH 1, SC into same stitch and each stitch around. Do not join (10 SC)
Work in continuous rounds now.
Round 12-28: SC into same stitch and each stitch around. (10 SC)
Slip stitch into next stitch. Finish off.
Change to color of the undies/panties
Round 29-30: CH 1. SC into same stitch and each stitch around. Join to first SC. (10 SC)
Finish off the first leg but do not finish off the yarn with the second leg. Set the legs together and slip stitch into the stitch that lines up from the top of the other leg.
Round 31: CH 1, SC into same stitch. SC around the legs in one large circle. (20 SC)
Round 32-35: CH 1, SC into same stitch and each stitch around. Join to first SC. (20 SC)
Crochet Lalaloopsy Belt and Skirt
With color of your choice for the belt band. Join yarn to the back of the doll.. in the back loop only.
Round 36: In back loops only. CH 1, SC into same loops and around. Join to first SC. (20 SC)
Round 37-38: CH 1, SC into same stitch and each stitch around. Join to first SC. (20 SC)
Finish off (I wove in my ends)
Using color of your choice for the top layer of skirt. Attach to the back of the doll into the front loop from round 35.
Round 39: In front loops. Crocheting from the top of the loops so the pretty side of the stitches will lay down as the outside of the skirt. CH 1, HDC into same stitch and each stitch around. Join to first HDC. (20 HDC)
Round 40: CH 1, HDC into same stitch. 2 HDC into next stitch. **HDC into next stitch. 2 HDC into next stitch. Repeat from ** around. Join to first HDC. (30 HDC)
Round 41:CH 1, HDC into same stitch and into the next stitch. 2 HDC into next stitch. **HDC into next 2 stitches. 2 HDC into next stitch. Repeat from ** around. Join to first HDC. (40 HDC)
Round 42-43: CH 1, HDC into same stitch and each stitch around. Join to first HDC. (40 HDC)
Round 44: In front loop only. CH 1, SC in same stitch. Skip one stitch. 3 DC into next stitch. Skip one stitch. **SC into next stitch. Skip one stitch. 3 DC into next stitch. Skip one stich** repeat from ** around. Join to first SC.
Change colors to your choice for the bottom layer of the dress. Attach to the back of the doll and into the back loops from round 43.
Round 45: In the back loops only. CH 3, DC into each stitch around. Join to top of CH 3. (40 DC)
Round 46: CH 1, HDC into same stitch and each stitch around. Join to first HDC. (40 HDC)
Finish off and weave in your ends.
Add some bows and shoe strings!
I added bows to every other shell at the bottom of the dress. When tying them on, I tied them through the center DC of the shell and I tied them through both the top and bottom layer of the skirt. (this helps the top layer from flipping up. The way I made my bows was very simple. I cut a piece of yarn and pulled in through from the top to the inside.. and then back out… and then tied it into a nice bow. If you are worried about your bows not wanting to stay tied, you can add a very small amount of hot glue under the knot and it will hold like a champ!
Now for the laces I used a yarn needle. I started at the bottom and pulled a piece of yarn half way through.. zig zagged both ends up the shoe and then tied them. Again, you can use a small amount of hot glue if you do not feel it it secure enough.
Lala Body
With color of your choice (I used the same color as the top layer of the skirt) Attach yarn to the back side of the doll. Into the back loop of the top of the belt.
Round 47: In back loops only- CH 1, SC into same stitch and each stitch around. Join to first SC. (20 SC)
Round 48-50: CH 1, SC into same stitch and each stitch around. Join to first SC. (20 SC)
Round 51: CH 1, SC DEC around. Join to first SC DEC. (10 stitches)
Finish off and weave in your end. Go ahead and stuff the body of the doll.
Crochet Lalaloopsy Neck and Head (part 1)
Attach skin color yarn into the back loop.
Round 52: In back loops only. CH 1, SC into same stitch and each stitch around. Join to first SC. (10 SC)
Round 53: CH 1, SC into same stitch and each stitch around. Join to first SC. (10 SC)
Round 54: In front loops only- CH 1, 2 SC into same stitch and each stitch around. Do NOT join. (20 SC)
Start working in continuous rounds.
Round 55: 2 SC into same stitch. SC into next stitch ** 2 SC into next stitch. SC into next stitch. Repeat from ** around. (30 SC)
Round 56: SC into each stitch around. (30 SC)
Round 57: 2 SC into same stitch. SC into next 2 stitches ** 2 SC into next stitch. SC into next 2 stitches. Repeat from ** around. (40 SC)
Round 58: SC into each stitch around. (40 SC)
Round 59: 2 SC into same stitch. SC into next 3 stitches ** 2 SC into next stitch. SC into next 3 stitches. Repeat from ** around. (50 SC)
Round 60: 2 SC into same stitch. SC into next 4 stitches ** 2 SC into next stitch. SC into next 4 stitches. Repeat from ** around. (60 SC)
Round 61-70: SC into each stitch around. (60 SC)
Slip stitch into next stitch and finish off. Attach color of yarn you will be using for the hair. (I used Caron Simply Soft
Round 71: SC into each stitch around (60 SC) DO NOT FINISH OFF
This is where I put the crochet at a pause and made her face.
Lalaloopsy face
The first step to making the face is to add the eyes. But before you can sew the 1 inch buttons on, you will need to use some black yarn and your yarn needle to make the lashes. I cannot tell you exactly how to do this other than to make two lashes. I start the lashes where the button will cover and then work out at an upper angle.
-Sew on your buttons.
-With yarn needle stitch a smile. You can use my doll as a guide or you can google images a picture of a lalaloopsy doll.
Now for the cheeks.
With light pink yarn. (make two)
Magic circle, CH 1, 9 HDC inside ring. pull ring tight and join to first HDC. CH 1, 2 SC into each HDC. Leave a long tale and use that tail to attach them to the face,
Crochet Lalaloopsy Head (part 2)
Pick the yarn pack up where you left off on the hair.
Round 72: SC into each stitch around (60 SC)
Round 73: **SC into next 2 stitches. SC DEC. Repeat from ** around. (45 stitches)
Round 74: **SC into next stitch. SC DEC . Repeat from ** around. (30 stitches)
Round 75: SC into each stitch around. (30 stitches)
Round 76: SC DEC around. (15 stitches)
Stuff the head now while you still have a small hole.
Round 77: SC DEC 7 times. SC into last stitch. ( 8 stitches)
Round 78: SC DEC around. (4 stitches)
Finish off leaving long tail to close hole.
Lalaloopsy Arms and Sleeves
Starting with skin color yarn.
Round 1: Magic circle, CH 1, SC 5 into magic ring, pull ring tight. Join to first SC. (5 SC)
Round 2-3: CH 1, SC into same stitch and each stitch around. Join to first SC. (5 SC)
Round 4: CH 1, HDC into same stitch. CH 1, Slip stitch into same stitch, SC into next 4 stitches. Join to first SC (skipping over the HDC thumb)
Round 5: CH 1, SC into each stitch around. (4 SC)
Round 6: CH 1, 2 SC into each stitch around. Join to first SC (8 SC)
Working in continuous rounds now.
Round 7-19: SC into each stitch around. (8 SC)
Change colors to your choice for the sleeves. Attach the yarn in the front loop. You with be crocheting into the loops upside down so that the pretty side of the stitches will be on the outside of the sleeves.
Round 20: In front loops only. CH 3, DC into same stitch and DC into the next stitch. **2 DC into next stitch. DC into next stitch. Repeat from ** around. Join to top of CH 3. (12 DC)
Round 21: CH 1, SC into same stitch and each stitch around, (12 SC)
Finish off. Weave in ends and attach the arms with a yarn needle. (I lightly stuffed the arms with yarn ends) This may be a little tight… be patient and it will all come together. I pinched the arm flat and sewed it on my the back loops that were left.
Lalaloopsy Curls
Using 5 MM crochet hook
Leaving tail, CH 15, 3 DC into second CH from hook and down the rest of the chains. *For a double curl do not finish off — CH 15, 3 DC into second CH from hook and in remaining chains. Cut yarn leaving tail – Make as many as it takes to get the fullness of hair you are going for.
To attach the hair. Inset hook around SC stitch of the scalp, pull one yarn tail through, tie both tails into a knot, the using yarn needle, weave in ends into the hair curl.
**When making my lalaloopsy with rainbow mohair I had to put 4 DC into each CH to get a good curl)
Crochet Hair Bow
With your choice of yarn color.
Step 1: CH 33, DC into 4th CH from hook and each CH across. (31 DC)
Step 2-4: CH 3, Turn, DC into each stitch across. (31 DC)
Join both ends with a slip stitch. Fold the bow so that the seam is in in the middle. CH 60. Finish off leaving long end.. Wrap your chain around the center of the bow. Weave your ends in to secure the CH. And then using the same end, attach it to the top of the lalaloopsy head.

I just quickly read the directions. The head is crochet directly to the body, right? The only thing made and attached separately are the arms?
I love all the little crocheted animals and dolls, but I can never get all the limbs and head to attach in a way that doesn’t look really awkward! And it’s so inch work to put into something to not have it turn out.
But I think I’m going to try this pattern!
Yes you are right. The arms, hair, and bow are the only thing you will be attaching. Will love to see when its finished!
Well I’m about 1/2 up the head…. Love how sturdy the neck is! Not sure i transitioned from legs to panties correctly….but it’ll do for this time!
I had problems and I’m pretty sure my whole thing is wrong… But it looks ok! The only thing wrong is my stitch count lol!
Hi! I’ve a question because I think I’m doing something wrong in The crocheting. When it says:SC 3 times into starting CH. Join to first SC (18 stitches)
Does it mean only in one chain or sc3 from that chain and sc 3 to rest until end? Cos my total chains are either more or less than 18. It doesn’t add up rite in my row.
These are so cute and my Great-Granddaughter will love it. Thank you. love Carol
Thank you so much for this cute cute pattern:)
Have a nice-crafty day:D
Extremely cute, love the curly hair!
does something go into the neck so the head stays up? my head just flops all around.
Mine was floppy too because of the weight of the hair… my the kids love it. I was thinking that if I made the head separate and attached it, it probably would be a lot more sturdy. But, I also noticed with my second one, I stuffed the neck of it a little extra and it held up a lot better than my first.
Thank you so much for sharing this great pattern. I have little girl who is turning two next week! She would love this!
Thanks for sharing the pattern, it is lovely!
You use yarn and not cotton to make doll? Would cotton work as well? Thanks
Cotton would work great!
Thank you for the pattern. I’ve been looking for something different. So cute! May I have permission to make a few and sell at my Holiday craft show? I don’t want to step on any toes. Please let me know, of course I would give credit to you for the pattern and a link to your website. Thanks again.
Yes! Sell sell sell!!! 😀 love helping others make a little money 🙂
I was going to ask the same thing. 🙂 Thank you so much! 🙂
I’m gonna try this, what lovely dolls. I have knitted many dolls in the past and always put a length of cardboard tube from the head, down the neck, and into the chest while stuffing. The tubes from cling film are quite narrow but very strong and keep the heads completely rigid.
Thank you! I was thinking something like that… even a popsicle stick 😉
I have come here many a times trying to figure how to obtain this lalaloopsy pattern. nothing seem to work i tried copy an d paste and it. \looked where to down load it of the site. \i even went to buy the Wool for it \i wanted to make it for my girl friends two kids for there birthdays. Thinking it be easy to do. |I would sat at the beach to do it.. Times ticking please help me out and send me the copy of this pattern \it be most appreciated thanks in advance Carla
Have you tried the clean print at the bottom of the post?
Corina, thank you so much for this BEAUTIFUL doll pattern. Both of my granddaughters birthdays are coming up and I can’t wait to make these for them, just TOO precious! Also, thank you for allowing us to make and sell your doll, and of course I would give credit to the creator, thank you again for sharing. 🙂
Just made this doll!!! Thank you so much for the pattern…She is a hit with my little girl.
Hi!! I have started this project and was wondering if i could have permission to sell these dolls to my local town folk? I am having a little trouble with the neck and head section, not completed though, but my neck seems awfully long and the head seems weird as well? And another question instead of buttons can we do maybe black crocheted circles instead? would it look the same? o
Yes you can sell them all that you wish <3 Im not sure why the neck is long though :/ If you need to change the pattern just make the head as round as you can. And yes, crochet circles would work as well. 🙂
I know this seems like a simple reply, but make sure you have not repeated too many “neck” rows. My eyes went to the wrong place in the pattern, and my neck was long as well — when I referred to the pattern and counted, I realized I had repeated too many rows. Also, if you do crochet eyes, it’d be a good idea to sew them on in a criss-cross fashion to replicate the 4 button holes. I, too, thought of making crochet eyes for a new baby, so she would not chew the buttons and choke. I am at the end of the first lalaloopsy I’m making; I intend to make more for the girls in my life~!
Thanks for taking the time to write up the pattern. I can’t wait to try it.
Thanx so much , 2 granddaughters will love this!!
You are so awesome!! You shared for FREE?? Thank you so much! I can’t wait to make her
When my granddaughter saw this on the computer today, she went NuTs!!! She couldn’t wait to show her mom. She was about in tears she loved it so much. She has ALL the ones you buy from the store, I do believe. Still, she was so excited to see this one. I will be making these. She wants both that are shown. One for her and one for her friend when she visits. She’s almost five, perfect doll for a ‘perfect’ granddaughter! Thanks for the pattern!!
Hello Corina! Thank you sooo much for this pattern. I just finished mine and it came out soooo gorgeous that I don’t believe it myself. I know My grandaughter would be so happy when she sees it. She loves Lalaloopsy so much. She is going to be five and she is in wheel chair, my little sweetheart. Anyways it was a veyr rewarding experience doing Lala. I didn’t have any problem following your pattern. It was very easy to follow. Thanks so much again. God Bless you for your talent and willigness for sharing with us your pattern. Not too many people does iy
I’ll try to attach a pic of her.
Great!!! I love positive feedback! She will adore her new doll <3 They are so rewarding to watch come together. You are more than welcome to share on my Facebook page as well. Thanks again for the comment.
If a line deoesn’t specify back or front loops on a line, is it both loops?
Yes, you are right. It does. 🙂
Thank you for this pattern and for free!!! Like you I’ve only been crocheting for a little over a year I’ve fallen in love with it!! I made this doll for my niece autumn and have several other friends and family wanting me to make them one!! Thank you for your talent on writing patterns!!
This pattern is adorable and I’m making it for my niece, but I have a question. When doing the head, you start working in the front loop only. Do you continue working in the front loop for the entire head, or only round 54? Thanks!
Just in that round. 🙂
Made these for my nieces…they turned out great. Wonderful pattern, easy to follow.
This is the first doll I’ve done that actually looks like the one pictured! Eek! I’m so excited! My daughter will love it, thank you for the pattern!
Aaaw! Thanks! Be sure to share a photo with me on my Facebook page 😀 https://www.facebook.com/stitch11page?bookmark_t=page
Where is the loom knitting pattern ?
Sorry, I have never knitted with needles or a loom.
have looked for a little doll like this for ages for my little granddaughter, cant’t believe it but last night i searched for hours online for a nice pattern and then low and behold up you pop today on my facebook with it….. i am afraid that it is going to be taken off line again, is there anyway i can print this out?
There is a print friendly button at the end of the post 🙂
This pattern literally saved me! My 2 little cousins are having a LaLaLoopsy joint birthday party this month and i have been struggling on what to make them or buy them without breaking my budget (i love them so much i would, but cousins got bills to pay) and i found this pattern and it about 6-8 hours i have almost finish one doll, it just needs her arms and her hair but otherwise stuffed and face is on and everything! Thank you so much for sharing this pattern, i have even sent the link to a few of my friends with young daughters, and a few crocheters i know who have been dying to make a cute doll! Thank you thank you thank you! I have a feeling im gonna have the best gift. Helping me reach my status of cool, fun cousin. I knew them when they were babies, and moved away, i moved back 7 years later and have a lot of making up to do and this completely helps in more ways than one! THANK YOU!!
This is so cute!! Thank you so much for sharing your pattern with us 🙂
Hello! I am so glad to see this site back up. I was so brokenhearted when you had to take this down because I was in the middle of finishing the heads for dolls I was making for my oldest daughters. I can finish them now. Hopefully they’ll still like them. I love your designs so much.
It’s a cool project but I’m not a native speaker so many things I don’t understand …I think a video it’s a great idea
I’ve just finished part 1 of the head (just the flesh color yarn) and its HUGE. I double and triple counted and there are only 60 SCs around so it’s not that. The head is like 7 inches across. Is it supposed to be that big? The dolls don’t appear to be that big.