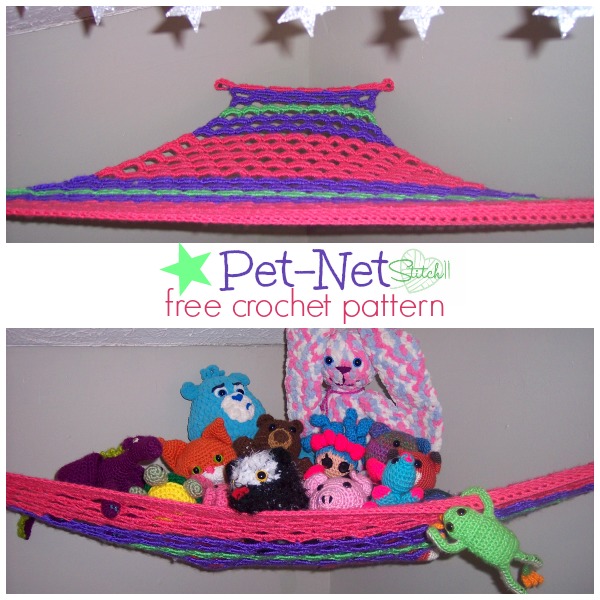
I have been trying to come up with a better idea for the Stuffed Animal Hammock since making the first design for one. (You can see that free crochet pattern HERE). To be honest, I still am not 100% happy but it is better than the first. I contemplated on even sharing this pattern. But, I decided to go ahead and share it with everyone while I keep brainstorming on the next better idea. 🙂
Be sure to read all the notes (at the beginning and end of the pattern) before starting your Pet-Net!
STOP! This pattern has been updated and perfected – View BEST version HERE!
Supplies
Medium Weight Yarn (Worsted)
5 mm Crochet Hook
Yarn needle for weaving in your ends
Stitches
FSC -Foundation Single Crochet
CH – Chain
SC – Single Crochet
HDC – Half Double Crochet
-Note- If you want to adjust the size, make your starting FSC in counts of 5 +1.
-Note- If you cannot do the FSC, you can make a CH of 122, turn, skip one CH, SC into next 121 CH. You may want to use a size larger hook just for your CH.
-Note- You can change colors before any odd numbered row (the rows with chains) to make whatever color pattern your heart desires.
-Note- If/when you change colors, attach the yarn into the center HDC instead of slip stitching to it.
Row 1: FSC 121.
Row 2: CH 4, turn. SC into each of the 121 FSC across. CH 4. Slip Stitch into the side FSC from row 1. (121 SC)
Row 3: CH 1, turn. 6 SC into CH space. SC into each of the 121 SC across. 6 SC into CH space. Slip stitch into FSC from row 1. CH 1. (133 SC)
Row 4: Turn. Slip Stitch into first 7 SC. CH 1. SC into same stitch and next 120 stitches. (121 SC)
Row 5: Ch 1, turn. SC into same stitch. ** CH 4. Skip 4 stitches. SC into next SC. Repeat from ** 23 more times. (25 SC)
Row 6: Turn.** 5 HDC into CH space. Slip Stitch into next SC. Repeat from ** 23 more times. (120 HDC)
Row 7: CH 1, turn. Slip stitch into next 3 HDC. CH 1. SC into same stitch. CH 4, Skip next 4 HDC (and the slip stitch). SC into next HDC. (This is the center HDC of 5 HDC). ** CH 4. SC into next center HDC of 5 HDC. Repeat from ** 21 more times. (24 SC)
Row 8: Turn.** 5 HDC into CH space. Slip Stitch into next SC. Repeat from ** 22 more times. (115 HDC)
Repeat rows 7 and 8 -17 times. Decreasing one 5 HDC set each time. Your last row will have 30 HDC (6 sets of 5 HDC)
Last 2 rows with loops for hanging
–CH 1, turn. Slip stitch into next 3 SC. CH 4. SC into same stitch. CH 4, Skip next 4 SC (and the slip stitch). SC into next SC. (This is the center HDC of 5 HDC). ** CH 4. SC into next center HDC of 5 HDC. Repeat from ** 3 more times. CH 4. Slip stitch into the same stitch. (6 SC)
– CH 1, turn. 6 SC into CH loop. Slip stitch into SC. **5 HDC into CH space. Slip stitch into next SC. Repeat from ** 4 more times. 6 SC into CH loop. Slip stitch into same loop.
–Finish off and weave in your ends.
-Note- When hanging mine, I used drywall screws. You should use whatever you feel is best for your walls. I am not an expert on hanging things. >.< Make sure you hang the net tight. Once you have stuffed animals in it, it will stretch.
After hanging mine up, I measured it 4 feet wide, and 2 feet deep from the corner.
-Note- If the sides are not strong enough to keep your animals from falling, You can attach the center set of HDC on both sides to the wall as well. This will eliminate the issue. **Edited** <- I now know that when you buy them from the store, they actually attach them on the sides as well.

Now I’m curious, do you have a pattern for the Carebear? Or could you tell me where you got it? I’ve been looking for one I like forever and I love that one! I also have that cat on my to-do list! 🙂
Yes I do! https://stitch11.com/grumpy-bear-free-crochet-pattern/
All of those items are actually on my blog somewhere. 🙂
Doing the rows 7 and 8. You say 17 times is that counting the rows separately or as a set?
As a set.
Is it meant to look like a triangle? Also it covers my lap when sitting down, is that the when it’s empty and not hanging? Thanks.
Yeas it is since it hangs in the corner. When I make another one, I will be editing the pattern to hang on the wall on the center of both sides. But with this one, you can still hang it on the center of both sides but just through the net.