Little kids love snuggly stuffed animals, and this huggy bunny crochet pattern is a great option for kids who want something handmade and huggable.
Want an ad-free version of the pattern? You can download it here.
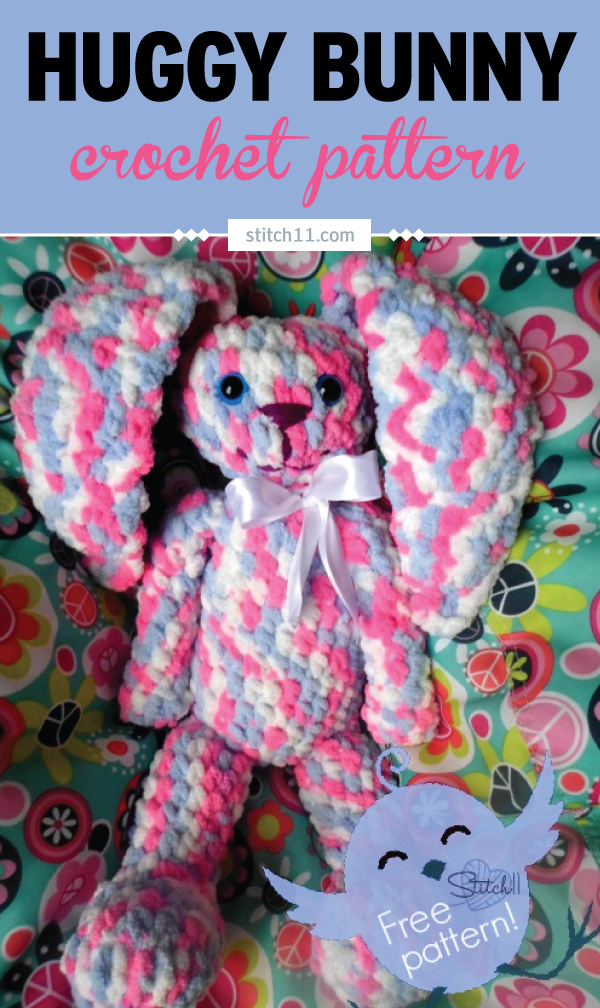
So here she is, Mrs. Huggy Bunny! She works up quickly since she calls for a super bulky yarn. She did use a little more yarn than I had expected or wanted to use, but she was worth it! And that makes for a great stash-busting project, too!
She measures 15 inches from the bottom of her feet to the top of her head. It’s such a cute and easy crochet project and a great gift for a kiddo in your life.
Speaking of the kiddos in your life, if you’re a lover of all things crochet toys, take a moment to learn how to crochet toys from hexagons with the professionally filmed Crochet Anything With Hexagons video classes.
Huggy Bunny Crochet Pattern
Skill Level: Intermediate
Materials:
• Hook:
– US Size K (6.5 mm) crochet hook or size needed to obtain gauge
• Yarn:
– 250 yds Super bulky yarn
– 5 yds worsted weight yarn (for nose and mouth embroidery)
• Notions:
– Scissors
– Yarn needle
– Safety Eyes (or extra yarn to embroider eyes)
Note:
Safety eyes can be pulled off and become a choking hazard. If making this for a very young child, consider embroidering eyes instead.
Size:
Approximately 15 inches tall (bottom of feet to top of head)
Gauge:
10 hdc x 9 rows = 4 inches
ABBREVIATIONS DESCRIPTION ch Chain dc Double crochet hdc Half double crochet hdc2tog Half double crochet next 2 stitches together rnd Round sc Single crochet sk Skip sl st Slip stitch st(s) Stitch(es)
*Looking for more great crochet stitches to try in other projects. Click here to see the Ultimate Crochet Stitch Library.
Want an ad-free version of the pattern? You can download it here.
Pattern
Join rnds where indicated with a sl st in the first st of the rnd.
Body:
With super bulky yarn, make a magic circle.
Rnd 1: Ch 1, 10 hdc in magic circle, close magic circle, join. (10 sts)
Rnd 2: Ch 1, 2 hdc in each st around, join. (20 sts)
Rnd 3: Ch 1, 2 hdc in first st, hdc in next st, [2 hdc in next st, hdc in next st] around, join. (30 sts)
Rnds 4-6: Ch 1, hdc in each st around, join.
Rnd 7: Ch 1, hdc in each of first 3 sts, hdc2tog, [hdc in each of next 3 sts, hdc2tog] around, join. (24 sts)
Rnds 8-9: Ch 1, hdc in each st around, join.
Rnd 10: Ch 1, hdc in each of first 4 sts, hdc2tog, [hdc in each of next 4 sts, hdc2tog] around, join. (20 sts)
Rnds 11-12: Ch 1, hdc in each st around, join.
Stuff body firmly.
Rnd 13: Ch 1, hdc2tog around, join. (10 sts)
Head:
Rnd 14: Ch 1, hdc in each st around, join.
Rnds 15-19: Repeat rnds 2-6 of body.
Rnd 20: Ch 1, hdc in first st, hdc2tog, [hdc in next st, hdc2tog] around, join. (20 sts)
Stuff head firmly.
Rnd 21: Ch 1, hdc2tog around, join. (10 sts)
Fasten off, leaving a long tail for sewing.
Embroider nose and mouth using worsted weight yarn and yarn needle.
Attach safety eyes or embroider eyes.
Add any additional stuffing to head and body if desired.
Use long tail to sew top of head closed.
Ears (make 2):
With super bulky yarn, ch 2.
Row 1: 3 hdc in 2nd ch from hook. (3 sts)
Row 2: Ch 1, turn, hdc in each st across.
Row 3: Ch 1, turn, hdc in first st, 2 hdc in next st, hdc in last st. (4 sts)
Row 4: Ch 1, turn, hdc in first st, 2 hdc in each of next 2 sts, hdc in last st. (6 sts)
Rows 5-7: Ch 1, turn, hdc in each st across.
Row 8: Ch 1, turn, hdc in each of first 2 sts, 2 hdc in each of next 2 sts, hdc in each of last 2 sts. (8 sts)
Rows 9-20: Ch 1, turn, hdc in each st across.
Fasten off, leaving a long tail for sewing.
Sew tail through the first st of row 20 to bring the ends together, then flatten ear so that this join is in the center. Sew ear to head.
Arm (make 2)
With super bulky yarn, make a magic circle.
Rnd 1: Ch 1, 10 hdc in magic circle, close magic circle, join. (10 sts)
Rnds 2-10: Ch 1, hdc in each st around, join.
Fasten off, leaving a long tail.
Use tail to sew end of arm closed and then to sew the arm to the body.
It is not necessary to stuff arm.
Foot and Leg (make 2)
Foot:
With super bulky yarn, make a magic circle.
Rnd 1: Ch 1, 10 hdc in magic circle, close magic circle, join. (10 sts)
Rnd 2: Ch 1, 2 hdc in first st, 2 dc in each of next 3 sts, 2 hdc in next st, 2 sc in each of last 5 sts, join. (20 sts)
Rnd 3: Ch 1, hdc in first st, 2 hdc in next st, [dc in next st, 2 dc in next st] 3 times, hdc in next st, 2 hdc in next st, sc in each of last 10 sts, join. (25 sts)
Rnd 4: Ch 1, hdc in first st, hdc2tog 5 times, hdc in each of last 14 sts, join. (20 sts)
Rnd 5: Ch 1, hdc2tog 5 times, hdc in each of last 10 sts, join. (15 sts)
Rnd 6: Ch 1, hdc in first st, hdc3tog, hdc in each of last 11 sts, join. (13 sts)
Rnd 7: Ch 1, hdc3tog, hdc in each of last 10 sts, join. (11 sts)
Stuff foot firmly.
Leg:
Rnds 8-13: Ch 1, hdc in each st around, join.
Fasten off, leaving a long tail.
Use tail to sew end of leg closed and then to sew the leg to the body.
It is not necessary to stuff leg.
Weave in all ends.
Want an ad-free version of the pattern? You can download it here.
Did you enjoy this crochet pattern? Check out some more of my fun crochet patterns below:

what size of balls, is the baby blanket yarn you used?
Each one is 86 yards each.
Where would you get one that size? The only ones I have seen are 72 yds
I believe I ordered the yarn through fabric.com
Joanna has the big ball 300 grams I buy it all the time and Walmart. Com has it as well
I knew as soon as I saw the picture of the Huggy Bunny it was the squishy Barnat baby blanket. I love it, thanks for the pattern. Now I need to go buy at least 2 more skeins so I can make 1.
Did you use all three strands in each stitch? Or is was the color of your yarn the multicolor? I’m a bit confused as the stitches seem so close together.
It is crocheted with just one strand. It is a multicolored yarn 🙂
ahh thank you 🙂 It’s absolutely adorable 🙂
What size did you use for the safety eyes ?
They are the bigger size of the two I have seen. I believe they are 1/2 inch.
Is the head, neck and body all one piece?
It is! Starting at the butt of the rabbit and finishing off at the top of the head. 🙂
Thanks!! It’s so cute I am going to make one for each my Grandaughters!
I love the idea to use this material for this! It’s perfect!
How are the ears, arms and legs attached? Any special stitch? I have all the parts done and now need to attach them.
I just hand sewed them on. Nothing special 🙂
Ok thank you!
These are absolutely adorable. I have made one and a friend asked for 4 for Easter.
I am making one for each of my 5 little Grandkids for Easter. They are so cute.
I am having a hard time understanding the directions for the ears with “folding the wide endwhen finished crocheting and attaching to the bunny. Do you stitch down both sides to close?
At the bottom of the ear, I just folded the two corners together and attached it.. I just thought it gave it a nice bunny ear look. And made it look like there is an inner ear. But it is not required that you fold the bottom. You can keep it straight.
For the arms Round 2-10 do you join to the first hdc after completing each round or no? I noticed you did on most of the others but didn’t know if you did for the arms or not, it wasn’t written to do so!
Thank you for sharing this lovely pattern!
No, I didn’t. You can if you want, I just found it easier not to.
Thank you for the beautiful pattern. I used the dusty rose color & the bunny is so cute! It’s for my grown up daughter! I did add two rows to the arms, i increased the hdcs in the 2nd and 3rd rows to make ‘hands’ for the bunny. I will post pics on Ravelry. Thank you again.
Did you make a tail for this bunny? If so, how please? Love this pattern…thank you.
I didn’t but my daughter did point out the fact that I forgot it. lol. I would just make a pom pom with the same color you embroidered the nose with. Check out my secure pom pom tutorial too! https://stitch11.com/secure-pom-pom-tutorial/
LOL! This will be the first doll that I will have made for my daughter. She just turned two so there must be a big pom pom tail! After posting I actually found one of your ravelry pattern users had posted a picture and reference to your pom pom tutorial. Check it out. Very cute. Maybe you should include your pom pom tutorial as an update option and link. Thank you again for this great pattern.
I just wanted to thank you for the WONDERFUL Huggy Bunny pattern. I have made two from a post Moogly shared and since then Everyone wants one… I know it says you can sell things you make from your patterns but I would not know how much to sell it for … I know my cost after my 50% off coupons from joann fabrics but would I use the retail price then double that? It takes me about 2 evenings to complete… I was thinking about selling them for $30.00… What do you think? Is that too cheap…. I only do top quality work so they do look amazing.
Sincerely, Susan
Thank you! And I think you are right about $30.. I wouldn’t sell it for less than that. Since they work up quickly… I don’t think you are undercharging unless you didn’t have the 50% off coupons. I haven’t sold any but I would personally go for anywhere between 30-40.
Pricing for this would be $40.00 fairly. You would be making $25 on each not counting the labor.
I was wondering how long this took you to make. I am new to crocheting and have 2 daughters under the age of two that I would like to make these for. I just don’t have to much free time so I don’t want to take on something to much to handle . Thank you. 🙂
You can make each one easily in a day. There really isn’t many stitches, and they are not tight. I personally think that baby blanket yarn is easier to work with for amigurumi type projects than actual blankets. 🙂
Thank you! I will give one a try and see how I do. Have a nice day!
Thank you so much for this pattern. I had recently purchased some of Bernats baby blanket yarn, thinking it would be great for a blanket , but after working with it , I don’t like how it works up as a blanket,now I know what to do with it ! Thanks again.
Is there a way to make this bunny smaller and if so could you let me know how I love this bunny Thank you so much
I would just use smaller yarn and a smaller hook instead of these really bulky baby blanket yarn.
Thank you for this great pattern. I absolutely love the Huggy Bunny and have made a couple of them. I was wondering if there are any directions of how to turn this into a bear. My granddaughter loves her bunny but she also wants a bear.
I would do it the same but maybe make two round ears instead? ANd make the nose a little rounder 🙂
This the best pattern that I have come across in a long time. I made my first one as a gift and 15 Huggy Bunny later, I can make with my eyes closed. I used plain color the match the multi-color on the feet to make it look like shoes and it looks fantastic. I took your advice with making round ears for a bear and it looks like a koala bear because I used the hard nose like the eyes only it’s nose shape. I did start to sell them because everyone wanted one. I sell them for $25 if I get the yarn on sale and $30 if yarn not on sale and have not had any complaints about the price. It is soooooo soft. Thank you soooo much for this wonderful pattern. It’s one of my favorites. I want to send you my photos of finished products. Where can I send it to?
Carmen Johnson
Thanks so much for the feedback! You will like the pattern I will be putting together in the next week or so 😀 It’s with the same yarn! You can send me photos on Facebook 😀 I will love to see! https://www.facebook.com/stitch11page
Hi I love this pattern! Thanks for sharing – I’ve made this one other time, but for some reason I don’t understand the beginning of the ears? It says CH 2, skip one chain 3, I’m not understanding what to do with the chain 3 and where do I skip one? Thanks for your time – Laurel
Nevermind, sorry I figured it out. New day, new eyes. lol
I’m struggling with this same part…. Help anyone???
I love this pattern! Thank you for sharing. I’ve got everything done but the ears. I don’t understand how it starts and I’ve read many times. What are we chaining from? Please help my confusion so I can finish this little guy up 🙂
Thanks!
You just start with the CH. After you make the ears you will attach them.
I just wanted to say a big thanks for this pattern! It is soooo adorable, I made it as part of a baby shower present (I also made a bobble blanket & tucked bunny under the blanket for presentation). The bunny was such a hit I’ve had other girls at work (nurses) asking do they have to get pregnant to qualify for a bunny! I will be making more…I love, love, love this bunny! Huge thanks again!
Thank you for sharing this pattern. That you made it available as a pdf why that is simply icing on the cake. Excited to make it for my schnookums.
Cheers,
Lyric
Am almost finished with my first bunny and loving it! It works up quickly and the pattern was fairly easy to follow. I have several granddaughters that will love these treasures on Easter Sunday. Thanks for sharing your pattern with us. It was delight to put together!
Hi Corina…. I love using Baby Bernat yarn and making this Bunny with it was so fun and easy!! Any chance you have made any other animals like this?? I’d gladly purchase any patterns you have. Thank you!!
Oh yes!! If you like this one you will LOVE the bear one!!! https://stitch11.com/grumpy-bear-free-crochet-pattern/
THANK YOU for the wonderful pattern! I have always wanted to make this and today I sat down and did it! SOOO love the bunny! Will definitely be making more!
Thank you for this pattern. I wish you had more using the same yarn- I love using the Bernat baby blanket yarn. I have made 24 of these bunnies-for every child I know!! And a few adults! My husband says I have to STOP!! They are pretty easy for me ( an old novice at crochet). I really enjoyed making them, ans wish there were other projects like this one. Thanks again.
Oooh! If you love this one you will adore the bear!! https://stitch11.com/grumpy-bear-free-crochet-pattern/
It’s lovely! I am planning a baby shower for my daughter, I am not decided yet to make bears, bunnies or jirafes!
How do you start the ears? I don’t understand how to skip one on the first chain.
When you turn after making the chain, you will not crochet into the chain that is closest to the hook. You will skip that chain and continue to the next chain.
Can you please explain? It says ch2 skip one ch 3rd into next ch ch1 turn (3)
Honest I just don’t understand.
Hi, I had a question about the ears. I just finished one and it is as long as the bunny is from head to bottom. Yours don’t seem that long in the picture. Any advice? Do you crochet tightly?
My ears are really long.
Where did you get the eyes for the bunny, and are they hard to put on?
I bought these at Hobby Lobby. Most craft stores have them though. They are REALLY easy to put on. You just slide it into the stitch you want it, then snap on the back piece.
This bunny is the cutest! It’s so easy to make and the pattern is so easy to follow. I’ve been looking for a good bunny pattern to make for Easter and I am so happy I found this one. After I made one my mom brought it to work and some of her coworkers already want me to make some for them.
I feel silly…no one else seems to have this issue. But on round 7 I can’t get the count down to 24. I end up with 30 like the round 6. I’m HDC 2 together where it states. I’m just still getting 30! What on earth could I be doing wrong?
Hi – I love this pattern and have made it a few times before, but it’s been awhile….So I have a question. On the ears it says Row 1: CH 2. Skip one CH. 3 HDC into next CH. CH 1, turn. (3)…What are we skipping after the chain 32? Do I make a ring to start it? or do we chain 2 then chain 3 in the beginning stitch? Thanks for your time and thanks for the pattern!! 🙂
Hi I have a question… I have made a couple of these and I love the pattern so thanks! My question is if I were to make the with the baby blanket tiny yarn instead what size hook would you recommend and how much smaller do you think it might be?
Corina,
I love your designs! I wanted to let you know that I used this Huggy Bunny for one of the posts on my blog. You can check it out here:
https://www.caitlinscontagiouscreations.com/bunny-crochet-pattern-and-amigurumi-assembly-tutorial/
Of course I give you the credit for this adorable bunny amirgurumi pattern! Thanks for the inspiration!
~Caitlin
Hello! I have made around fifteen bunnies and with where I live, I charge $25 for them. I wish I could charge more but, people feel that is as much as they will spend. I too try to buy my yarn on sale! This pattern is fabulous. Thank you for sharing!
Hi! I love this pattern but I only have 220 yards so my question to you is…did you use all 3 skeins completely or was there a bit left over? I would love to know, I’m hoping to make this bunny for a love bunny for my 4 yo by Valentine’s Day:)! Thank you so much in advance if you can answer this question!!!!
Love this..can’t wait to get started on it..thank you for the pattern.
Pattern makes no sense as the body ends at R9 then the head starts at R14? Where’s R10-13???
I am sitting here stuck at the same place
Do you have a “huggy penguin” pattern. Would love to make one for my granddaughter.
Hello, I love this pattern. I think I made a mistake though because my head is rather large in the back. What may have happened?