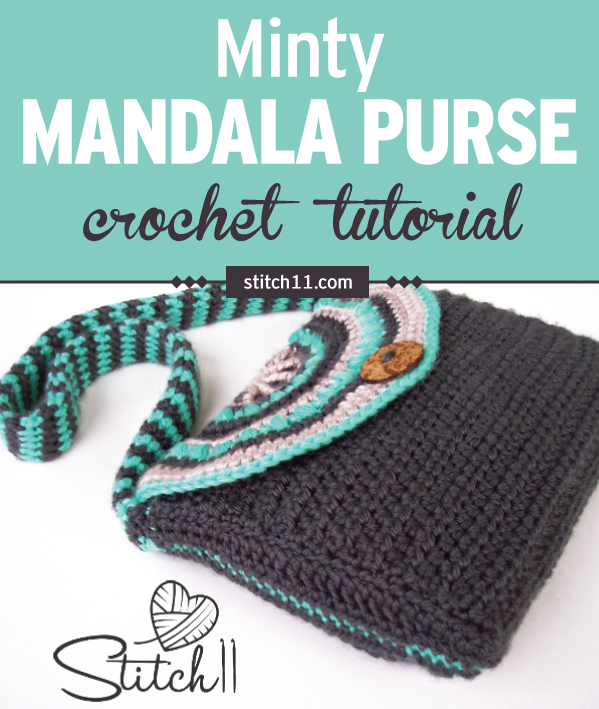
Minty Mandala Purse doesn't only feature a mesmerizing pattern, the colors are absolutely gorgeous, too! The pattern uses a variety of stitches that can help you polish up on the basics. Try the free pattern below or get the ad-free printable PDF pattern here.
I designed the Minty Mandala Purse for me! As much as I love to crochet projects and patterns, I rarely make anything for myself.
My Fat Bottom Bag has been through a lot, and needed to be replaced. I wanted something with a fun Bohemian style. Enjoy your new free crochet pattern!
You know what else I love about this pattern? Most of the pattern is made using just a simple rectangle. There are so many crochet patterns you can make with just rectangles. I show you how in my Crocheting Anything with Rectangles course. Check it out here.

Minty Mandala Purse Crochet Pattern
Skill Level: Intermediate
Materials:
• Hook:
– US Size H/8 (5 mm) crochet hook or size needed to obtain gauge
• Yarn: Bulky weight yarn
– 125 yds beige (A)
– 250 yds dark grey (B)
– 125 yds green (C)
• Notions:
– Scissors
– Yarn needle
– 1-inch – 1.5-inch button
Size:
8 x 11 inches
Gauge:
16 dc x 7 rnds = 4 inches
Get the ad-free printable PDF pattern here
| ABBREVIATIONS | DESCRIPTION |
|---|---|
| blo | Back loop only |
| ch | Chain |
| dc | Double crochet |
| fptr | Front post treble crochet |
| hdc | Half double crochet |
| rnd | Round |
| sc | Single crochet |
| sk | Skip |
| sl st | Slip stitch |
| sp | Space |
| st(s) | Stitch(es) |
| yo | Yarn over |
Special Stitch:
Puff Stitch (puff): [Yo, insert hook in indicated st or sp, pull up a loop]
3 times, yo and pull through all 7 loops on hook, ch 1 to close.
Pattern
FLAP:
With A, make a magic circle.
Row 1 (RS): Ch 1, 5 hdc in magic circle, close magic circle. (5 dc)
Row 2: Ch 1, turn, 2 sc in first st, sc in next st, 2 sc in next st, sc in next st, 2 sc in next st. (8 sc) Change to B
Row 3: Ch 2, turn, dc in first st, 2 dc in next st, [dc in next st, 2 dc in next st] across. (12 sts) Change to A
Do NOT skip any sts behind the fptrs in row 4. The fptrs are extra sts and you will still work into every st from row 3.
Row 4: Ch 1, turn, sc in each of first 2 sts, fptr around 2nd st from row 1, sc in next 2 sts, fptr around same st as previous fptr, sc in next 2 sts, [fptr around next st from row 1, sc in next 2 sts] twice, fptr around same st as previous fptr, sc in last 2 sts. (12 sc, 5 fptr)
Change to B
Row 5: Ch 1, turn, sc in each st across. (17 sts)
Change to C
Row 6: Ch 1, turn, hdc in first st, [puff in next st, hdc in next st] across. (9 hdc, 8 puffs) Change to B
Row 7: Ch 1, turn, hdc in first st, [2 hdc in next puff, hdc in next st] across. (25 hdc)
Row 8: Ch 1, turn, 2 hdc in first st, hdc in each of next 4 sts, [2 hdc in next st, hdc in each of next 4 sts] across. (30 sts)
Change to A
Row 9: Ch 1, turn, 2 hdc in first st, hdc in each of next 5 sts, [2 hdc in next st, hdc in each of next 5 sts] across. (35 sts)
Change to C
Get the ad-free printable PDF pattern here
Row 10: Ch 1, turn, hdc in first st, [puff in next st, hdc in next st] across. (18 hdc, 17 puffs) Change to B
Row 11: Ch 1, turn, hdc in first st, [2 hdc in next puff, hdc in next st] across. (52 hdc) Change to A
Row 12: Ch 1, turn, hdc in each of first 24 sts, ch 4, sk next 4 sts, hdc in each of last 24 sts. (48 hdc, 1 ch-4 sp)
Row 13: Ch 1, turn, hdc in each of first 12 sts, 2 hdc in next st, hdc in each of next 5 sts, 2 hdc in next st, hdc in each of next 5 sts, 5 hdc in ch-4 sp, [hdc in each of next 5 sts, 2 hdc in next st] twice, hdc in each of last 12 sts. (57 sts)
Change to C
Row 14: Ch 1, turn, hdc in each st across.
Fasten off. Weave in all ends.
BODY:
With B, ch 31.
Row 1 (RS): Hdc in 2nd ch from hook and in each ch across. (30 hdc)
Rows 2-25: Ch 1, turn, hdc in each st across.
Row 26: Ch 1, turn, sc in blo of each st across. (30 sc)
Rows 27-29: Ch 1, turn, sc in each st across.
Row 30: Ch 1, turn, hdc in blo of each st across. (30 hdc)
Rows 31-54: Ch 1, turn, hdc in each st across.
Edging rnd: Ch 1, turn, 2 sc in first st, sc in each st across to last st, 2 sc in last st, working in sides of rows, sc in each row across, working in bottom of foundation ch, 2 sc in first ch, sc in each ch across to last ch, 2 sc in last ch, working in sides of rows, sc in each row across, join with sl st in first st. (172 sc)
Fasten off, leaving a long tail for sewing.
SIDES (MAKE 2):
With B, ch 27.
Row 1 (RS): Sc in 2nd ch from hook, sc in each of next 6 chs, hdc in each of next 4 chs, dc in each of next 10 chs, hdc in each of next 2 chs, sc in each of last 3 chs. (10 sc, 6 hdc, 10 dc)
Row 2: Ch 1, turn, sc in each of first 5 sts, hdc in each of next 14 sts, sc in each of last 7 sts. (12 sc, 14 hdc)
Change to C
Row 3: Ch 1, turn, sc in each st across. (26 sc).
Change to B.

Row 4: Repeat row 2.
Row 5: Ch 1, turn, sc in each of first 7 sts, hdc in each of next 4 sts, dc in each of next 10 sts, hdc in each of next 2 sts, sc in each of last 3 sts. (10 sc, 6 hdc, 10 dc)
Fasten off, leaving a long tail for sewing.
STRAP:
With B, ch 10, being careful not to twist the ch, join with a sl st to first ch to make a circle. Strap is worked in spiral rnds, do not join rnds, do not ch to start rnds.
Rnd 1: Hdc in each of first 9 chs, remove loop of B from hook and secure with a stitch marker, join C with sl st in last st, hdc with C in last st.
Rnd 2: Hdc with C in each st of B until you reach the free loop of B, remove loop of C from hook and secure with a stitch marker, remove marker from loop of B and place that loop on hook.
Rnd 3: Hdc with B in each st of C until you reach the free loop of C, remove loop of B from hook and secure with a stitch marker, remove marker from loop of C and place that loop on hook. Repeat rnds 2-3 until work measures 30 inches or desired length.
Last rnd: Hdc with C in each of next 6 sts, sl st in next st, fasten off C. Remove marker from loop of B and place that loop on hook, sl st in next st, fasten off B.
Fasten off.
ASSEMBLY:
The blo stitches on the body create 2 fold lines. The area between these lines is the bottom of the purse.
With RS together, place one side piece along one side edge of the purse so that the winder end aligns with the bottom. Sew together around side and bottom edges, using long tail. Repeat for the other side piece.
With RS together, align straight edge of flap with one of the top edges of the purse (this is now the back of the purse). Sew together using long tail.
Sew one end of handle to top edge of each side piece.
Weave in all ends.
Turn bag right side out.
Sew button to center front of purse. Insert button between dc stitches on flap to close.
Did you enjoy making this sweet purse?
Get the ad-free printable PDF pattern here
If you're looking for more great patterns, check out more of my posts below: