If you follow my blog, you already know that I bought a new/used vehicle. I recently wrote out a free console cover crochet pattern.
Now it is time to cover the cut up steering wheel!
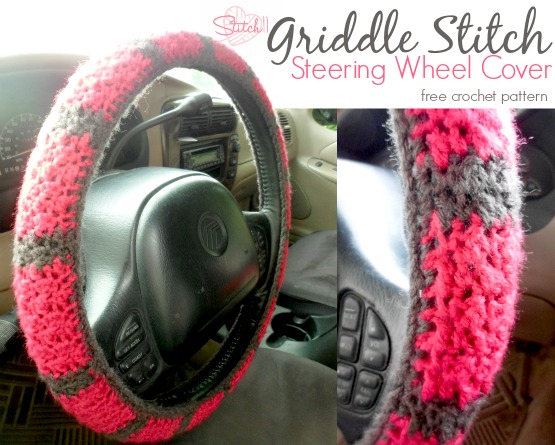
I did a quick search for free patterns but to my surprise, there really are not any to choose from. So here I am, with my yarn, hook, and the Moogly Griddle Stitch Tutorial pulled up. If you are not familiar with this stitch, go ahead and check it out before starting. (Yes, I write the posts as I crochet the item) 🙂
First thing is first, measure your steering wheel. I just took a piece of yarn and wrapped it around the outside of the wheel which measures out to be about 47 inches. Then measure how wide around the wheel is, mine is around 4 inches.
The trick to making your cover, is to make it so it has to stretch as big as you can stretch it to be the length you need. Don't worry, you will be able to get it onto the wheel easier than it seems. Your goal is to make it so it is stretched so tight, that it doesn't want to move once you put it on. I was intimidated by this idea.. but once I made it, I realize it is so much easier and more secure than I imagined beforehand.
So now that I know it is around 4 inches, I will make a band that stretches to be about 4 inches wide. And then I will crochet in length that the steering wheel is round. I will share my pattern with you, just remember to make your own measurements just in case yours needs to be a few inches different than mine. Mine will fit to stretch into place.
Free Steering Wheel Cover Crochet Pattern
Supplies
Med/WW yarn (I used two colors of I Love This Yarn)
F/5-3.75 mm crochet hook
Yarn needle
Stitches
CH- Chain
SC- Single Crochet
DC- Double Crochet
Row 1: CH 12, skip 3 CH (counts as first DC) SC into next CH. **DC into next CH. SC into next CH. Repeat from ** across. (10)
Row 2-6: CH 3(Counts as first DC) SC into the next stitch. **DC into the next stitch. SC into the next stitch. Repeat from ** across. (10)
Drop your original color of yarn.Do not finish off. Attach contrasting color. You will pick up your original yarn after the next two rows.
Row 7-8: CH 3(Counts as first DC) SC into the next stitch. **DC into the next stitch. SC into the next stitch. Repeat from ** across. (10)
Finish off. Pick up your original color yarn. Slip stitch up the side of the last two rows so that you are starting in the same place you finished off the contrasting yarn.
Row 9-14: CH 3(Counts as first DC) SC into the next stitch. **DC into the next stitch. SC into the next stitch. Repeat from ** across. (10)
Drop your original color of yarn.Do not finish off. Attach contrasting color. You will pick up your original yarn after the next two rows.
Row 15-16: CH 3(Counts as first DC) SC into the next stitch. **DC into the next stitch. SC into the next stitch. Repeat from ** across. (10)
Finish off. Pick up your original color yarn. Slip stitch up the side of the last two rows so that you are starting in the same place you finished off the contrasting yarn.
Repeat rows 9-16 twelve more times.
Edging and Joining
Step 1: CH 1. Turn and work up the side of the steering wheel cover. 1 SC into the side of each SC and 1 SC into the side of each CH 3.
Step 2: CH 1, Turn and work back down this same side. SC into the first stitch. SC DEC. **SC into the next stitch. SC DEC. Repeat from ** across.
Step 3: Repeat steps 1-2 but on the other side of the steering wheel cover.
Step 4. Finish off leaving long tail for joining the ends. Join the ends and stretch around the steering wheel. It will be a good secure and snug fit.