• Home
  • Free Patterns
    • Toys
    • Costumes
    • Bags
    • Flowers
    • Hats
    • Pattern Reviews
    • Household
    • Newborn
    • Scarves
    • Sports
  • Disclosure
  • Contact
  • Yummy Food
  • Round Ups

Stitch11

A Yarntastic Life!

  • Girls
  • Boys
  • Hats
  • Newborn
  • Flowers
  • Household
  • Costumes
  • Toys
  • Pattern Reviews
  • Grannys
You are here: Home / Archives for Costumes

Newborn Skull Knot Hat

May 27, 2015 By stitch11 2 Comments

Newborn Skull Knot Hat

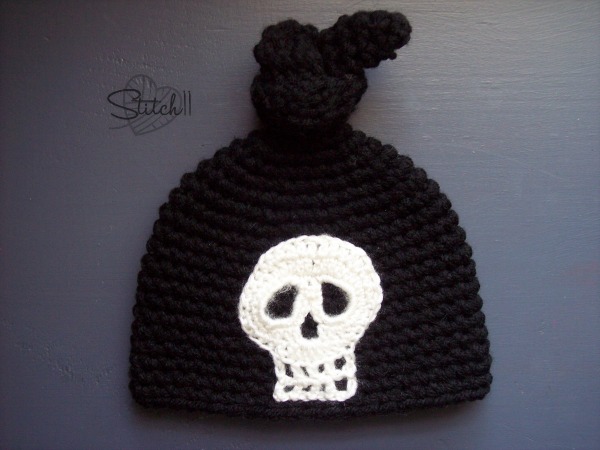
My latest order is for a dear friend who wanted to welcome her new baby home in a custom made crochet hat.
As soon as she messaged me on Facebook, I knew the Crochet Newborn Knot Hat by Repeat Crafter Me would be perfect!

I told her I could put any applique on the hat that she wished.. and she requested a skull. Which is really ideal for their family since her daughters love Monster High!

To make the skull I followed the Day Of The Dead Skull Applique by KristinsKrazyKnits. I found this free pattern through one of Moogly's wonderful round ups that you can check out HERE!

For the hat I used Red Heart With Love and for the skull I used Cascade Cherub DK weight.

Filed Under: Boys, Costumes, Free Patterns, Hats, Newborn, Pattern Reviews

Bunny Hat – Free Crochet Pattern – Review

March 24, 2015 By stitch11 Leave a Comment

Bunny Hat - free crochet pattern - review


I decided to follow the free “One Hour Bunny Hat” (<–link to pattern) by Moogly – because I wanted a quick and simple pattern to add to my Easter crochet stash… well, my daughters. 😉

After working up the base of the hat, Ella asked me if the ears would stick up like a “real bunny”. I told her I will see what I can do…

I decided to make two layers of each ear before doing the trim around the ears. I used one white layer and one blue layer for each ear. I then joined them together while doing the trim directed by the pattern. I also lightly stuffed them.
When attaching them, they wanted to flop straight forward. To solve this issue.. I just kept securing them, over and over. I also attached them a little bit together at the bottom of the ears. I would put the hat on, check to see if they stood up, and if not, I would go back and secure them to the base of the hat a little more. Then suddenly, they stayed straight up!

Ella was so excited, as you can see from the photos! This fun and quick pattern made my daughter so happy! Thanks Moogly!!!

Filed Under: Boys, Costumes, Free Patterns, Girls, Hats, Pattern Reviews

Infant Cocoon Flower Photo Prop – Free Crochet Pattern

March 8, 2015 By stitch11 14 Comments

Infant Cocoon Flower Photo Prop Free Crochet Pattern Stitch11

This project came to me while I was at the Dollar Store. I was buying some candles and My Little Ponies… when the man behind the register complimented my daughters hat. He proceeds to tell me he is expecting.. and would love to make a crochet order. I instantly knew what I wanted to make for his baby girl (due to arrive this Spring).
After chatting with his wife on Facebook.. we had settled on the direction I would run with the project.. and I also let her know I would be gifting the photo prop to her.
As many of you know, I do not take very many crochet orders. But for some reason, I felt the urge to crochet a flower pattern for photo prop for the wittle baby growing in her belly. 🙂 Gotta follow your heart!
This infant photo prop is very stretchy. It should work great for newborn to at the least 6 month old's. you may be able to make it work for even larger babies.. but since I do not have any babies on hand, I can't test it out. Maybe the mother will share some photos with us this Spring!

Supplies 
N – 9 mm crochet hook.
< One Skein of #5 Bulky- Lion Brand Homespun – Forest (green)
< One Skein of #5 Bulky- Lion Brand Homespun – Purple Haze (or whatever color you want the most of your flower to be)
1/2 Skein of #4 Medium- Simply Soft – Grape (purple)
< 1/4 Skein of #4 Medium – Simply Soft -Limelight (light green)
Yarn Needle

Stitches
Magic Circle
CH- Chain
SC – Single Crochet
HDC- Half Double Crochet
DC – Double Crochet
DC DEC – Double Crochet Decrease
DC 4 together
TRE – Treble Crochet

Gauge
4 rows of DC = 3.5 inches
5 DC = 3 inches.

Note – Starting CH does not count as a stitch. 

Leaves! 
Starting with the Lion Brand Homespun – Forest (green) 
Step 1: (Leaving long starting tail.) Magic Circle. CH 2. 11 DC into magic circle. Join to the top of first DC. (11 stitches)
Step 2: CH 2. 2 DC into each DC. Join to the top of first DC. (22 stitches)
Step 3: CH 2. **2 DC into the first SC. 1 DC into the next DC. Repeat from ** 10 more times. Join to the top of the first DC.  (33 stitches)
Step 4: Crochet in front loops of this round only. CH 2. **2 DC into the first DC. 1 DC into each of the next 2 DC.  Repeat from ** 10 more times. Join to top of first DC. (44 stitches)
Step 5: CH 2. **2 DC into the first stitch. 1 DC into the next 3 stitches. Repeat from ** 11 more times. Do NOT join. (55 stitches)
Step 6: Turn. CH 2. DC into each SC across. (55 stitches)
Step 7: Turn. CH 2. DC DEC.  DC in next 27 stitches. (28 stitches)

Step 8: Turn. CH 2.  DC DEC. DC in next 24 stitches. DC DEC. (26 stitches)
Step 9: Turn. CH 2. DC DEC. DC in next 22 stitches. DC DEC.  ( 24 stitches)
Step 10: Turn. CH 2.  Two DC DEC. DC in next 16 stitches. Two DC DEC. (20 stitches)
Step 11: Turn. CH 2. DC into each stitch across. (20 stitches)
Step 12: Turn. CH 2. DC DEC. DC in next 16 stitches. DC DEC. (18 stitches)
Step 13: Turn. CH 2. DC DEC.  DC in next 14 stitches. DC DEC. (16 stitches)
Step 14: Turn. CH 2. DC into each stitch across.  (16 stitches)
Step 15: Turn. CH 2. DC DEC. DC in next 12 stitches. DC DEC. (14 stitches)
Step 16: Turn. CH 2. DC DEC. DC into next 10 stitches. DC DEC. (12 stitches)
Step 17: Turn. CH 2. Two DC DEC. DC in next 4 stitches. Two DC DEC. (8 stitches)
Step 18: Turn. CH 2.  DC DEC. DC in next 4 stitches. DC DEC. (6 stitches)
Step 19: Turn. CH 2. DC DEC. DC in next 2 stitches. DC DEC. (4 stitches)
Step 20: Turn. CH 2. DC all 4 stitches together. Finish off leaving long tail for weaving in.

Join yarn to the turning (unworked) stitch from Step 7. Repeat Steps 8-20 for other leaf. 

Flower/ Cocoon!
Using Lion Brands Homespun Purple Haze 
Step 1: Join yarn to unworked back loops from step 4 of the leaves. CH 2. DC into each stitch around. Join to first DC. (33 stitches)
Step 2-12: CH 2. DC into each stitch around. Join to first DC. (33 stitches)
Step 13: Crocheting in front loops of this round only. CH 2. DC into each front loop around. Join to first DC. (33 stitches)
Step 14-15: CH 2. 1 DC into each DC around. Join to first DC. (33 stitches)
Step 16: CH 2.** 2 DC into the first DC. 1 DC into each of the next 2 DC.  Repeat from ** 10 more times. Join to first DC. (44 stitches)
Step 17: CH 2. 2 DC into each DC. Join to first DC. (88 stitches)
Step 18: CH 1. **SC into next 2 stitches. 2 DC into next stitch. 1 DC into next stitch. 3 TRE into each of the next 2 stitches.  1 DC into next stitch. 2 DC into next stitch. Repeat from ** 10 more times. (154 stitches)
Finish off leaving long tail for weaving in.

Flower/ Cocoon Edging
Using Simply Soft Grape (purple)
Step 1: Attach yarn where you finished off from Step 18. CH 1. **SC into each of the next 2 SC. SC into next 2 stitches. DC into next 2 stitches. 2 TRE into next stitch. 3 TRE into each of the next 2 stitches. 2 TRE into next stitch. DC into next 2 stitches. SC into next 2 stitches. Repeat from ** 10 more times. Join to first stitch. (220 stitches)
Step 2: CH 1, turn. SC into each stitch around. Join to first stitch. (220 stitches) You will be going the other direction since the petals fold down.. it will give it a nice finished edging.  

Inner Flower Petals
Using Simply Soft Grape (purple) 
Step 1: Attach your yarn to one of the back loops from Step 13 of the flower. But, attach it as if it were the front loop. You will want the nice side of the stitches showing when it folds down. CH 2. DC into same loop and each loop around. Join to first stitch. (33 stitches)
Step 2: CH 2. DC into each stitch around. Join to first stitch. (33 stitches)
Step 3: CH 2. 2 DC into each stitch around. Join to first stitch. (66 stitches)
Step 4: CH 1. **SC into next two stitches. DC into next stitch. 3 TRE into each of the next  2 stitches. DC into next stitch.  Repeat from ** 10 more times. Join to first stitch. (110 stitches)
Step 5: CH 1. ** SC into next 3 stitches. HDC into next stitch. 2 DC into next stitch. 3 TRE into next stitch. CH 3. Slip stitch into first CH. 3 TRE into next stitch. 2 DC into next stitch. HDC into next stitch. SC into the next stitch Repeat from ** 10 more times.  Join to the first stitch. (160 stitches)
Finish off with long enough tail for weaving in your end. 

Leaf Edging
Using Simply Soft – Limlight (light green) 
Join your yarn to the edge of one of the leaves. You will be putting 2 SC into the side of each DC while working around the edge. When you get to the places where the leaves join each other, you will just put 1 SC between the stitches. When you get to the tip of the leaves. {1 SC CH 3, slip stitch to first CH. 1 SC.} All into the tip of each leaf.  Work your way around and join to your starting SC.

You are almost done. Remember your starting end? The one at the bottom of the crochet piece? Take it and weave it back and forth between step one and two. Pull tight and secure your end. This make the first round you crocheted stick out like a little bump.. giving the look as if you plucked the flower right off the stem.
Now that you have done that, weave in all of your other ends. Now, all that is left to do- find a cute baby!!! 😉

Filed Under: Costumes, Flowers, Free Patterns, Girls, Newborn

6 Cat Patterns!

January 16, 2015 By stitch11 Leave a Comment

6 Crochet Cat Patterns

My family has a fascination with cats! They are so much fun.. each one and their unique personalities!

Over the last few years, I have crocheted 6 cat inspired patterns. These are patterns I have either written or reviewed. Enjoy meow!

Free Cat Ear Headband Pattern 
Crochet Kitty Cats
Toddler Kitty Cat Hat 
Fingerless Kitty Mittens 
Grumpy Cat (pet) Hat 
Cat Nap Hat 

Filed Under: Costumes, Free Patterns, Hats, Pattern Reviews, Round Ups

So Easy and So Perfect! – The Three Step Bow –

January 16, 2015 By stitch11 5 Comments

The Three Step Crochet Bow

Today is “Wear your Colts colors” day at my daughters school. I asked her if she wanted a bow and she quickly said yes! Due to little time to make it, I came up with a super fast and easy version of the Boutique Bow.
This bow measures about 3 inches wide and 2 inches tall.

Stitches Used 
CH – Chain
Slip Stitch
SC – Single Crochet
HDC – Half Double Crochet
DC – Double Crochet

Supplies 
Any yarn with the appropriate hook size.  – I used Red Heart with Love and a 5.5 mm crochet hook
Yarn needle

Get Started! 
Row 1: CH 21. Turn. Skip 1 CH. **DC in next 2 CH. HDC in next 2 CH. SC in next 2 CH. HDC in next 2 CH. DC in next 2 CH. Repeat from ** one more time. CH 1. Turn.
Row 2: **DC in next 2 stitches. HDC in next 2 stitches. SC in next 2 stitches. HDC in next 2 stitches. DC in next 2 stitches. Repeat from ** one more time. CH 1. Turn.
Row 3: **DC in next 2 stitches. HDC in next 2 stitches. slip stitch in next 2 stitches. HDC in next 2 stitches. DC in next 2 stitches. Repeat from ** one more time.
Finish off leaving long tail. Fold the piece. Using yarn needle, sew both ends together. The SC should line up over each other. Weave your yarn end to the center of the bow. Wrap the bow with your yarn end and secure the end using your yarn needle. Finish off.

Filed Under: Costumes, Free Patterns, Girls

Free Crochet FOX Costume Tutorial

October 30, 2014 By stitch11 3 Comments

Free Crochet FOX Costume Tutorial

My daughter wanted to be a fox! I knew instantly this would be a fun one to put together. You can make a fox costume too!
HERE is the free Fox Hat crochet pattern.
You can get the free Fingerless Gloves pattern HERE.
HERE is the free Leg Warmer pattern.
The free Tutu Tutorial is HERE.
And HERE is the review for the free Fox Tail tutorial.

To make the belly, I just cut a piece of felt into an oval and hot glued it onto the shirt.
Happy Halloween!


Filed Under: Costumes, Free Patterns, Girls

Fluff Cuff – Child Size Leg Warmers

October 29, 2014 By stitch11 Leave a Comment

Fluff Cuff - Child Size Leg Warmers

The child size Fluff Cuff Leg Warmers were designed to look like fox legs. My daughter will be wearing a crocheted fox costume this year for Halloween. Be sure to also check out the free crochet patterns for the Fluff Cuff Fingerless Gloves, Fox Hat, Fox Tutu, and the Fox Tail. If you really love foxes, you may want to make the Baby Fox too!

Supplies
Medium weight yarn – I used “Brown” I Love This Yarn for the leg warmers.
Medium weight “Terra Cotta” I Love This Yarn. (It’s a rusty orange) and “Cranberry” I Love This Yarn. (It’s a pretty rosey color) for the fluff.
Pet Brush
Yarn needle – for weaving in ends
J-6.00 MM crochet hook

Stitches
Slip Stitch
SC – Single Crochet
HDC – Half Double Crochet
FSC – Foundation Single Crochet

*Tip* you will want to take the time to learn the FSC. Check out this fantastic tutorial by Moogly. Because of using the FSC, the legwarmer will stretch nicely over the foot for a perfect fit.

Round 1: FSC 31. Join to first FSC
Round 2-23:  Now working in continuous rounds. HDC into same stitch and each stitch around.  (31)

SC into next stitch. Slip stitch into next stitch

Round 24: CH 1, SC into same stitch and each stitch around. Join to first SC. (31)

Finish off and weave in your ends. Repeat… one for each leg 🙂

Cut pieces of yarn about 4 inches long. You will need to attach 3 strands at a time over the SC stitches of Round 28. To attach them, fold 3 strands in half. Insert your hook around a SC stitch. Put the hook through the fold of the yarn strands. Pull through stitch creating a loop. Wrap yarn ends over the hook, and pull through the loop you just made. Tug on yarn strands.
Once you have attached yarn the entire way around, trim the yarn to be about 1.5 inches long.  Brush the yarn with the pet brush until it’s fluffy. Lightly brush the entire leg warmer to make a slight fluffy look to the stitches. Repeat on other leg warmer.

Filed Under: Costumes, Free Patterns, Girls

Fox TuTu For Miss Fox – Free Tutorial

October 27, 2014 By stitch11 Leave a Comment

Fox Tutu Tutorial

Supplies
-1.5 inch button
-2 colors of your choice of medium weight yarn.  I used “Terra Cotta” I Love This Yarn. (It’s a rusty orange) and “Cranberry” I Love This Yarn. (It’s a pretty rosey color)
-J-6.00 MM crochet hook
-Yarn needle for weaving in ends and attaching the button.  
-Tulle (The amount of tulle used will vary.) I bought one roll of tulle that is already in the right width needed. But I also bought 3 yards of tulle that isn't cut at all. The amount of tulle you will need will depend on how long or fluffy you want to make the tutu. I like to buy a tad more than I expect to need.. just to be safe.
-Ribbon (The ribbon is optional. I found some pretty orange ribbon and some ribbon with foxes on it.. too cute to pass up!) 

Crochet Stitches Used 
FSC – Foundation Single Crochet
TRE – Treble Crochet Stitch
HDC – Half Double Crochet

Step 1
Holding both strands of yarn together – I started with a FSC  of 62. You will want to check the measurements for whom you are making the tutu for. I wrapped the FSC piece around my daughters hips to make sure it fit snuggly. As I have learned from the past.. they tend to stretch out a little after being worn the first time.  You do not have to use a count of 62 FSC… if you need to make it smaller or larger.. adjust the number of FSC until you have the appropriate size.

Step 2
CH 3. Turn. TRE into each FSC across.

Step 3 
CH 1. Turn. HDC into each stitch across.

Step 4
Weave in your ends and attach your button.  The entire row of step 2 can be button holes. 🙂

Step 5
All that is left for you to do it attach the tulle and ribbon. If you do not know how to do this, check out my How To Make A TuTu tutorial for a step by step photo direction on attaching the tulle.
I cut my tulle to be about 2 feet long (and 6 inches wide). I did 1 orange for every 3 red pieces. After I joined tulle around the HDC stitches of step 3, I added a 2 foot piece of ribbon to the bottom of every 4th TRE stitch from step 2.

You can add a fox tail using this FREE Fox Tail Tutorial! By using the loops at the top of your braid, ,you can attach and detach the fox tail to your button anytime!
Also check out the Fox Hat and Fluffy Cuff Fingerless Gloves!
If you really love fox's, you may want to make the baby fox too!

Filed Under: Costumes, Free Patterns, Girls, Pattern Reviews

Fluff Cuff – Child Size Fingerless Gloves

October 22, 2014 By stitch11 Leave a Comment

Fluff Cuff - Child Size Fingerless Gloves - Free Crochet Pattern

Living in Indiana, means not knowing what kind of weather Halloween will bring. Some years we have Indian Summers (or so the weather man calls them?) -while some Halloween's bring snow. To avoid the risk of my children getting cold while trick or treating door to door… I always try to make sure their costumes are warm enough to block crisp air from reaching their skin.
Last Halloween, my daughter was a cat. I made her the Fingerless Kitty Cat Mittens. This year she will be a FOX! 😀 So far I have made the Fox Tail, and the Fox hat. It's only fitting that I make her new fingerless gloves to match this years costume. And like most of what I make, here is the free pattern for these adorable Fluff Cuff – Child Size Fingerless Gloves!

[Read more…]

Filed Under: Costumes, Free Patterns, Girls

Child Size Fox Hat – free crochet pattern

October 19, 2014 By stitch11 Leave a Comment

Child Size Fox Hat - Free Crochet Pattern

If you haven't already made the Fox Tail, you must check the Fox Tail Tutorial out right away! I used the same pet brush to fluff this basic medium weight beanie!  You do not have to fluff the beanie you make, it looked beautiful with clean stitches- My daughter is just asking for a fluffy type of fox costume. As much as I would love to make every piece of her costume with super fluffy yarn… it just isn't practical for me at the moment. Basic medium weight yarn is much easier to buy in the colors I need.
There will be more pieces to my daughters costume. If you want to make sure you never miss a post, make sure you subscribe! You can find the option to subscribe on the right side of this site. Thanks!!

Also check out the matching Fingerless Glove pattern!

How To Crochet a Child Size Fox Hat – Free Crochet Pattern

[Read more…]

Filed Under: Boys, Costumes, Free Patterns, Girls, Hats, Inspired

Fox Tail – Free Tutorial – Review

October 15, 2014 By stitch11 Leave a Comment

Fox Tail - Free Tutorial Review

I am so excited to finally start on my daughters Halloween costume. She made it clear to me that I *must* start by making her fox tail first.

A quick post in the Facebook crochet group Yartists led me to this fun free tutorial by I Save A 2 Z. You can view the tutorial HERE.

It took me about three days to complete- but I am not able to sit and work on my projects all day… or I would have been able to finish it in one day.  I did not use a straightener on the yarn. If you choose to use one, I would suggest using it before attaching the yarn to the braid.

We are so thrilled with how beautiful this tail came out! Now to start on another part of her costume. More posts to come!  😀

If you love a beautiful fox, check out the Baby Fox Pattern I tested!
Also check out the matching Fingerless Gloves Pattern and the free Fox Hat pattern!

Filed Under: Costumes, Free Patterns, Pattern Reviews

Where’s Waldo – free crochet pattern review

October 12, 2014 By stitch11 Leave a Comment

Where's Waldo - free crochet pattern review

A friend of mine asked if I could squeeze in a small project to help her complete her sons Halloween costume. She sent me a link to what she had in mind.

To my surprise, it was a free Where's Waldo crochet hat pattern designed by Repeat Crafter Me! I love all of her designs! Her patterns are always very easy to follow and very true to the size.

I tried this one on my 3 year old and she says it fits perfect.

Pair this hat with a striped shirt and black round glasses and you will have Waldo! Thanks for the pattern Repeat Crafter Me!

Get your copy of this free pattern >HERE<

Filed Under: Boys, Costumes, Free Patterns, Pattern Reviews

Creepy Skull Slouch – Pattern Review

October 2, 2014 By stitch11 14 Comments

Crochet Skull Hat Pattern

I stumbled upon this amazing Skull Hat pattern by Spider Mambo Designs. You can get the pattern HERE. Be sure to check out her Facebook page HERE too!

I want to start off by letting you know how much I am amazed by this design. I would never have been able to figure out how to make skulls like this.. and Spider Mambo makes it EASY!!!!

I did make a few changes… only to my personal liking. I did not find any reasons to HAVE to make changes. You can follow the pattern to exact and it turn out amazing!  I will say, the size small is more like child size.. but my head is small so I made it into an adult beanie instead of slouch.  If you are wanting the teen-adult slouch, definitely make the size large.
What changes did I make?
-I  started off the Creepy Skull pattern with  a FSC instead of the basic CH.
– I then did a round of FPSC before continuing with the DC directed in the pattern. I do this because I love the snug and stretchy fit that the FSC and FPSC together make.
– After round 14, I decided to go ahead and skip the next few rounds to close the hat a little earlier than the pattern calls for. This makes the size small more beanie than slouchy for my own head.  Doing this, I did the 4 SC like the pattern calls for on round 15. Just not the chains. Then, I finished it off with a long end and wove it back and forth around the stitches, pulled tight to close and wove in my ends.
– I decided to line my hat using fleece from sweatpants that my daughter had outgrown. I followed this awesome tutorial by Playin' Hooky Designs!
– I also added a pom pom using my Secure Pom Pom Tutorial.

Filed Under: Costumes, Hats, Pattern Reviews

Crochet New York Newsboy Hat and Diaper Cover

September 27, 2014 By stitch11 1 Comment

https://stitch11.com/wp-content/uploads/2014/09/New-York-Newsboy-and-Diaper-Cover.jpg

An old friend of mine contacted me with this New York newsboy hat and diaper cover request.
I used my own (free) >Newborn Newsboy< hat crochet pattern.
Below you will find the N and Y crochet pattern.
The diaper cover can be found at >Crochet by Jennifer's Ravelry account<. It is a paid pattern but well worth those few bucks! She gives plenty of measurements to help you make sure everything is coming out the right gauge. The pattern is well written and simple to follow!
I couldn't be more happy with the outcome of the diaper cover! I have followed a free pattern for one in the past but it didn't turn out as perfect as this one.

Using a 5 MM crochet hook and white Medium/Worsted Weight yarn.

N
Part 1: CH 18. Skip 1 CH. 2 HDC into next CH. CH 1, Slip stitch into same CH. Slip stitch into next 5 CH. CH 1, HDC into same CH. CH 1, Slip stitch into same CH.
Part 2: Slip stitch into next 6 CH. CH 1, HDC into same CH. CH 1, Slip stitch into same CH.
Part 3: Slip Stitch into last 5 CH.  CH 1, 2 HDC into same CH.
Part 4: Finish off leaving long tail. You will need to twist the piece while attaching it to make the N shape point back up.

Y
Part 1: CH 8. Skip 1 CH. HDC into next CH. CH 1, Slip stitch into same CH. Slip stitch into next 3 CH.
Part 2: CH 5, Skip 1 CH, HDC into next CH. CH 1, Slip stitch into same CH and back up 3 more CH.  Slip stitch into the same CH you slip stitched into last in part 1.
Part 3: Slip stitch into last 3 CH. CH 1. HDC into same CH.
Part 4: Finish off leaving long tail. Attach to the hat using the photo (or google) as a guide.

If this hasn't satisfied your hat pattern cravings, take a peek at these other hat patterns from my blog: 40 Baby Boy Crochet Hat Patterns

Filed Under: Boys, Costumes, Free Patterns, Hats, Newborn, Pattern Reviews

Minnie Mouse in Preschool

August 20, 2014 By stitch11 35 Comments

This Minnie Mouse Hat Crochet Pattern is perfect for little ones who are big fans of Miss Minnie Mouse. Fits kids aged 3-5. #crochet #crochetlove #crochethat #crochetaddict #crochetpattern #crochetinspiration #ilovecrochet #crochetgifts #crochet365 #addictedtocrochet #yarnaddict #yarnlove

This Minnie Mouse Hat Crochet Pattern is perfect for little ones who are big fans of Miss Minnie Mouse.

When I was first learning how to crochet, a local mom came to me while shopping in the baby food aisle at Walmart. She told me she LOVED my daughter's hat (first and the only thing I had made at the time) She offered me 20 dollars to make her daughter a hat too! I was so shocked and excited!

Now 2.5 years later, she has come back! She wanted to know if I could make her daughter a Minnie Mouse hat. How exciting is this? We will both get to see how far I have come since that first sale. And… not to mention the fact that she came back in the first place 😉 I told her I felt sorry for all the people who paid me for hats when I was first learning to crochet. She was quick to tell me they still love and admire the hat, but that her beautiful daughter has simply outgrown it. So here we go!

This pattern is designed for 3-5 year olds.

Minnie Mouse Hat Crochet Pattern

Supplies
I/9 – 5.5 mm crochet hook
black med-worsted weight yarn (I used I Love This Yarn)
Yarn needle
You will also need…
#5 Pink Bulky Weight Yarn and a 6.5 mm crochet hook for the bow

Stitches Used
Magic Circle 
CH- Chain
SC- Single Crochet
HDC- Half Double Crochet
FPDC – Front Post Double Crochet 
FPSC – Front Post Single Crochet

You will also be using these stitches when making the bow
DC- Double Crochet
HDC-2-TOG
DC-2-TOG

The Beanie (Fits 3-5-year-olds)

You will be working in continuous rounds.

Round 1: Magic Circle. 10 HDC in the magic circle.  (10)
Round 2: 2 HDC into each of the next 10 stitches. (20)
Round 3: **2 HDC into the next stitch. HDC into the next stitch. Repeat from ** 9 more times. (30)
Round 4: **2 HDC into the next stitch. HDC into the next 2 stitches. Repeat from ** 9 more times. (40)
Round 5: **2 HDC into the next stitch. HDC into the next 3 stitches. Repeat from ** 9 more times. (50)
Round 6:  1 HDC into each of the next 50 stitches. (50)
Round 7: 2 HDC into the next stitch. 1 HDC into the next 5 stitches.  Repeat from ** 7 more times. HDC into each of the next two stitches. (58)
Rounds 8-13: 1 HDC into each of the next 58 stitches. (58)
Round 14: 1 HDC into each of the next 56 stitches. SC into the next stitch. Slip stitch into the next stitch. (58)
Rounds 15-19: CH 1, HDC into same stitch. FPDC over next stitch. ** HDC into next stitch. FPDC over next stitch. Repeat from ** around. Join to first HDC. (58)
Round 20: CH 1, FPSC into each stitch around. Join to first FPSC. (58)

Finish off and weave in your ends.

Ears

Round 1: Magic Circle. CH 1. 6 HDC into the magic circle. Do NOT join. Pull ring tight.(6)
Round 2: CH 1, turn. 2 HDC into each stitch across. (12)
Round 3: CH 1, turn. 2 HDC into the first stitch. 1 HDC into the next stitch. **2 HDC  into the next stitch. 1 HDC into the next stitch. Repeat from ** across. (18)
Round 4: CH 1, turn. SC into next 4 stitches. 2 SC into the next stitch. HDC into next 3 stitches. 2 HDC into each of the next two stitches. HDC into next 3 stitches. 2 SC into the next stitch. SC into next 4 stitches. (22)
Round 5: CH 1, turn. SC into next 6 stitches. 2 SC into the next stitch. HDC into next 3 stitches. 2 HDC into each of the next two stitches. HDC into next 3 stitches. 2 SC into the next stitch. SC into next 6 stitches. (26)
Round 6: CH 1, turn. SC into next 8 stitches. HDC into next stitch. 2 HDC into the next stitch. HDC into each of the next 6 stitches. 2 HDC into the next stitch. HDC into the next stitch. SC into next 8 stitches. (26)

Finish off and repeat for a total of 4 ears.

Layer 2 ears together and join from one side to the other with the slip stitch. No need to join the bottom, you will do that when attaching it. This will make it a thicker and stronger ear. Attach the ear to the hat and repeat for the other ear. I attached my ears across rounds 2-9.

Now all you need to do is make your Minnie Mouse Bow and attach it in front of your ears.
When I attached my bow, I used black yarn and not only attached the bottom center to the hat, but I also attached it to the ears a little bit.

Filed Under: Costumes, Free Patterns, Girls, Hats, Inspired Tagged With: crochet hat, hat, mini, minnie, minnie mouse, mouse

Cat Nap Hat

August 2, 2014 By stitch11 1 Comment

Cat Nap Hat- free crochet pattern - sizes adult, child, and toddler


This fun cat lover crochet hat is designed to have a warm, stretchy & snug fit around the ears. The hat (in sizes adult, child, and toddler) is great for all seasons and all reasons!

Supplies
Med/Worsted Weight Yarn (I used black I Love This Yarn and pink Red Heart Super Saver)
I/9- 5.5 MM Crochet Hook
Yarn Needle

Stitches Used 
CH – Chain
SC – Single Crochet
FSC – Foundation Single Crochet
FPSC – Front Post Single Crochet
FPDC – Front Post Double Crochet

Sizes
Toddler (Child, Teen/Adult)

[Read more…]

Filed Under: Costumes, Free Patterns, Girls, Hats

Free Eyeball Crochet Pattern- Family Fun

June 21, 2014 By stitch11 5 Comments

Free Crochet Eyeball Pattern

I wanted to crochet something to have an excuse to not only get out and find fun ways to use it, but also to have a need to go back to the craft store for more safety eyes! 😉

I bought the safety eyes at Hobby Lobby. They come in packs of 4-8 for about 99 cents – $1.50 a package. These are 15 mm eyes.

To crochet the eyes I used Red Heart Super Saver (worsted) yarn. I used a size E hook (3.5 mm).

Step 1: 6 SC into a magic circle. (Do not pull your ring completely closed, you will want to put the safety eyes through the hole, just not yet)
Step 2: 2 SC into each of the 6 SC from previous step.
Step 3-4: 1 SC into each of the 12 stitches.
Step 5: Put your safety eyes on and pull your ring tight.
Step 6: Make a total of 6 SC DEC.
Stuff the eyeball with cotton or scrap yarn.  Weave in your yarn end!

So much fun and they work up within a minute or two each!

Free Crochet Eyeball Pattern

Free Crochet Eyeball Pattern

Free Crochet Eyeball Pattern

Free Crochet Eyeball Pattern

Free Crochet Eyeball Pattern

Free Crochet Eyeball Pattern

Free Crochet Eyeball Pattern

Free Crochet Eyeball Pattern

Free Crochet Eyeball Pattern

This last one is my favorite. I wish I could have sat around waiting for someone to go into it! Btw, I did NOT do this one, my husband did. I refuse to walk into those things… I am a wuss and always feel like a snake will fly out of it! haha!

Filed Under: Costumes, Free Patterns, Inspired, Toys

Batman!

June 18, 2014 By stitch11 3 Comments

A friend of mine asked me to make her daughter a batman. I was planning on designing my own pattern, but a quick pattern search led me to an adorable free one by Tales Of Twisted Fibers!

I finished this fun guy in about 24 hours from the starting point. My thumb is pretty sore but I was able to power through the tight Single Crochet Stitches. 🙂  If you would like your own copy of the pattern check it out HERE!

If you have a love for Superheros, you can also get your own free Ninja Mask pattern, Captain America Hat, and Ninja Stars all designed by me!

Free Batman Crochet Pattern

Filed Under: Boys, Costumes, Free Patterns, Pattern Reviews, Toys

Grumpy Cat – Beanie for your pets!

May 22, 2014 By stitch11 3 Comments

Grumpy Cat Beanie For Your Pets

Check out this Grumpy Cat beanie! I discovered this pattern on Ravelry a few weeks ago and knew I was going to have to torture my dog Avis. To my surprise, he didn't mind the beanie at all! But my cat, Catcat, ripped it off her head the second I tried to put it on her. She is the grumpiest cat ever!

My great aunt has a giant Main Coon and I would LOVE to see if I can crochet one to fit him. His name is Rooster. He is probably the coolest cat ever! I will most likely be taking this beanie with me everywhere and making every dog I run into model for me. hahaha!

This fun design by Posh Pooch Designs is a great investment for your crochet business. Not only will you be able to make the Grumpy Cat, but with the base of this design, you can use your creativity to create so many other themed/character beanies!

For the eyes I used safety eyes. I attached them to the eye patches. I then used my yarn and yarn needle to stitch a bit of grumpy eye lids over the eyes and also inside the hat to make sure the back of the safety eyes couldn't harm my model.

Hop on over to Posh Pooch Designs on Ravelry and get your copy of this design today!

Filed Under: Costumes, Pattern Reviews

How to Crochet a Hawaiian Lei

May 7, 2014 By stitch11 4 Comments

How To Crochet a Hawaiian Lei - by Stitch11
I have been in what many people call a “Crochet Rut”. It seems like every time I have felt this way…. I am actually just waiting for the right inspiration to boost me back into the hook of things. After weeks.. maybe even months of waiting for that right idea to pop into my head, I remembered one of the things I wrote on my invisible “to crochet” list- a crochet Hawaiian Lei!
The reason this was one of the first things on my list is because I have made them before, just out of fabric cut outs of flowers and fake flowers I found at yard sales. I even made a giant one that my MIL still uses as a decoration around her Hawaiian themed bathroom.
I loved the fabric ones, but the fabric flowers were so thin, it didn't give me the look I had pictured.
When learning how to crochet, flowers were the second thing I taught myself how to do (ear flap hats being the first). So, naturally I thought of the Hawaiian Lei instantly.
I now know why I was in the rut… I needed to back up about 2 years on that invisible list I keep! 😉

This Hawaiian Lei has many possibilities. Have fun with your yarn choices. Dig through your stash and get creative!

[Read more…]

Filed Under: Costumes, Flowers, Free Patterns, Girls, Inspired

  • « Previous Page
  • 1
  • 2
  • 3
  • 4
  • Next Page »
  • Email
  • Facebook
  • Pinterest
  • RSS

Stitch11 is a Red Heart Blogger!

unnamed

.

Grab My Button

Archives

Privacy Policy

Copyright © 2026 Stitch11.com · All Rights Reserved · Log in