• Home
  • Free Patterns
    • Toys
    • Costumes
    • Bags
    • Flowers
    • Hats
    • Pattern Reviews
    • Household
    • Newborn
    • Scarves
    • Sports
  • Disclosure
  • Contact
  • Yummy Food
  • Round Ups

Stitch11

A Yarntastic Life!

  • Girls
  • Boys
  • Hats
  • Newborn
  • Flowers
  • Household
  • Costumes
  • Toys
  • Pattern Reviews
  • Grannys
You are here: Home / Archives for Free Patterns

Little Bigfoot Lion – Review- Free Pattern

January 21, 2015 By stitch11 Leave a Comment

Free Lion Crochet Pattern

As many of you already know, my boss is a 4 year old little girl. She likes looking over my shoulder while I adore patterns by other designers.

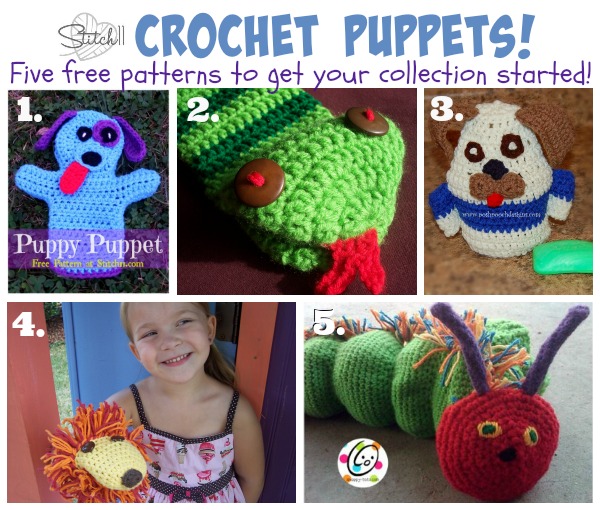
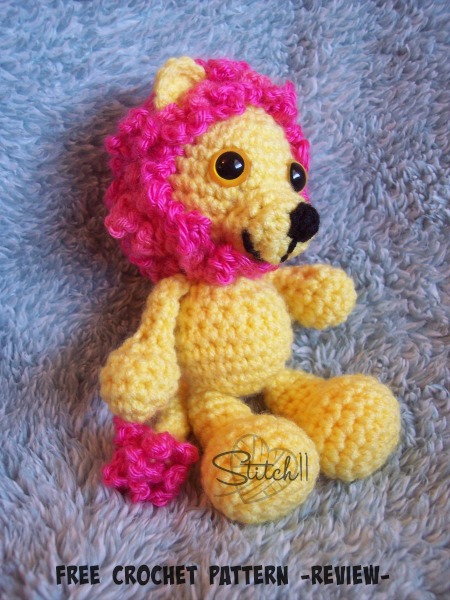
Yesterday, she fell in love with all the Little Big Foot animals, designed by Amiguruimi To Go. But when she laid her eyes on the lion- I was given the color directions and told to get to work! 😉

Click HERE for the free lion pattern.

The pattern worked up very quickly and so much easier than it would appear. The lion is the perfect size! Not so big that your fingers will feel like they are going to fall off, and not too small that it looks sloppy. It's the PERFECT size! I found no flaws and have nothing negative to say about this pattern. I loved it every step of the way! Thanks so much for the awesome pattern Amigurumi To Go!

For more animal patterns and reviews by me, click HERE. 🙂

Filed Under: Free Patterns, Pattern Reviews, Toys

Five Free Puppet Crochet Patterns

January 20, 2015 By stitch11 Leave a Comment

Free Puppet Crochet Patterns

My daughter loves her puppets! Although she has many handmade and store-bought puppets, we are always keeping our eyes out for new crochet puppet patterns. Here are 3 of my free puppet crochet patterns, along with two other free puppet patterns I have found through TheYarnBox!

1. Dog Puppet – Design by Stitch11
2. Snake Puppet – Design by Stitch11
3. Dog Bath Buddy Puppet – Design by Posh Pooch Designs
4. Daniel in The Lions Den – Design by Stitch11
5. Munching Caterpillar – Design by Snappy Tots

Filed Under: Free Patterns, Round Ups, Toys

Five Free Crochet Bow Patterns

January 17, 2015 By stitch11 Leave a Comment

Five Free Crochet Bow Patterns

After making my recent- So Easy and So Perfect Bow pattern.. I decided I wanted to round up my favorite bow patterns from my own designs, and designs linked in the free crochet pattern directory, The Yarn Box.

If you didn't already know, I am an editor for The Yarn Box. My sister Miranda, from Work At Home Adventures, and I work together to share free crochet patterns and to promote traffic to other crochet designers.

If you haven't checked out the directory, hop on over and discover new favorite designs! The best way to help a designer.. is by sharing the links!

Anyways… back to the bows! 

1. Sassy Bow by Simply Collectable Crochet

2. Boutique Bow by Stitch11 (that's me! 😉 )

3. So Easy and So Perfect Bow by Stitch11 (Hey!! That's me too! 🙂 )

4. Chunky Bobble Bow by Lulu Loves

5. How To Crochet A Bow Tie by Mollie Makes

Filed Under: Boys, Free Patterns, Girls, Pattern Reviews, Round Ups

Crochet A Skunk!

January 17, 2015 By stitch11 4 Comments

Free Skunk Crochet Pattern

Supplies 
Yarn Bee – Cameo Bulky- One skein of white. One skein of black.
J/10-6.00 mm crochet hook
Yarn needle
Batting/stuffing
Two 15mm Safety Eyes
Medium/worsted weight yarn in both black and white. (This is for the ears and the tail)
Dog Brush (For brushing the tail)
Small amount of felt for the heart nose.
Hot glue gun for adding the nose.

Stitches
Magic Circle
SC -Single Crochet
SC DEC – Single Crochet Decrease
HDC – Half Double Crochet
DC – Double Crochet

Tip: When changing colors mid-way through a round/row, before you pull your yarn through your last stitch, switch colors and pull it through the two loops. This will not count as your first stitch of your new color. It will give your stitches a clean color change.
You will carry the color you are not using along by crocheting over the yarn strand.
If this is confusing – Check out this tutorial by Moogly. Although please note- with this your will crochet over the unused yarn instead of dropping it behind the stitches.

-Note- The tail of this skunk is made the same way as the Fox Tail from my daughters Fox Halloween Costume.

Lets Get Started On The Body!

Starting with black yarn.
Round 1: Magic Circle. CH 1. 8 SC into magic circle. Join to first SC. (8 stitches)
Round 2: CH 1. 2 SC into each SC around. Join to first SC. (16 stitches)

You will now start working in continuous rounds. (You may want to use a stitch marker.)

Round 3: **2 SC into the next stitch. 1 SC into the next stitch. Repeat from ** 7 more times. (24 stitches)
Round 4: 2 SC into the next stitch. 1 SC into the next 9 stitches. Change to white. 1 SC into next stitch. Change to black.  SC into the next 2 stitches. Change to white. 1 SC into the next stitch. Change to black. 1 SC into the next 9 stitches. 2 SC into the next stitch. (26 stitches)
Round 5: SC into each of the next 11 stitches. Change to white. 1 SC into next stitch. Change to black.  SC into the next 2 stitches. Change to white. 1 SC into the next stitch. Change to black. 1 SC into the next 11 stitches. (26 stitches)
Round 6: SC into each of the next 10 stitches. Change to white. SC into next 2 stitches. Change to black. SC into next 2 stitches. Change to white. SC into next 2 stitches. Change to black. SC into next 8 stitches. Change to white. SC in next 2 stitches.(26 stitches)
Round 7: SC into next 2 stitches. Change to black. SC into next 8 stitches. Change to white. SC into next 2 stitches. Change to black. SC into next 3 stitches. Change to white. SC into next 2 stitches. Change to black. SC into next 7 stitches. Change to white. SC in next 2 stitches. (26 stitches)
Round 8: SC into next 3 stitches.  Change to black. SC into next 7 stitches. Change to white. SC in next 2 stitches.  Change to black. SC into next 3 stitches. Change to white. SC in next 2 stitches. Change to black. SC in next 6 stitches. Change to white. SC in next 3 stitches. (26 stitches)
Round 9: SC into next 3 stitches. Change to black. SC into next 7 stitches. Change to white. SC into next 3 stitches. Change to black. SC into next stitch. Change to white. SC into next 3 stitches. Change to black. SC into next 6 stitches. Change to white. SC in next 3 stitches.  (26 stitches)
Round 10: SC into next 4 stitches. Change to black. SC into next 6 stitches. Change to white. SC into next 3 stitches. Change to black. SC into next stitch. Change to white. SC into next 3 stitches. Change to black. SC into next 6 stitches. Change to white. SC in next 3 stitches. (26 stitches)
Round 11: SC into next 4 stitches. Change to black. SC into next 6 stitches. Change to white. SC into next 3 stitches. Change to black. SC into next stitch. Change to white. SC into next 3 stitches. Change to black. SC into next 6 stitches. Change to white. SC in next 3 stitches.  (26 stitches)
Round 12: SC DEC. SC in next 2 stitches. Change to black. SC DEC. SC in next 5 stitches. Change to white. SC in next 5 stitches. Change to black. SC in next 5 stitches. SC DEC. Change to white. SC DEC. Sc into the next stitch. (22 stitches)
Round 13: SC in next stitch. SC DEC. Change to black. SC in next 2 stitches. SC DEC. SC in next 2 stitches. Change to white. SC in next 5 stitches. Change to black. SC in next 2 stitches. SC DEC. SC in next 2 stitches. Change to white. SC DEC. (18 stitches)
Round 14: SC in next 2 stitches. Change to black. SC DEC. SC in next 4 stitches. Change to white. SC in next 3 stitches. Change to black. SC in next 4 stitches. SC DEC. SC in next stitch. (Go ahead and break the white yarn here.) (16 stitches)
Stuff the body
Round 15: SC DEC 8 times. Slip stitch into next stitch. Finish off leaving long tail.

 Time To Start The Head! 

Starting with black yarn.

Round 1: Magic circle.  CH 1. 6 SC inside magic circle. Join to first SC. (6 stitches)
Round 2: CH 1. 1 SC into each SC around. Join to first SC. (6 stitches)
Round 3: CH 1. 2 SC into the first stitch. SC into next stitch. Change to white yarn. SC in next 2 stitches. Change to black yarn. SC into next stitch. 2 SC into last stitch. Join to first SC. (8 stitches)

You will now start working in continuous rounds. (you may want to use a stitch marker.

Round 4: 2 SC into next stitch. SC into next stitch. Change to white. 2 SC into each of the next 2 stitches. Change to black. SC into next stitch. 2 SC into next stitch. SC into next 2 stitches. (12 stitches)
Round 5: SC into each of the next 3 stitches. Change to white. SC into next stitch. 2 SC into next 2 stitches. SC into next stitch. Change to black. SC into next 5 stitches. (14 stitches)
Round 5: SC into next stitch. 2 SC into next stitch. SC into the next stitch. Change to white. SC into each of the 6 stitches. Change to black. SC into the next stitch. 2 SC into the next stitch. SC into each of the next 3 stitches.  (16 stitches)
Round 6: 2 SC into each of the next 4 stitches. Change to white. 2 SC into each of the next 6 stitches. Change to black. 2 SC into each of the next 4 stitches. 1 SC into next 2 stitches. (30 stitches)
Round 8: 1 SC into next 9 stitches. Change to white. 1 SC in next 10 stitches. Change to black. 1 SC into next 11 stitches. (30 stitches)
Round 9-11: 1 SC into next 10 stitches. Change to white. 1 SC in next 8 stitches. Change to black. 1 SC into next 12 stitches. (30 stitches)
Round 12: SC DEC 5 times. Change to white. 1 SC in next 8 stitches. Change to black. SC DEC 6 times. (19 stitches)
Round 13: SC in next stitch. SC DEC 2 times. Change to white. SC DEC. SC in next 4 stitches. SC DEC. Change to black. SC DEC 3 times. (12 stitches)
Round 14: SC in next 3 stitches. Change to white. SC in next 2 stitches. SC DEC. SC in next 2 stitches. Change to black. SC in next 3 stitches. slip stitch into next stitch. (11 stitches – not including the slip stitch)
–Finish off the white and secure the end. Finish off the black leaving long tail.
–Using the photo (or a googled photo of a skunk) as a guide.. attach 2 safety eyes.
–Stuff the head.
–Weave yarn tail around the stitches of last round and pull tight to close the hole.
–Attach the head to the body.

Let's Start the Ears! – Make Two

Using the medium worsted black yarn.

Step 1: CH 5. Skip 1 CH. HDC in next stitch. 3 DC in each of the next two stitches. HDC in next stitch. CH 1. Slip stitch in same stitch.
Step 2: Finish off leaving long tail. Fold the CH part of the ear in half (with the pretty side of stitches on the inside). Slip stitch down the chain joining both halves. Attach to the head and repeat for second ear. I attached it up the part that is slip stitched.from front to back.. the attached the bottom sides of the ear from left to right. 

 Let's Make The Legs! – Make Four

Using black yarn

Round 1: Magic Circle. 10 SC into magic circle. Join to first SC.
Round 2: In back loops of this round only. CH 1. SC into each Back loop around. join to first SC.
Round 3-4: CH 1. 1 SC into each SC around. Join to first SC.
Finish off leaving long tail. Lightly stuff and attach to the body of your skunk.

Making the Skunk Tail

The first thing you will need to do is look at my review for the Fox Tail. You will be making the skunk tail the same way. But, you will be tying the yarn on in the skunk tail pattern (with a white stripe down the middle). You will start with a 5 inch braid using 6 strands of the black medium/worsted yarn.

-Attach the tail using your yarn needle.
-Cut felt into the shape of a heart and hot glue it on for the nose. 


Filed Under: Free Patterns, Toys

6 Cat Patterns!

January 16, 2015 By stitch11 Leave a Comment

6 Crochet Cat Patterns

My family has a fascination with cats! They are so much fun.. each one and their unique personalities!

Over the last few years, I have crocheted 6 cat inspired patterns. These are patterns I have either written or reviewed. Enjoy meow!

Free Cat Ear Headband Pattern 
Crochet Kitty Cats
Toddler Kitty Cat Hat 
Fingerless Kitty Mittens 
Grumpy Cat (pet) Hat 
Cat Nap Hat 

Filed Under: Costumes, Free Patterns, Hats, Pattern Reviews, Round Ups

So Easy and So Perfect! – The Three Step Bow –

January 16, 2015 By stitch11 5 Comments

The Three Step Crochet Bow

Today is “Wear your Colts colors” day at my daughters school. I asked her if she wanted a bow and she quickly said yes! Due to little time to make it, I came up with a super fast and easy version of the Boutique Bow.
This bow measures about 3 inches wide and 2 inches tall.

Stitches Used 
CH – Chain
Slip Stitch
SC – Single Crochet
HDC – Half Double Crochet
DC – Double Crochet

Supplies 
Any yarn with the appropriate hook size.  – I used Red Heart with Love and a 5.5 mm crochet hook
Yarn needle

Get Started! 
Row 1: CH 21. Turn. Skip 1 CH. **DC in next 2 CH. HDC in next 2 CH. SC in next 2 CH. HDC in next 2 CH. DC in next 2 CH. Repeat from ** one more time. CH 1. Turn.
Row 2: **DC in next 2 stitches. HDC in next 2 stitches. SC in next 2 stitches. HDC in next 2 stitches. DC in next 2 stitches. Repeat from ** one more time. CH 1. Turn.
Row 3: **DC in next 2 stitches. HDC in next 2 stitches. slip stitch in next 2 stitches. HDC in next 2 stitches. DC in next 2 stitches. Repeat from ** one more time.
Finish off leaving long tail. Fold the piece. Using yarn needle, sew both ends together. The SC should line up over each other. Weave your yarn end to the center of the bow. Wrap the bow with your yarn end and secure the end using your yarn needle. Finish off.

Filed Under: Costumes, Free Patterns, Girls

Size Small Dog Sweater

December 29, 2014 By stitch11 65 Comments

This adorable crochet dog sweater pattern might be the cutest thing we have ever seen! Imagine it on your furry friend? Scroll down for the complete free pattern or purchase the ad-free, printable PDF here.

Small Dog Sweater Crochet Pattern -This Small Dog Coat Crochet Pattern is just what you need to keep your dog warm on cold days. Dogs of all sizes can have thin hair and get cold in the winter. #crochet #crochetlove #crochetlife #crochetaddict #crochetpattern #crocheteveryday #crochetinspiration #ilovecrochet #crochetgifts #crochet365 #addictedtocrochet #yarnaddict #yarnlove
Free Crochet Dog Sweater Pattern

Purchase the ad-free, printable pattern here.

This crochet dog sweater is designed for dogs (and cats) who weigh 8-16 lbs. It measures 15.5 inches long and 8 inches wide (laying flat).  If your pet weighs 5-10 lbs, try the XS Dog Sweater. 

Crochet sweaters for pets are great stash buster projects because they don’t care if they are wearing lots of funky colors all at once! Just make sure that all the yarns you use are machine washable because odds are good that this sweater is going to get dirty!

Small Dog Sweater Crochet Pattern

Purchase the ad-free, printable pattern here.

Supplies
6.5 mm crochet hook
(#4)Medium weight yarn (Red Heart with Love)
Yarn needle for weaving in ends

Stitches
CH- Chain
SC- Single Crochet
HDC- Half Double Crochet
Half Double Crochet 2 together
Front Post Double Crochet – FPDC
Front Post Single Crochet – FPSC

-Note- I used a contrasting color for rows 4, 35, 38 and around the leg holes.

*Looking for more great crochet stitches to try in other projects. Click here to see the Ultimate Crochet Stitch Library.

Get Started!

Row 1: CH 37, HDC into 2nd CH from hook, HDC across the rest of the
CH. (36 HDC)
Row 2-3: CH 1, Turn, HDC into each stitch across. (36 HDC)
Row 4: CH 1, Turn, 2 HDC into first stitch, 1 HDC into next 34
stitches, 2 HDC into last stitch. (38 HDC)
Row 5-6: CH 1, Turn, HDC into each stitch across. (38 HDC)
Row 7: CH 1, Turn, 2 HDC into first stitch, 1 HDC into next 36 stitches. 2 HDC
into last stitch. (40 HDC)
Row 8-13: CH 1, Turn, HDC into each stitch across. (40 HDC)

Slip stitch to Join the last and first stitch from the previous row. This will make it a circle instead of a flat piece. 

Row 14-25 : CH 1, Turn. HDC into each stitch around, Join to top of the first HDC.
(40 HDC)

Row 26: CH 1,turn. HDC into the next 2 stitches. CH 8, Skip 8 stitches. HDC into the next 20 stitches.
CH 8, skip 8 stitches. HDC into the next 2 stitches. Join to first HDC. (24 HDC)
Row 27: CH 1, turn. HDC into the next 2 stitches. HDC into the next 8 Chains. HDC into the next 20 stitches.
HDC into the next 8 Chains. HDC into the last 2 stitches. Join to the first HDC. (40 HDC)

Row 28-31 : CH 1, Turn. HDC into each stitch around, Join to top of the first HDC.
(40 HDC)
Row 32: CH 1, Turn.**HDC Two Together. HDC into the next 8 stitches. Repeat from ** 3 more times.
Join to the first stitch.(36 HDC)
Row 33: CH 1, Turn. **HDC Two Together. HDC in next 7 stitches. Repeat from ** 3 more times. Join to first stitch. (32 HDC)
Row 34-37:(make sure you are working with the nice side of the stitches on the outside of the sweater) CH 1, **HDC into the next stitch. FPDC over the next stitch. Repeat from ** around.
Join to first HDC. (32 stitches)
Row 38: CH 1, FPSC into each stitch around. Join to first FPSC.(32 stitches)

HDC around the leg holes.
Attach yarn into one of the stitches of the leg hole. CH 1. – One HDC into each of the 8 stitches, each of the 8 Chains, and 2 HDC into the side of the HDC on both sides. (20 HDC) Repeat for the other leg hole.

Weave in your ends and get your cute crochet dog sweater on your pup!

One great thing about this crochet project is that it's super quick. If you enjoy crocheting projects that are quick and easy, check out 90 amazing “Done in a Day” crochet patterns.

Size Small Crochet Dog Sweater - Free Pattern

Purchase the ad-free, printable pattern here.

Looking for more great crochet patterns: 61 Free Women’s Crochet Sweater Patterns

Filed Under: Free Patterns Tagged With: crochet, crochet patterns, dog, dog sweater, dog sweater pattern, free patterns, pattern

Christmas Party – Apple Cozy – Free Pattern Review

December 18, 2014 By stitch11 7 Comments

Christmas Party Apple Cozy

It's Christmas time! That means, Chocolate, hard candy, and pure sugar EVERYWHERE! Although I love sweets, just as much as my daughter… I wanted to send her to school with a Christmas party snack that wasn't the normal sugar rush idea.

What better than an apple wrapped in a red and green cozy?

To make this apple cozy, I followed the Large version of THIS PATTERN. I used Red Heart with Love and a 5 mm crochet hook. I didn't make the drawstring.. because they clearly fit well enough to have no need to tighten. I did want to add name tags, so I cut felt into leaf shapes and hot glued them on!  Each one took be a little more than an hour. But I could have made them faster if needed.

My daughter loves them, as I am sure the other 3-4 year old's will too!

Filed Under: Free Patterns, Household, Pattern Reviews, Yummy Food

Bobble Leg Warmers -Toddler, Child and Adult Sizes

December 14, 2014 By stitch11 5 Comments

Free Bobble Leg Warmer Crochet Pattern - Toddler-Child-Adult

Like usual, my daughter told me what she wanted me to make her next. She specifically wanted blue leg warmers. Luckily, I had just bought a lot of blue Red Heart with Love during the Black Friday sale at Walmart.
I didn't want to make these like my usual HDC leg warmers. I wanted to use a fun stitch! The Bobble Stitch is so much fun to work with… especially when crocheting for a young child.
Although this pattern was designed for my daughter, I went ahead and wrote out this free crochet pattern in three sizes- toddler, child, and adult.

Supplies 
Red Heart with Love (For the toddler and child size, you will need less than one skein. For the adult size, you will need a little more than one skein.)
K-6.5 mm crochet hook
Yarn needle for weaving in ends.

Stitches
FSC – Foundation Single Crochet
CH – Chain
SC – Single Crochet
4-DC-Bobble

I used the video tutorial by Kim Guzman to learn the 4 DC Bobble Stitch and I used the video tutorial by Moogly to learn the Foundation Single Crochet.

~Note~ If you need to adjust the size, all you have to do is add or subtract stitches from your starting FSC by counts of 2. 

Round 1: FSC 26 for Toddler size –– FSC 30 for Child –– FSC 36 for Adult size.  Join to first FSC.
Round 2: CH 1. Turn. SC in same stitch. 4-DC-Bobble in next stitch. **SC in next stitch. 4-DC-Bobble in next stitch. Repeat from ** around. Join to first SC.  (26, 30, 36 stitches)
Round 3: CH 1. Turn. (Do not crochet into the same stitch. Your first SC will go into the top of the bobble stitch. Your last SC of this round will go into your starting stitch) SC into each stitch around. Join to first SC.  (26, 30, 36 stitches)
Repeat rounds 2 and 3 — 11, 14, 17 more times.
Finish off and weave in your ends.

Filed Under: Free Patterns, Girls

Chevron Lace Cowl – (free) pattern review

December 7, 2014 By stitch11 2 Comments

Chevron Lace Cowl

I have been wanting to make something “Chevron” for a very long time now. When I discovered this Chevron Lace Infinity Scarf pattern by Moogly… I quickly put it at the top of my list.

I did use a thicker yarn that the pattern called for. I used Red Heart With Love and a size N crochet hook. I also made the scarf shorter before joining because I have been loving the look and ease of cowls lately more than infinity scarves.
Especially when crocheting for a blind family member, she won't have to worry about the scarf falling and tripping her. And since it's shorter, it's less likely to snag on anything while she is walking. 

My first attempt at following the pattern I was REALLY confused, but then I scrolled down a little and found Moogly's diagram. Then it ALL made since. If you have never used a diagram, this will be the perfect project… especially since you have a written pattern to help you understand it!

Thanks Moogly for sharing another great free pattern!

Get your copy of this pattern > HERE<

See more scarves I have made >HERE<

Filed Under: Free Patterns, Girls, Pattern Reviews, Scarfs

Leaping Stripes – For Men – Pattern Review

December 2, 2014 By stitch11 5 Comments

Leaping Stripes - For Men

My husband let me know that his feelings were hurt. 🙁 I had been crocheting for over two years, and have never made him a hat. AND, I have made everyone in both of our families hats.. and never made one for him. >See last years men's beanie Christmas gifts<

I tried to explain to him that I was waiting for the perfect design for him…. and that I didn't want to make him wear something that wasn't manly enough. It is hard to know if something designed with yarn is fit for the most picky manly man you know. >.< It wasn't that I didn't want to make him something… it was just that I had not came up or found the perfect design for him.

So, to solve our problem, I showed him a bunch of crochet beanie designs… and let him pick which one was his favorite. I also let him choose what yarn colors to use. He knew instantly when seeing the Leaping Stripes Beanie by Moogly that it was perfect for him.

I did make changes for the brim, but only because I really like making them a certain way. I did three rows of *2 HDC, 2 FPDC* repeated. One row of SC. And finished it off with one row of FPSC to make sure it is snug under the ears.

The hat fits him perfect and he loves it! Thanks Moogly!!!

Filed Under: Boys, Free Patterns, Hats, Pattern Reviews

Curtain Hugging Bear – Free Crochet Pattern

November 28, 2014 By stitch11 7 Comments

Curtain Hugging Bear

I had the opportunity to write a pattern for Stitch and Unwind! When I asked her if there was any theme of amigurumi she would like me to go with… she told me that “Woodland Creatures” are popular right now.

So many ideas ran through my mind! But trying to write a pattern that was easy to follow for all levels of crocheters is a main priority when I write patterns. I thought about making  a skunk, raccoon, and even a deer. But when I pictured the pattern process, I felt overwhelmed. So I went with an animal I was familiar with- a bear!

I didn't just want to make a bear though. I wanted to make something unique and fun. Somehow, a curtain tie back came mind. I felt like I was brilliant! 😉 Haha I couldn't be happier with the level of cuteness! Get your own copy of the free pattern >HERE<!

Filed Under: Free Patterns, Household, Newborn

Six Stitch11 Patterns May Expire

November 12, 2014 By stitch11 15 Comments

Stitch11 Crochet Patterns set to Expire

Due to all the copyright talk spreading through the crochet world, I may be deleting 6 of my free crochet patterns.

I have emailed a few companies to attempt getting the “ok”/ rights to distribute them on this website. While I wait to hear back, I will go ahead and plan on deleting these patterns on 12/1/2014.

I am really hoping to at the least… keep the Care Bear pattern. It is my favorite design ever! *Crossing fingers*

I really wanted to give everyone a heads up and a chance to get their copy beforehand. I have given this so much thought…. and it breaks my heart to do it but I have to be responsible. 😉
Much yarn love <3 – Stitch11

Grumpy Bear
Minnie Mouse Hat
Lalaloopsy Doll
Adult Yoda Hat
3-6 Month Yoda Hat
Captain America Hat 

Filed Under: Free Patterns

Top 12 Free Stitch11 Designs – My Personal Favorites!

November 9, 2014 By stitch11 Leave a Comment

Top 12 (FREE) Stitch11 Crochet Designs

The last few years has been an amazing learning experience for me. I have created items that make me so proud and happy. I have also create items that I probably should use as a fire started during our next camping trip.

Many of you have been following me, learning with me, and supporting me on this adventure. I want to thank YOU for helping me grow as an artist and as a blogger. Without my followers.. none of this would be possible <3

Here is a list of my personal favorite 12 free Stitch11 crochet patterns! (Not in any particular order)

Click on the name of the pattern, or the photo for the link.

Grumpy Bear 

Free Grumpy Carebear Crochet Pattern

Dog Puppet

Crochet Puppy Puppet

Fox Costume 

Free Crochet FOX Costume Tutorial

Double The Fun Double The Flop (Toddler, Child, Adult)

Double the fun - Double the Flop - Free Crochet Pattern Adult-Child-TOddler

Boutique Bow

Boutique Bow - Free Crochet Pattern

XS Dog Sweater 

XS Dog Sweater

Child Size Pom Pom Beanie 

Pom Pom Beanie - Free Crochet Pattern

Granny Slouch Hat (Toddler, Child, Adult)  

Free Slouch Hat Crochet Pattern

Lalaloopsy Doll 

Free Crochet Lalaloopsy Crochet Pattern

Giraffe Hat (6-12 months, adult) 

free-crochet-giraffe-hat

Sweetheart Love Flower 

sweetheart-love-flowers

The Ella Request Toddler Dress 

Ella's Request - Toddler Dress

Filed Under: Free Patterns, Round Ups

Trees Go Round – Free Pattern – Review

November 7, 2014 By stitch11 1 Comment

Trees Go Round - Free Pattern - Review

I have the Christmas Spirit! Between wearing my Christmas socks, putting up Christmas lights around my daughters bed, and having this uncontrollable urge to crochet Christmas hats…. I think I am ready for the Holidays!
I was searching through Cre8tion Crochet's Ravelry, when I rediscovered this beautiful free hat pattern. I had seen this pattern about a year ago but never had the time to work it up. I was not going to push it down my list any longer!
I personally found the pattern easy to follow. I used the 5.5 mm hook for a child size.
This was also my first experience making a tassel! So much easier than I thought it would be… and I don't think it will be falling apart anytime soon like I would have imagined!  Get your own copy of the free pattern >HERE<

Filed Under: Free Patterns, Hats, Pattern Reviews

Mini Mandala Magic Square – Free Crochet Pattern – Review

November 6, 2014 By stitch11 2 Comments

Mini Magic Mandala Square - Free crochet pattern - review -

I had the chance to test out this beautiful square designed by Moogly! And like all of her patterns, it was very easy to follow, and very fun to work up! In fact, she not only designed THIS free pattern, but she also made a stunning Magic Rainbow Baby Blanket from them! Make sure you save this free pattern. You will want it for your next granny square project!

Filed Under: Free Patterns, Grannys, Pattern Reviews

Free Crochet FOX Costume Tutorial

October 30, 2014 By stitch11 3 Comments

Free Crochet FOX Costume Tutorial

My daughter wanted to be a fox! I knew instantly this would be a fun one to put together. You can make a fox costume too!
HERE is the free Fox Hat crochet pattern.
You can get the free Fingerless Gloves pattern HERE.
HERE is the free Leg Warmer pattern.
The free Tutu Tutorial is HERE.
And HERE is the review for the free Fox Tail tutorial.

To make the belly, I just cut a piece of felt into an oval and hot glued it onto the shirt.
Happy Halloween!


Filed Under: Costumes, Free Patterns, Girls

Fluff Cuff – Child Size Leg Warmers

October 29, 2014 By stitch11 Leave a Comment

Fluff Cuff - Child Size Leg Warmers

The child size Fluff Cuff Leg Warmers were designed to look like fox legs. My daughter will be wearing a crocheted fox costume this year for Halloween. Be sure to also check out the free crochet patterns for the Fluff Cuff Fingerless Gloves, Fox Hat, Fox Tutu, and the Fox Tail. If you really love foxes, you may want to make the Baby Fox too!

Supplies
Medium weight yarn – I used “Brown” I Love This Yarn for the leg warmers.
Medium weight “Terra Cotta” I Love This Yarn. (It’s a rusty orange) and “Cranberry” I Love This Yarn. (It’s a pretty rosey color) for the fluff.
Pet Brush
Yarn needle – for weaving in ends
J-6.00 MM crochet hook

Stitches
Slip Stitch
SC – Single Crochet
HDC – Half Double Crochet
FSC – Foundation Single Crochet

*Tip* you will want to take the time to learn the FSC. Check out this fantastic tutorial by Moogly. Because of using the FSC, the legwarmer will stretch nicely over the foot for a perfect fit.

Round 1: FSC 31. Join to first FSC
Round 2-23:  Now working in continuous rounds. HDC into same stitch and each stitch around.  (31)

SC into next stitch. Slip stitch into next stitch

Round 24: CH 1, SC into same stitch and each stitch around. Join to first SC. (31)

Finish off and weave in your ends. Repeat… one for each leg 🙂

Cut pieces of yarn about 4 inches long. You will need to attach 3 strands at a time over the SC stitches of Round 28. To attach them, fold 3 strands in half. Insert your hook around a SC stitch. Put the hook through the fold of the yarn strands. Pull through stitch creating a loop. Wrap yarn ends over the hook, and pull through the loop you just made. Tug on yarn strands.
Once you have attached yarn the entire way around, trim the yarn to be about 1.5 inches long.  Brush the yarn with the pet brush until it’s fluffy. Lightly brush the entire leg warmer to make a slight fluffy look to the stitches. Repeat on other leg warmer.

Filed Under: Costumes, Free Patterns, Girls

Fox TuTu For Miss Fox – Free Tutorial

October 27, 2014 By stitch11 Leave a Comment

Fox Tutu Tutorial

Supplies
-1.5 inch button
-2 colors of your choice of medium weight yarn.  I used “Terra Cotta” I Love This Yarn. (It’s a rusty orange) and “Cranberry” I Love This Yarn. (It’s a pretty rosey color)
-J-6.00 MM crochet hook
-Yarn needle for weaving in ends and attaching the button.  
-Tulle (The amount of tulle used will vary.) I bought one roll of tulle that is already in the right width needed. But I also bought 3 yards of tulle that isn't cut at all. The amount of tulle you will need will depend on how long or fluffy you want to make the tutu. I like to buy a tad more than I expect to need.. just to be safe.
-Ribbon (The ribbon is optional. I found some pretty orange ribbon and some ribbon with foxes on it.. too cute to pass up!) 

Crochet Stitches Used 
FSC – Foundation Single Crochet
TRE – Treble Crochet Stitch
HDC – Half Double Crochet

Step 1
Holding both strands of yarn together – I started with a FSC  of 62. You will want to check the measurements for whom you are making the tutu for. I wrapped the FSC piece around my daughters hips to make sure it fit snuggly. As I have learned from the past.. they tend to stretch out a little after being worn the first time.  You do not have to use a count of 62 FSC… if you need to make it smaller or larger.. adjust the number of FSC until you have the appropriate size.

Step 2
CH 3. Turn. TRE into each FSC across.

Step 3 
CH 1. Turn. HDC into each stitch across.

Step 4
Weave in your ends and attach your button.  The entire row of step 2 can be button holes. 🙂

Step 5
All that is left for you to do it attach the tulle and ribbon. If you do not know how to do this, check out my How To Make A TuTu tutorial for a step by step photo direction on attaching the tulle.
I cut my tulle to be about 2 feet long (and 6 inches wide). I did 1 orange for every 3 red pieces. After I joined tulle around the HDC stitches of step 3, I added a 2 foot piece of ribbon to the bottom of every 4th TRE stitch from step 2.

You can add a fox tail using this FREE Fox Tail Tutorial! By using the loops at the top of your braid, ,you can attach and detach the fox tail to your button anytime!
Also check out the Fox Hat and Fluffy Cuff Fingerless Gloves!
If you really love fox's, you may want to make the baby fox too!

Filed Under: Costumes, Free Patterns, Girls, Pattern Reviews

Fluff Cuff – Child Size Fingerless Gloves

October 22, 2014 By stitch11 Leave a Comment

Fluff Cuff - Child Size Fingerless Gloves - Free Crochet Pattern

Living in Indiana, means not knowing what kind of weather Halloween will bring. Some years we have Indian Summers (or so the weather man calls them?) -while some Halloween's bring snow. To avoid the risk of my children getting cold while trick or treating door to door… I always try to make sure their costumes are warm enough to block crisp air from reaching their skin.
Last Halloween, my daughter was a cat. I made her the Fingerless Kitty Cat Mittens. This year she will be a FOX! 😀 So far I have made the Fox Tail, and the Fox hat. It's only fitting that I make her new fingerless gloves to match this years costume. And like most of what I make, here is the free pattern for these adorable Fluff Cuff – Child Size Fingerless Gloves!

[Read more…]

Filed Under: Costumes, Free Patterns, Girls

  • « Previous Page
  • 1
  • …
  • 8
  • 9
  • 10
  • 11
  • 12
  • …
  • 21
  • Next Page »
  • Email
  • Facebook
  • Pinterest
  • RSS

Stitch11 is a Red Heart Blogger!

unnamed

.

Grab My Button

Archives

Privacy Policy

Copyright © 2026 Stitch11.com ¡ All Rights Reserved ¡ Log in