• Home
  • Free Patterns
    • Toys
    • Costumes
    • Bags
    • Flowers
    • Hats
    • Pattern Reviews
    • Household
    • Newborn
    • Scarves
    • Sports
  • Disclosure
  • Contact
  • Yummy Food
  • Round Ups

Stitch11

A Yarntastic Life!

  • Girls
  • Boys
  • Hats
  • Newborn
  • Flowers
  • Household
  • Costumes
  • Toys
  • Pattern Reviews
  • Grannys
You are here: Home / Archives for Free Patterns

Majestic Bloom – Free Crochet Pattern – Review

April 2, 2015 By stitch11 1 Comment

Majestic Square - Free Crochet Pattern -- Review
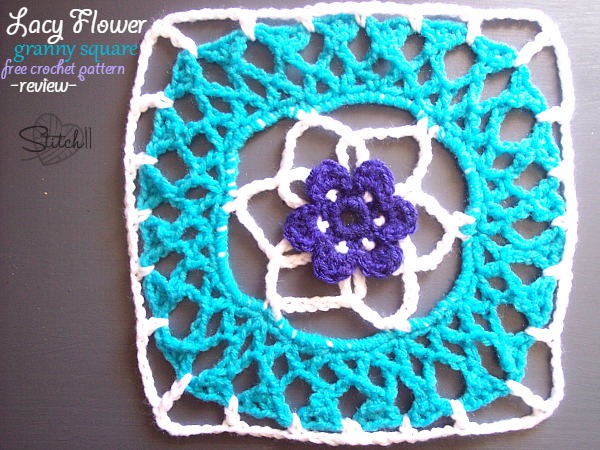
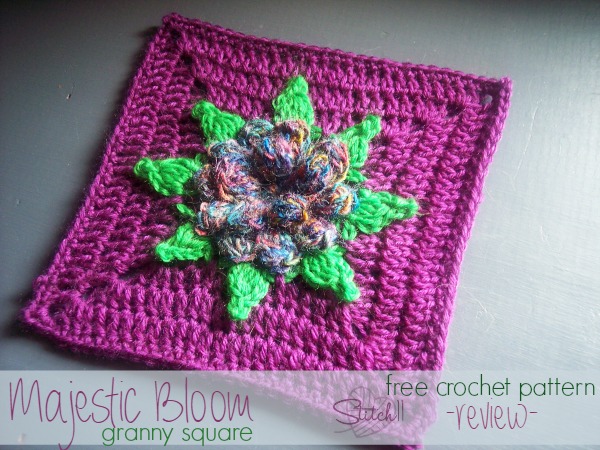
I love it when I find an excuse to my DK weight yarn! Although she mentions that you can use any weight, the fact that she used DK made me run to my DK drawer with excitement. It's the little things in life… right? 😉

The Majestic Bloom Granny Square (<-link) was really easy for me to follow. It works up so clean and beautiful! I love love love the way she does the leaves!

Thank you My Hobby Is Crochet for sharing your wonderful art with us!

Filed Under: Flowers, Free Patterns, Grannys, Pattern Reviews

Hydrangea Shrub – Crochet Pattern Review

March 31, 2015 By stitch11 Leave a Comment

Hydrangea Shrub - Crochet Pattern Review

I am thrilled to share the link for the Hydrangea Shrub Crochet Square!

And, I am so excited to finally have the chance to learn the Bullion stitch! To be honest, I never thought I would be able to pull it off!  But this square has the perfect amount for someone like me who fears pulling through too many loops at once. Ha! If you haven't worked with the Bullion stitch before, this is your excuse to learn it!

Thank you so much for sharing your design Underground Crafter!

Filed Under: Grannys, Pattern Reviews

Lacy Flower Granny Square – Free Crochet Pattern Review

March 30, 2015 By stitch11 2 Comments

Lacy Flower Granny Square - Free Crochet pattern - Review

The Lacy Flower Crochet Granny Square (<–pattern linked) is the first of the series that is to come. This square is going to look beautiful wrapped around a tree!

As soon as I started hookin' the square up, ideas started popping into my head like a spreading wild fire. You can make beach bags, market bags, ponchos, beach wraps, lacy shirts to wear over your tanks, and even curtains! Have more ideas? Share them in the comment section below! I want to hear them!

Thanks for the endless ideas and for the free crochet pattern KatidCreations.

Filed Under: Flowers, Free Patterns, Grannys, Pattern Reviews

Cute Cat – Why I Follow Crochet Patterns

March 29, 2015 By stitch11 15 Comments

Cute Cat - Why I follow crochet patterns.


I often see/hear people say “I do not follow patterns.” I know there are many reasons a person will say this.. but I want to share with everyone why I choose to follow patterns.

Sometimes I feel like I can make anything that I put my mind to… and at this moment, I still feel this way. Not that I think I can design or freehand anything I put my mind to, or that I can find a pattern for anything I wish. I just know that between the patterns and techniques that are out there for me to discover, I can learn how to make anything that I need/want to. And really, so can you.

For this cat, I knew I wanted to make something better than my first experience with crocheting kittens. After all, it has been a few years since I made them, why wouldn't I be able to make something better?

After searching online with my daughter by my side, we were inspired by many patterns, photos and even a video! Here are the links that helped me create this adorable crochet cat pattern!

First of all, the kitten who started the idea…

This video has captured the hearts of everyone in my home. We have watched a few different ones.. but this one was the first. So cute!!!

Next, we attempted to find the perfect and most adorable cat pattern to use/base the creation off of. I knew I could design one, or wing it; but I think following other peoples patterns only increases my own skill. I learn new techniques that I would have never thought up on my own!

IMG_8356_rt_w


This blog
post captured my child's imagination and inspired the colors of the cat. But when I went to follow the pattern… I couldn't get it translated well enough without having to wing it anyways.

moko
Earth-Amigurumi

Next up, we found another pattern that my daughter said was her favorite- Moko The Cat.

So, using this, I crocheted the head. But instead of making the bottom half a different color, I changed colors using the techniques I learned from the little Earth I crocheted last year.

Grumpy-Cat-Beanie-For-Your-Pets
Baby-Fox-Pattern-Review

With the eyes, I knew I loved the look of the Grumpy Cat Hat I made last year. So I used techniques from that experience for this item.

For the ears, I knew I wanted the clean look- like the ones from the Baby Fox pattern!

Ella Bunny - pattern review

For the puffy cheeks above the mouth, I used the technique that I fell in love with last week while following the Sweet Bunny Hat!

PuppyDogLovey

For the paws, I googled “Crochet Amigurumi Paws” and found this fantastic and creative pattern by Repeat Crafter Me! It was perfect for the feet. And using what I learned from this pattern, I was able to make a smaller version for the front paws too.

For the body, I free handed something similar to the pattern I used for the head.
For the tail, I just started with 8 SC in a magic ring, and kept it at 8 SC the entire length. I will be honest though, there were a few cat patterns out there with amazing tails that I contemplated on using.

Why I follow Crochet Patterns

This cat is the outcome from putting the minds of many artists together into one piece. This is exactly why I love to follow patterns. I take what I learn from each one, whether it be their ideas, techniques, or actual patterns- and mix it all up with my own creativity. It is like the fire that sparks my own passion for art. Without everyone else sharing their work, patterns, and tutorials. It would have taken me longer than 2 years to go from the original cats I made…. to this latest. And wow, what a difference!!!

If you'd like more inspiration for crochet cat patterns, take a peek at some of my other blog pages here: 50+ Purr-fect Crochet Cat Patterns

Filed Under: Free Patterns, Inspired, Pattern Reviews, Toys

Bunny Hat – Free Crochet Pattern – Review

March 24, 2015 By stitch11 Leave a Comment

Bunny Hat - free crochet pattern - review


I decided to follow the free “One Hour Bunny Hat” (<–link to pattern) by Moogly – because I wanted a quick and simple pattern to add to my Easter crochet stash… well, my daughters. 😉

After working up the base of the hat, Ella asked me if the ears would stick up like a “real bunny”. I told her I will see what I can do…

I decided to make two layers of each ear before doing the trim around the ears. I used one white layer and one blue layer for each ear. I then joined them together while doing the trim directed by the pattern. I also lightly stuffed them.
When attaching them, they wanted to flop straight forward. To solve this issue.. I just kept securing them, over and over. I also attached them a little bit together at the bottom of the ears. I would put the hat on, check to see if they stood up, and if not, I would go back and secure them to the base of the hat a little more. Then suddenly, they stayed straight up!

Ella was so excited, as you can see from the photos! This fun and quick pattern made my daughter so happy! Thanks Moogly!!!

Filed Under: Boys, Costumes, Free Patterns, Girls, Hats, Pattern Reviews

Free Crochet Robot Pattern

March 16, 2015 By stitch11 2 Comments

Free Robot Crochet Pattern

Supplies
E/ 3.5 mm crochet hook
Med/worsted weight yarn (gray, blue, dark green, light green, yellow, orange, red, black and white)
Yarn needle

Stitches
Magic Circle
CH – Chain
SC – Single Crochet
SC DEC – Single Crochet Decrease
HDC – Half Double Crochet

Feet and Legs
Starting with gray yarn.
Round 1: Magic Circle. Ch 1, 7 SC into magic circle. Pull ring tight and join to first SC. (7 SC)
Round 2: CH 1. 2 SC into each SC. Join to first SC. (14 SC)
Round 3: CH 1. 2 SC into the first SC. 1 SC into the next SC. **2 SC into next SC. 1 SC into next SC. Repeat from ** 5 more times.  Join to first SC. (21 SC)
Round 4: CH 1. 2 SC into first SC. 1 SC into each of the next 2 SC. ** 2 SC into the next SC. 1 SC into each of the next 2 SC. Repeat from ** 5 more times. Join to first SC. (28 SC)
Round 5: In back loops only- CH 1. 1 SC into each back loop around. Join to first SC. (28 SC)
Round 6: In back loops only- CH 1. **SC DEC. SC into each of the next 2 back loops. Repeat from ** 6 more times. Join to first SC. (21 stitches)
Round 7: CH 1. **SC DEC. SC into next stitch. Repeat from ** 6 more times. Join to first SC. (14 stitches)
Round 8: CH 1. SC DEC around. Join to first SC DEC. (7 stitches)
Finish off and weave in your yarn ends. When doing this, weave your starting end on the top.. so the piece wants to stay flat (it will hold the top and bottom together). Be sure not to mess up your last row of stitches, as you will be crocheting in them in your next round.

Join red yarn to a front loop.
Round 9: CH 1. 2 SC into each front loop around. Join to first SC. (14 SC)
Round 10-12: CH 1. 1 SC into each SC around. Join to first SC. (14 SC)
Round 13: CH 1. SC DEC around. Join to first SC DEC. (7 stitches)
Finish off. Add a small amount of stuffing/batting.

Tip: When you changing colors, work over your yarn ends the entire way around. Once you are done with the new color, pull those yarn ends tight. Then stuff them into the leg. This will just make even more definition of the crease between colors.

Repeat rounds 9-13 two more times with the colors listed below. 
-Orange
-Yellow

Repeat for second leg. 

Arms
Starting with dark green yarn 
Round 1: Magic Circle. CH 1. 7 SC into magic circle. Pull magic circle tight. Join to first SC. (7 SC)
Round 2: CH 1. 2 SC into each front loop around. Join to first SC. (14 SC)
Round 3-5: CH 1. 1 SC into each SC around. Join to first SC. (14 SC)
Round 6: CH 1. SC DEC around. Join to first SC DEC. (7 stitches)
Finish off. Add a small amount of stuffing/batting. 

Repeat rounds 2-6 two more times with the colors listed below. 
-Light Green
-Yellow

Claw
With gray yarn
Round 1: Magic Circle. CH 1, 5 SC into magic circle. Pull magic circle tight. Join to first SC. (5 SC)
Round 2: CH 1. SC into each of the back loops around. Join to first SC. (5 SC)
Round 3-9: CH 1. SC into each stitch around.

Finish off leaving long tail.
Weave your tail around each stitch around and pull tight. Secure yarn end to keep the whole closed. With your yarn needle. Pull the yarn through the center of the peace so you can attach it from the middle, to the end of the dark green piece of the arm. You may want to pull the yarn through both sides of the claw to help bring each end closer together while you are attaching. This will make it look like a claw.

Repeat for second arm and claw.  

Robot Body Walls
Using blue yarn 
Row 1: CH 15. Turn. Skip one CH. SC into next 14 CH.
Row 2-14: CH 1. Turn. SC into next 14 SC.

Row 15: CH 1, Turn. SC into each front loop across.
Row 16-28: CH 1, Turn. SC into next 14 SC.

Row 29: Repeat row 15.
Row 30-42: Repeat rows 16-28.

Row 43: Repeat row 15.
Row 44-56: Repeat rows 16-28.

Finish off leaving long tail. Using yarn needle and yarn tail, Attach both ends of your piece through the back loops of row 56. The back loops that were left at each edge of the square will be on the outside of your piece. Now you have the walls of the body.

Robot Body Top and bottom
Using blue yarn. 
-make two-
Row 1: CH 15. Turn. Skip one CH. SC into next 14 CH.
Row 2-14: CH 1. Turn. SC into next 14 SC.
Finish off leaving long tail for attaching to the body walls.

Attach one square to the robot body walls. Attach all but one side of the other square…. stuff the cube and finish attaching the square.

Attach the legs and the arms.

Robot Head Walls
Using blue yarn
Row 1: CH 13. Turn. Skip one CH. SC into next 12 CH.
Row 2-12: CH 1. Turn. SC into next 12 SC.

Row 13: CH 1. Turn. SC into each front loop across.
Row 14-24: CH 1. Turn. SC into next 12 SC.

Row 25: Repeat row 11.
Row 26-36: Repeat rows 12-20

Row 37: Repeat  row 11.
Row 38-48: Repeat row 12-20

Finish off leaving long tail. Using yarn needle and yarn tail, Attach both ends of your piece through the back loops of row 48. The back loops that were left at each edge of the square will be on the outside of your piece. Now you have the walls of the head. 

Top and Bottom of Head
Using Blue Yarn
-Make Two- 
Row 1: CH 13. Turn. Skip one CH. SC into next 12 CH.
Row 2-12: CH 1. Turn. SC into next 12 SC.

Attach one square to the robot head walls. Attach all but one side of the other square…. stuff the cube and finish attaching the square. Set aside.

Robot Neck
Using gray yarn. Leaving a long starting tail. 
Round 1: Magic Circle. CH 1. 8 SC into magic circle. Pull circle tight. Join to first SC. (make sure your starting tail is on the nice side of the crochet.. you will need this for attaching)
Round 2: CH 1. 2 SC into each stitch around. Join to first SC.
Round 3-4: CH 1. 1 SC into each SC around. Join to first SC.
Round 5: CH 1. SC DEC around. Join to first SC.
Finish off leaving long yarn tail for attaching.

Lightly stuff the neck.
Using your long starting tail attach the neck to the center top of the body. Using your finishing off tail, attach the neck to the center bottom of the head. Make sure you attach the neck really well!!!! Weave in your ends.

Moon Applique
Using yellow yarn
CH 11. Turn. Skip first CH. Slip stitch into next CH. 2 SC into next CH. 2 HDC into next CH. DC into next CH. 2 DC into each of the next 2 CH. DC into next CH. 2 HDC into next CH. 2 SC into next CH. Slip Stitch into next CH.

Robot Antenna
Starting with gray yarn
Round 1: Magic circle. CH 1. 4 SC into magic circle. Pull yarn end through the hole so its on the outside. You will want to use this when attaching it to the robot head. Pull circle tight. Join to first SC.
Round 2: CH 1. 2 SC into each SC around. Join to first SC. (8 SC)
Round 3-4: CH 1. 1 SC into each SC around. Join to first SC. (8 SC)
Round 5: CH 1. SC DEC 4 times. Join to first SC DEC. (4 stitches)
Round 6: CH 1. In back loops only. 2 SC into each SC around. Join to first SC. (8 SC)
Round 7-8: CH 1. 1 SC into each SC around. Join to first SC. (8 SC)
Round 9: CH 1. SC DEC 4 times. Join to first SC DEC. (4 stitches)
Change to red yarn. 
Round 10: CH 1. In back loops only. 2 SC into each SC around. Join to first SC. (8 SC)
Round 11: CH 1. 2 SC into first stitch. 1 SC into next stitch. **2 SC into next stitch. 1 SC into next stitch. Repeat from ** 2 more times. (12 SC)
Round 12-13: CH 1. 1 SC into each SC around. Join to first SC. (12 SC)
Round 14: CH 1. SC DEC 6 times. Join to first SC. (6 stitches)
Finish off leaving long yarn end. Lightly stuff the end of the antenna. Weave yarn end back and forth around. Pull end tight. Weave in your end. 
Attach to the top of the robot head.  

Robot Mouth 
Starting with white yarn 
Row 1: CH 7. Skip 1 CH. HDC in next 6 CH.
Row 2: CH 1. Turn. HDC in next 6 HDC.
Finish off and weave in your ends. 
Join black yarn.
CH 1 and SC around the entire outside of the piece. Doing 1 SC into the side of each HDC while working up and down the sides of the mouth. 2 SC into the corner stitches. Join to first SC.
Finish off leaving long tail. Using yarn needle.. embroider the lines for the robot teeth. Attach to robot face. 

Robot Eyes
Starting with black yarn
-Make Two-
Row 1: Magic Circle. CH 1. 9 HDC into magic circle. Pull ring tight. Join to first HDC. (9 HDC.
Finish off leaving a long tail for attaching. Before you attach, take your white yarn and your yarn needle and embroider a sparkle in the eye. 


Filed Under: Boys, Free Patterns, Toys

Infant Cocoon Flower Photo Prop – Free Crochet Pattern

March 8, 2015 By stitch11 14 Comments

Infant Cocoon Flower Photo Prop Free Crochet Pattern Stitch11

This project came to me while I was at the Dollar Store. I was buying some candles and My Little Ponies… when the man behind the register complimented my daughters hat. He proceeds to tell me he is expecting.. and would love to make a crochet order. I instantly knew what I wanted to make for his baby girl (due to arrive this Spring).
After chatting with his wife on Facebook.. we had settled on the direction I would run with the project.. and I also let her know I would be gifting the photo prop to her.
As many of you know, I do not take very many crochet orders. But for some reason, I felt the urge to crochet a flower pattern for photo prop for the wittle baby growing in her belly. 🙂 Gotta follow your heart!
This infant photo prop is very stretchy. It should work great for newborn to at the least 6 month old's. you may be able to make it work for even larger babies.. but since I do not have any babies on hand, I can't test it out. Maybe the mother will share some photos with us this Spring!

Supplies 
N – 9 mm crochet hook.
< One Skein of #5 Bulky- Lion Brand Homespun – Forest (green)
< One Skein of #5 Bulky- Lion Brand Homespun – Purple Haze (or whatever color you want the most of your flower to be)
1/2 Skein of #4 Medium- Simply Soft – Grape (purple)
< 1/4 Skein of #4 Medium – Simply Soft -Limelight (light green)
Yarn Needle

Stitches
Magic Circle
CH- Chain
SC – Single Crochet
HDC- Half Double Crochet
DC – Double Crochet
DC DEC – Double Crochet Decrease
DC 4 together
TRE – Treble Crochet

Gauge
4 rows of DC = 3.5 inches
5 DC = 3 inches.

Note – Starting CH does not count as a stitch. 

Leaves! 
Starting with the Lion Brand Homespun – Forest (green) 
Step 1: (Leaving long starting tail.) Magic Circle. CH 2. 11 DC into magic circle. Join to the top of first DC. (11 stitches)
Step 2: CH 2. 2 DC into each DC. Join to the top of first DC. (22 stitches)
Step 3: CH 2. **2 DC into the first SC. 1 DC into the next DC. Repeat from ** 10 more times. Join to the top of the first DC.  (33 stitches)
Step 4: Crochet in front loops of this round only. CH 2. **2 DC into the first DC. 1 DC into each of the next 2 DC.  Repeat from ** 10 more times. Join to top of first DC. (44 stitches)
Step 5: CH 2. **2 DC into the first stitch. 1 DC into the next 3 stitches. Repeat from ** 11 more times. Do NOT join. (55 stitches)
Step 6: Turn. CH 2. DC into each SC across. (55 stitches)
Step 7: Turn. CH 2. DC DEC.  DC in next 27 stitches. (28 stitches)

Step 8: Turn. CH 2.  DC DEC. DC in next 24 stitches. DC DEC. (26 stitches)
Step 9: Turn. CH 2. DC DEC. DC in next 22 stitches. DC DEC.  ( 24 stitches)
Step 10: Turn. CH 2.  Two DC DEC. DC in next 16 stitches. Two DC DEC. (20 stitches)
Step 11: Turn. CH 2. DC into each stitch across. (20 stitches)
Step 12: Turn. CH 2. DC DEC. DC in next 16 stitches. DC DEC. (18 stitches)
Step 13: Turn. CH 2. DC DEC.  DC in next 14 stitches. DC DEC. (16 stitches)
Step 14: Turn. CH 2. DC into each stitch across.  (16 stitches)
Step 15: Turn. CH 2. DC DEC. DC in next 12 stitches. DC DEC. (14 stitches)
Step 16: Turn. CH 2. DC DEC. DC into next 10 stitches. DC DEC. (12 stitches)
Step 17: Turn. CH 2. Two DC DEC. DC in next 4 stitches. Two DC DEC. (8 stitches)
Step 18: Turn. CH 2.  DC DEC. DC in next 4 stitches. DC DEC. (6 stitches)
Step 19: Turn. CH 2. DC DEC. DC in next 2 stitches. DC DEC. (4 stitches)
Step 20: Turn. CH 2. DC all 4 stitches together. Finish off leaving long tail for weaving in.

Join yarn to the turning (unworked) stitch from Step 7. Repeat Steps 8-20 for other leaf. 

Flower/ Cocoon!
Using Lion Brands Homespun Purple Haze 
Step 1: Join yarn to unworked back loops from step 4 of the leaves. CH 2. DC into each stitch around. Join to first DC. (33 stitches)
Step 2-12: CH 2. DC into each stitch around. Join to first DC. (33 stitches)
Step 13: Crocheting in front loops of this round only. CH 2. DC into each front loop around. Join to first DC. (33 stitches)
Step 14-15: CH 2. 1 DC into each DC around. Join to first DC. (33 stitches)
Step 16: CH 2.** 2 DC into the first DC. 1 DC into each of the next 2 DC.  Repeat from ** 10 more times. Join to first DC. (44 stitches)
Step 17: CH 2. 2 DC into each DC. Join to first DC. (88 stitches)
Step 18: CH 1. **SC into next 2 stitches. 2 DC into next stitch. 1 DC into next stitch. 3 TRE into each of the next 2 stitches.  1 DC into next stitch. 2 DC into next stitch. Repeat from ** 10 more times. (154 stitches)
Finish off leaving long tail for weaving in.

Flower/ Cocoon Edging
Using Simply Soft Grape (purple)
Step 1: Attach yarn where you finished off from Step 18. CH 1. **SC into each of the next 2 SC. SC into next 2 stitches. DC into next 2 stitches. 2 TRE into next stitch. 3 TRE into each of the next 2 stitches. 2 TRE into next stitch. DC into next 2 stitches. SC into next 2 stitches. Repeat from ** 10 more times. Join to first stitch. (220 stitches)
Step 2: CH 1, turn. SC into each stitch around. Join to first stitch. (220 stitches) You will be going the other direction since the petals fold down.. it will give it a nice finished edging.  

Inner Flower Petals
Using Simply Soft Grape (purple) 
Step 1: Attach your yarn to one of the back loops from Step 13 of the flower. But, attach it as if it were the front loop. You will want the nice side of the stitches showing when it folds down. CH 2. DC into same loop and each loop around. Join to first stitch. (33 stitches)
Step 2: CH 2. DC into each stitch around. Join to first stitch. (33 stitches)
Step 3: CH 2. 2 DC into each stitch around. Join to first stitch. (66 stitches)
Step 4: CH 1. **SC into next two stitches. DC into next stitch. 3 TRE into each of the next  2 stitches. DC into next stitch.  Repeat from ** 10 more times. Join to first stitch. (110 stitches)
Step 5: CH 1. ** SC into next 3 stitches. HDC into next stitch. 2 DC into next stitch. 3 TRE into next stitch. CH 3. Slip stitch into first CH. 3 TRE into next stitch. 2 DC into next stitch. HDC into next stitch. SC into the next stitch Repeat from ** 10 more times.  Join to the first stitch. (160 stitches)
Finish off with long enough tail for weaving in your end. 

Leaf Edging
Using Simply Soft – Limlight (light green) 
Join your yarn to the edge of one of the leaves. You will be putting 2 SC into the side of each DC while working around the edge. When you get to the places where the leaves join each other, you will just put 1 SC between the stitches. When you get to the tip of the leaves. {1 SC CH 3, slip stitch to first CH. 1 SC.} All into the tip of each leaf.  Work your way around and join to your starting SC.

You are almost done. Remember your starting end? The one at the bottom of the crochet piece? Take it and weave it back and forth between step one and two. Pull tight and secure your end. This make the first round you crocheted stick out like a little bump.. giving the look as if you plucked the flower right off the stem.
Now that you have done that, weave in all of your other ends. Now, all that is left to do- find a cute baby!!! 😉

Filed Under: Costumes, Flowers, Free Patterns, Girls, Newborn

Twenty Two FREE Flower Crochet Patterns

February 24, 2015 By stitch11 6 Comments

Twenty Two FREE Flower Crochet Patterns

You may already know, but I am moving this week. Moving is really exhausting…. so this will probably be my last post until we get settled into our new home.

Since packing has been taking up so much of my time, I had decided to crochet flowers and write reviews. Now, it's time to pack up my yarn! So until next time, enjoy these 22 free crochet flower patterns either designed by me, or reviewed by me. Hook on!

1. My Daisy
2. Autumn Flower
3. Flower Photo Prop
4. Pet Cowl & Flower
5. Flower of Dreams
6. Spiral Flower
7. Rose Pattern
8. Easy Crochet Flower
9. Three Layer Flower
10. That 70's Flower
11. Simple Crochet Flower
12. Fantastic Curly Flower
13. Flower in a Square
14. Sunflower in a Square
15. Dahlia in a Square
16. Water Lily
17. The Pansy Flower
18. Sweetheart Love Flower
19. Hawaiian Lei
20. The Perfect Flower
21. Rose Headband
22. Crocodile Stitch Flower

Filed Under: Flowers, Free Patterns, Round Ups

Spiral Flower – Free Crochet Pattern – Review

February 23, 2015 By stitch11 2 Comments

Spiral Flower - Free Crochet Pattern - Review

This beautiful free Spiral Flower pattern is written by Busting Stitches.

Get your copy of the pattern >>>HERE<<<

When I first discovered this pattern, I loved the way the flower petals curled and went together. I had no clue how she accomplished such a pretty and unique look. I knew I had to crochet one!

The technique she has for adding rows of petals is something I have never seen done before. Not only is it different, but it's also simple. You get the 3D flower without the bulk! This flower will make a great embellishment!

Filed Under: Flowers, Free Patterns, Pattern Reviews

The Perfect Flower – Free Crochet Pattern – Review

February 21, 2015 By stitch11 3 Comments

The Perfect Flower - Free Crochet Pattern - Review

The term “Nothing is what is seems” comes to mind when I made this flower. When I first looked at the photo, it reminded me of my beginner crochet days, when I would make multiple flowers, layer them, and attach them together with a button.
This flower does NOT do that!!!! No more wasting time making layers!!! This flower is quick, simple, unique, and ONE flower!

I was so curious as to how it was going to come together (I never read ahead on patterns.. I know, shame on me. 😉 ) So when I realized the back and front petals are done first, and then the middle layer of petals, I was pretty impressed and amazed!

Make sure you save your copy of The Perfect Flower by KatiD Creations!
Get the free crochet pattern >>>HERE<<<

Filed Under: Flowers, Free Patterns, Pattern Reviews

Free Pansy Flower Crochet Pattern – Review

February 20, 2015 By stitch11 Leave a Comment

Free Pansy Flower Crochet Pattern - Review

I have been admiring this flower pattern for about a year now. So, when I asked my designer friends to share their flower links with me, I was so excited to finally have the push to complete it. That is, until I realized I had already packed away my buttons! We are moving during this next week… and I really didn't want to move the boxes around to find the right craft tote.
Perfect excuse to go button shopping!!!! I found these little pearl buttons at Walmart. I knew they would be perfect for the flower color combos I had in mind.
My favorite part of following this pattern wasn't how easy it was (although it is VERY easy!) But just seeing the way other designers brains work. >.< I know this sounds silly.. but each of us think in different ways. The way she put this pansy together is perfect!! And is also something I would have never thought of on my own. So “Thank you!” Little Monkey's Crochet for sharing your crochet smarts, and this pattern with us!
Get the free crochet Pansy Flower pattern >>>HERE<<<

Filed Under: Flowers, Free Patterns, Pattern Reviews

Easy Crochet Flower – Free Crochet Pattern – Review

February 19, 2015 By stitch11 Leave a Comment

Simple Crochet Flower - Free Crochet Pattern - Review

The Simple Crochet Flower is designed by the wonderful and brilliant Lisa Auch.

I was attracted to this flower because of its simple and elegant look. I used DK weight yarn and a 3.75 mm hook.  Make sure you check out her hat pattern that comes with the flower, along with her other designs. She has many adorable free patterns for babies!

Get the free crochet pattern >>>HERE<<<

Filed Under: Flowers, Free Patterns, Pattern Reviews

That 70’s Flower – Free Crochet Pattern – Review

February 17, 2015 By stitch11 1 Comment

That 70's Flower - Free Crochet Pattern - Review

That 70's Flower by Jessie At Home is the perfect embellishment for the fun loving flower children you know.

This pattern will a great addition to hats, baskets and bags. My first thought when finishing the flower was that it would be adorable to decorate the walls of my daughters room with. When I showed the awesome flower to my husband, he told me I should join a bunch of them to make an afghan.  So many ways you can run with this project!

Get the free crochet pattern >>>HERE<<<

Filed Under: Flowers, Free Patterns, Pattern Reviews

Easy Crochet Flower – Free Crochet Pattern – Review

February 16, 2015 By stitch11 1 Comment


Easy Crochet Flower - Free Crochet Pattern - Review

The Easy Crochet Flower by Simply Collectible Crochet is really quick to work up!

The pattern calls for three colors. This gives you a chance to dig through your stash and get creative! I decided to use Cascade DK weight Yarns and a 4.25 MM crochet hook. My flower came out measuring 2 inches.  By using different yarns and hooks, you can customize your size!

Get the free crochet pattern >>HERE<< -where you will also see how many creative ways you can use this fun free flower design!


Filed Under: Flowers, Free Patterns, Pattern Reviews

Fantastic Curly Flower

February 15, 2015 By stitch11 Leave a Comment

Fantastic Curly Flower -Free Crochet Pattern -Review

Oombawka Design Crochet shared this fun free flower crochet pattern with me. This is the 3rd flower I have decided to work up and review while I am in the process of moving.

Get the free crochet pattern HERE.

The pattern is very easy and fun to follow. Great little pattern when you need to add some pretty sass to a project.

The entire time I was crocheting the pedals, my kitten was trying to eat my project! It all started with the yarn ball but once she seen the curly pedals.. she wasn't going to give up! I will probably attach this beautiful flower to a string and let it be hers… after all, she is princess Beauty. 😉

000_0917

Filed Under: Flowers, Free Patterns, Pattern Reviews

Three Layer Flower – Free Crochet Pattern Review

February 12, 2015 By stitch11 1 Comment

Three Layer Flower - Free Crochet Pattern Review

This adorable pattern by Crocheting The Day Away is so unique and fun to work up. I have never made a flower this way, but I am in love with the technique! You can get the pattern HERE!

I used a 3.25 mm crochet hook and some random super fine wool yarn.

My favorite thing about this tutorial is that when you get unsure of yourself, she has photo's to help you every step of the way!

Filed Under: Flowers, Free Patterns, Pattern Reviews

Pet Cowl – Free Crochet Pattern – Review

February 11, 2015 By stitch11 Leave a Comment


Pet Cowl - Free Crochet Pattern - Review

My family is moving this month.. so with all the craziness going on, I haven't been able to put much time into my love for crochet.In efforts to keep my blog moving with the little spare time I have, I decided to ask my fellow bloggers to share their flower patterns with me- so I can review them. As a bonus, I get to share beautiful flower crochet patterns just in time for Spring!

The first one I decided to hook up, is this oh-so-cute flower cowl for animals. This free crochet pattern is designed by Posh Pooch Designs. You can get the pattern >HERE<

The pattern worked up super quick, and as you can see, it's adorable!!!! The only change I made, was subtracting the starting chain by 4 stitches. 🙂 Beauty is still pretty small. <3

Miss Beauty is the newest model of our family 😉 We recently adopted her from a cat rescue here in Indiana. If you live in Indiana or would like to contribute to the cause, check out Howard County Kitten Rescue.


Filed Under: Free Patterns, Pattern Reviews

Crochet Your Blues Away!

February 6, 2015 By stitch11 Leave a Comment

Crochet Your Blues Away - Ten Free Crochet Patterns

Feeling the Winter blues? Here is a list of 10 free crochet patterns that will help you not only downsize your blue yarn stash, but the act of crocheting can also be an antidepressant! Getting your mind off the negative, and focusing on your creative love for crochet can only be healthy, right? 😉

1. Simply Perfect Coaster 
2. Dog Puppet 
3. 6 Month Owl Hat, Leg Warmers, and Diaper Cover Set 
4. The EveryBeanie 
5. 3 Month Infant Overalls 
6. Free Coaster Crochet Pattern 
7. So Easy and So Perfect – The Three Step Bow 
8. Grouchy Bear (baby blanket yarn) 
9. Size Small Dog Sweater 
10. Bobble Leg Warmers (Toddler, Child, Adult) 

Filed Under: Boys, Free Patterns, Round Ups

11 Free Pink Crochet Patterns

January 27, 2015 By stitch11 1 Comment

11 free pink crochet patterns

The one color that my yarn stash is always lacking is PINK! Not because I never use it, but because it is a very popular color for my daughter and customers.  I am not gonna lie… I love pink too!

Although I have more than eleven free pink crochet patterns- I decided to narrow it down to my favorite 11!

1. Size 0-3 Princess Crown (With toddler-child adult sizes linked)
2. Beach Bag For Momma
3. Sun Hat for the Ladies ( with 9 month-adult sizes)
4. My Daisy
5. Newborn Princess Hat (With Toddler size linked)
6. Sweet Ella Valentine (Fits toddler-child)
7. Toddler Fingerless Gloves
8. Lean on Me– Infinity Scarf
9. Boinky The Baby Pig
10. Boutique Bow
11. Sweet Stitches – Teen/Adult Beanie

Filed Under: Free Patterns, Round Ups

Sweet Stitches- Teen/Adult Beanie

January 26, 2015 By stitch11 16 Comments

A sweet beanie that both adults and teens can enjoy! This pattern uses crochet clusters which makes it the perfect opportunity for newbies to add another stitch to their stash. Free pattern is below or get the ad-free printable PDF pattern here.

Sweet Stitches - TeenAdult Beanie - Free Crochet Pattern

Have you ever worked with crochet clusters? They’re not actually hard to do – you just start working a double crochet stitch but don’t complete the last step before starting the next stitch, then repeat that several times and finish them all together. 

Once you get the knack of it they’re lots of fun and they make a cool texture on patterns like this beanie that will fit a teen or adult. 

Love this easy and fast crochet pattern? So do! That is why I put together a pattern bundle with all my favorite Done In A Day Patterns! And get this…there are 90 patterns included in this collection! Check out the bundle and all the patterns here!

The hat calls for worsted weight yarn, and while the original was worked in a solid color, it’s easy to make this a stash buster by doing each cluster round in a different color. Or work the bottom of the hat in one color and another toward the top.

Sweet Stitches- Teen/Adult Beanie Pattern

Skill Level: Easy 

Materials: 

• Hook: 

– US Size H/8 (5 mm) crochet hook or size needed to obtain gauge 

• Yarn: 250 yds worsted weight yarn

• Notions: 

– Scissors 

– Yarn needle 

Size: 

Hat circumference: 20 inches  

To fit head circumference: 20-22 inches 

Gauge:  

11 dc x 6 rows = 4 inches

Special Stitches: 

Sweet Stitches Beanie Crochet Pattern 

• 5 double crochet cluster (5-dc-cl): [Yo, insert hook in indicated st or sp, draw up a loop, yo and pull through 2 loops on hook] 5 times, yo and pull through all 6 loops on hook. 

• 4 treble crochet cluster (4-tr-cl): [Yo twice, insert hook in indicated st or sp, draw up a loop,  {yo and pull through 2 loops on hook} twice] 4 times, yo and pull through all 5 loops on hook.  

Get the ad-free printable PDF pattern here

ABBREVIATIONSDESCRIPTION
chChain
rndRound
scSingle crochet
sc2togSingle crochet next 2 stitches together
skSkip
spSpace
st(s)Stitch(es)
yoYarn over

Pattern

Join rnds where indicated with a sl st in the first st of the rnd. 

Ch 55 

Rnd 1: Sc in 2nd ch from hook and in each ch across, join. (54 sc) 

Rnd 2: Ch 1, sc in each st around, join. 

Rnd 3: Ch 2, 5-dc-cl in first st, ch 1, sk next st, [5-dc-cl in next st, ch 1, sk next st] around, join. (27 5-dc-cls, 27 ch-1 sps)  

Rnd 4: Ch 1, sc in each st and in each ch-1 sp around, join. (54 sc) 

Rnd 5: Ch 1, sc in each st around, join. 

Rnd 6: Ch 3, 4-tr-cl in first st, ch 2, sk next 2 sts, [4-tr-cl in next st, ch 2, sk next 2 sts] around, join. (18 4-tr-cls, 18 ch-2 sps)  

Rnd 7: Ch 1, sc in first st, 2 sc in next ch-2 sp, [sc in next st, 2 sc in next ch-2 sp] around, join. (54 sc)

Rnd 8: Ch 1, sc in each st around, join.  

Rnds 9-14: Repeat rnds 6-8 twice 

Rnd 15: Ch 3, 4-tr-cl in first st, ch 1, sk next 2 sts, [4-tr-cl in next st, ch 1, sk next 2 sts] around, join.  (18 4-tr-cls, 18 ch-1 sps)  

Rnd 16: Ch 1, sc in first st, sk next ch-1 sp, [sc in next st, sk next ch-1 sp] around, join. (18 sc)

Rnd 17: Ch 1, sc2tog in first 2 sts, [sc2tog in next 2 sts] around, join. (9 sts) 

Fasten off, leaving a long tail for sewing.  

Sew long tail through each of the sts on rnd 30, then pull tightly to close top of hat. Weave in end.

Use starting tail to sew bottom of rnd 1 closed. Weave in end.

Get the ad-free printable PDF pattern here

Filed Under: Free Patterns, Girls, Hats

  • « Previous Page
  • 1
  • …
  • 7
  • 8
  • 9
  • 10
  • 11
  • …
  • 21
  • Next Page »
  • Email
  • Facebook
  • Pinterest
  • RSS

Stitch11 is a Red Heart Blogger!

unnamed

.

Grab My Button

Archives

Privacy Policy

Copyright © 2026 Stitch11.com · All Rights Reserved · Log in