• Home
  • Free Patterns
    • Toys
    • Costumes
    • Bags
    • Flowers
    • Hats
    • Pattern Reviews
    • Household
    • Newborn
    • Scarves
    • Sports
  • Disclosure
  • Contact
  • Yummy Food
  • Round Ups

Stitch11

A Yarntastic Life!

  • Girls
  • Boys
  • Hats
  • Newborn
  • Flowers
  • Household
  • Costumes
  • Toys
  • Pattern Reviews
  • Grannys
You are here: Home / Archives for stitch11

Another Child Mouse Hat

December 16, 2015 By stitch11 Leave a Comment

Child Size Minnie Mouse Hat - Free Crochet Pattern

Each time I make something… I tend to want to do things a little differently.
I decided to use Caron Simply Soft this time.
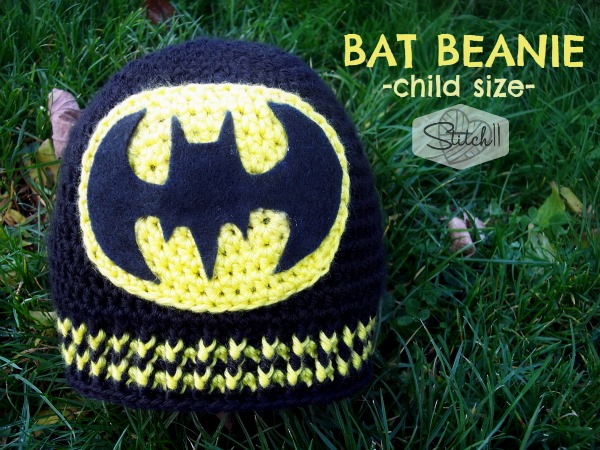
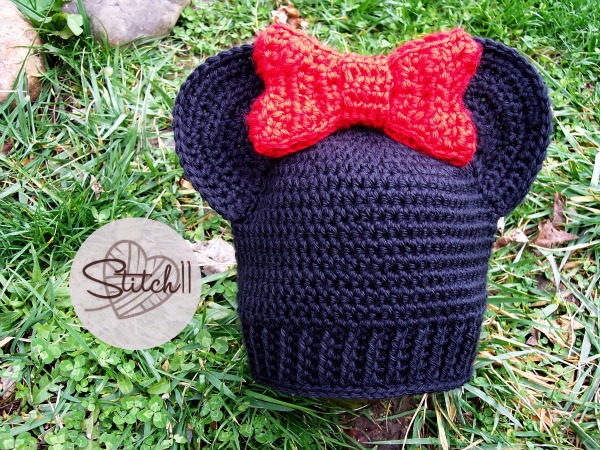
In order to get the correct size, instead of using the original Minnie Mouse Hat for Preschoolers or the Child Size Minnie Mouse Hat, I used the Hat Pattern from the Batman Hat.
I paired the hat with the ears from the Preschool Minnie Mouse Hat. I used two strands of caron simply soft held together to make sure they would be strong. (instead of making 2 layers for each ear) I still crocheted the edging around the ear.
For the bow, I held 3 strands of Red Heart Soft together and followed the free Boutique Bow pattern.

Filed Under: Costumes, Free Patterns, Girls, Hats, Inspired, Pattern Reviews, Uncategorized

Adult Beanie for Men or Women – Free Crochet Pattern

December 7, 2015 By stitch11 29 Comments

Looking for a beanie pattern you can use every day? This pattern is for you. With its simplicity, this beanie will look great in men and women, teens and adults alike! Give it a try with the free pattern below, or get the ad-free printable PDF pattern here.

Be prepared to get a lot of orders to make this simple yet classic beanie hat crochet pattern. #crochet #crochethat #crochetbeanie #crochetpattern #crochetaccessories #crochetaddict #ilovecrochet #freecrochetpattern

This cute adult beanie for men or women has such a great classic look. This is a simple crochet beanie pattern that's perfect for anyone.

Made with worsted weight yarn, it's also a great stash-buster project. They make great gifts, to give to charity or to make for the entire family.

These crochet beanie hats make up really quickly and are great for people who are learning to crochet or even working on improving their crochet skills. That is also why I included a step by step tutorial in my Crochet Fundamentals course on exactly how to crochet a hat like this! You can learn from scratch or simply pick up some pointers in an area where you might be struggling. There is something for everyone in this class.

Want more done in a day patterns? I have you covered with my entire collection of 90 Done in A Day Patterns that will surely keep you busy for some time! I love these patterns! Check them all out here.

Skill Level: Intermediate 

Materials: 

Yarn: Worsted weight yarn 
250 yds 

Hook: 
US size H/8 (5.00mm) crochet hook or size needed to match gauge 

Notions: 
Scissors 
Yarn needle 
Stitch marker 

Size: Circumference: 20” (to fit head circumference up to 24”); Height: 8” 

Gauge: 16 hdc x 12 rows = 4″

Pattern uses US crochet terms

ABBREVIATIONSDESCRIPTION
chChain
dcDouble crochet
fpdcFront post double crochet
fpscFront post single crochet
hdcHalf double crochet
rndRound
scSingle crochet
sl stSlip stitch
st(s)Stitch(es)

Pattern

Get the ad-free printable PDF pattern here

Hat 

Note: Hat is worked in continuous rounds, do not join unless indicated. Mark the first stitch of each rnd with a stitch marker. 

Make a magic circle. 

Rnd 1: 10 hdc in magic circle. (10 hdc) 

Rnd 2: 2 hdc in each st around. (20 hdc) 

Rnd 3: [2 hdc in next st, hdc in next st] around. (30 hdc) 

Rnd 4: [2 hdc in next st, hdc in each of next 2 sts] around. (40 hdc) 

Rnd 5: [2 hdc in next st, hdc in each of next 3 sts] around. (50 hdc) 

Rnd 6: [2 hdc in next st, hdc in each of next 4 sts] around. (60 hdc) 

Rnd 7: Hdc in each st around. 

Rnd 8: [2 hdc in next st, hdc in each of next 5 sts] around. (70 hdc) 

Rnd 9: Hdc in each st around. 

Rnd 10: [2 hdc in next st, hdc in each of next 6 sts] around. (80 hdc) 

Rnds 11-18: Hdc in each st around. 

Rnd 19: Hdc in each of the next 78 sts, sc in next st, sl st in next st. (78 hdc, 1 sc, 1 sl st)

Ribbing 

Rnds 20-25: Ch 1, sc in first st, fpdc in next st, [sc in next st, fpdc in next st] around, join with sl st in first st. (40 sc, 40 fpdc) 

Rnd 26: Ch 1, fpsc in each st around, join with sl st in first st. (80 fpsc) 

Fasten off; weave in ends.

That's all there is to it!

Get the ad-free printable PDF pattern here

Do you enjoy making simple shapes like rectangles? I highly recommend the Crochet Anything with Rectangles class where you take the basic shape and make a tote bag, beanie, slippers, and cardigan. All of these projects are made with simple rectangles!

Adult Beanie Crochet Pattern - Be prepared to get a lot of orders to make this simple yet classic beanie hat crochet pattern. #crochet #crochethat #crochetbeanie #crochetpattern #crochetaccessories #crochetaddict #ilovecrochet

Filed Under: Free Patterns, Hats

Child Size Batman Beanie

December 1, 2015 By stitch11 7 Comments

Bat Beanie - Child Size - Free Crochet Pattern by Stitch11

Supplies
5 mm crochet hook
black and yellow medium weight yarn (I used Caron Simply Soft)
Yarn needle
Black Felt

-NOTE- If you choose to use another medium weight or worsted weight yarn, it may work up larger than with Caron Simply Soft. If that is the case, stop increasing at 60 stitches. For Child size, when laying your hat flat, it sure measure between 9 and 10 inches across. 

Stitches Used
Slip Stitch
Magic Circle 
CH- Chain
SC- Single Crochet
HDC- Half Double Crochet
FPDC – Front Post Double Crochet 
FPSC – Front Post Single Crochet


The Child Size Beanie
You will be working in continuous rounds.

Round 1: Magic Circle. 10 HDC in magic circle.  (10)
Round 2: 2 HDC into each of the next 10 stitches. (20)
Round 3: **2 HDC into the next stitch. HDC into the next stitch. Repeat from ** 9 more times. (30)
Round 4: **2 HDC into the next stitch. HDC into the next 2 stitches. Repeat from ** 9 more times. (40)
Round 5: **2 HDC into the next stitch. HDC into the next 3 stitches. Repeat from ** 9 more times. (50)
Round 6: **2 HDC into the next stitch. HDC into the next 4 stitches. Repeat from ** 9 more times. (60)
Rounds 7: 1 HDC into each of the next 60 stitches. (60)
Round 8: **2 HDC into the next stitch. HDC into the next 5 stitches. Repeat from ** 9 more times. (70)
Round 9-17: 1 HDC into each of the next 70 stitches. (70)
Round 18: 1 HDC into the next 68 stitches. SC into the next stitch. Slip stitch into the next stitch. (70)
Round 19: CH 1. SC into the same stitch. FPDC into the next stitch. **SC into the next stitch. FPDC into the next stitch. Repeat from ** around. Join with a slip stitch to the first SC. (70)
Change to Yellow
Round 20: CH 1. SC into the same stitch. FPDC into the next stitch. **SC into the next stitch. FPDC into the next stitch. Repeat from ** around. Join with a slip stitch to the first SC. (70)
Change to Black 
Round 21:CH 1. SC into the same stitch. FPDC into the next stitch. **SC into the next stitch. FPDC into the next stitch. Repeat from ** around. Join with a slip stitch to the first SC. (70)
Change to Yellow
Round 22: CH 1. SC into the same stitch. FPDC into the next stitch. **SC into the next stitch. FPDC into the next stitch. Repeat from ** around. Join with a slip stitch to the first SC. (70)
Change to Black
Round 23: CH 1. SC into the same stitch. FPDC into the next stitch. **SC into the next stitch. FPDC into the next stitch. Repeat from ** around. Join with a slip stitch to the first SC. (70)
Round 24: CH 1. FPSC into each stitch around. Join to first stitch. Finish off and weave in your ends.

For the “Bat Symbol” I just used Google Images. I drew the one I liked onto some black felt, and cut it out. 

The Oval
Using Yellow

Round 1: CH 8. Skip 1st CH from hook. 2 HDC into next CH. 1 HDC into each of the next 5 CH. 3 HDC into last CH.
Turn your work and start crocheting into the other side of the chains. 
1 HDC into next 5 CH. 1 HDC into starting CH. Join to first HDC.
Round 2: CH 1. 3 HDC into same stitch. 1 HDC into next 7 stitches. 4 HDC into next stitch. 1 HDC into next 7 stitches. 1 HDC into starting stitch. Join to first HDC.
Round 3: CH 1. 1 HDC into same stitch. 1 HDC into next stitch. 3 HDC into next stitch. 1 HDC into next 7 stitches. 3 HDC into next stitch. 1 HDC into each of the next 2 stitches. 3 HDC into next stitch. 1 HDC into each of the next 7 stitches. 3 HDC into next stitch. Join to first HDC.
Round 4: CH 1. HDC into same stitch and into next 3 stitches. 3 HDC into next stitch. HDC into next 9 stitches. 3 HDC into next stitch. 1 HDC into next 4 stitches. 3 HDC into next stitch. 1 HDC into next 9 stitches. 3 HDC into last stitch. Join to first HDC.
Round 5: CH 1. 2 HDC into same stitch. 1 HDC into each of the next 2 stitches. 2 HDC into next stitch. 1 HDC into next stitch. 2 HDC into next stitch. 1 HDC into next 11 stitches.
2 HDC into next stitch. 1 HDC into next stitch. 2 HDC into next stitch. 1 HDC into each of the next 2 stitches. 2 HDC into next stitch. 1 HDC into next stitch. 2 HDC into next stitch. 1 HDC into next 11 stitches. 2 HDC into next stitch. 1 HDC into next stitch.
Finish off with a long tail for attaching to the hat.

You have the choice to hot glue the batman symbol or sew it onto the yellow oval. Then attach the oval to the front of your hat.

Filed Under: Boys, Costumes, Free Patterns, Hats

Eleven Scarf Patterns – Reviewed or Designed by Stitch11

November 24, 2015 By stitch11 Leave a Comment

Eleven Scarf Patterns - Reviewed or Designed by Stitch11

Sometimes plans can change. I keep putting off my WIP. My current excuse is that I am sick, and don't want to crochet my germs into the project. 😉 Why are there projects that just don't want to be finished? Or that just scream “Noooooo” when you go to pick it up?
To make up for lost crochet time, I decided to put together a round up of all the scarf patterns I have written or reviewed.  Each one of these was fun to finish and only scream “MAKE ME!” ha ha!
I will list/link them from the top, left to right.

Kissing Jewels 
Lacey Chevron 
Lean on Me 
Good Morning Cowl 
Shell of a Scarf 
Tunisian Infinity 
Snow Cowl 
Simple and Quick (and unique) Scarf 
Boston Terrier Scarf 
Artfully Simple Infinity 
Pavement Infinity

Filed Under: Round Ups, Scarfs

Boston Terrier Scarf – Pattern Review

November 18, 2015 By stitch11 Leave a Comment

Boston Terrier Scarf - Pattern Review- Stitch11

Before I get started on the review- CLICK HERE to get your copy of this awesome Boston Terrier Scarf pattern!

The Boston Terrier Scarf is designed by the creative Crochetions. Be sure to follow her on Facebook to get all the newest designs!

Tomorrow is my sisters birthday! She has this CRAZY love for Boston Terriers! I like to call her a “Boston Freak”. She has pictures, paintings, wrapping paper, shoes, pajamas, shirts, and now even a scarf in Boston Terrier theme.
When I found this design by Crochetions I KNEW it was perfect for my sister!!
I paired this scarf with a couple other crocheted scarves and folded them nicely in a box. I made sure to fold the Boston Terrier scarf so it looked solid black. When she pulled it out of the box, a couple legs fell from the fold. She looked very confused! >.< Then she opened the scarf with a GASP and SCREEECH! Her reaction was priceless!!!
I could not be more happy with the outcome of this scarf. Crochetions did an amazing job designing it!
I also have her Boston Terrier Hat pattern (you can get your copy HERE)
I used the nose from the hat for this scarf. I also made the eyes all black with a white slip stitch around because I didn't have the right size safety eyes.
Want to check out her other amazing animal scarves?
She has a fox, cats, many different dogs, dragons, bacon, pigs and even a sloth! I LOVE THEM ALL!!!
Click here to view her patterns on Ravelry! 

Animal Scarves

Filed Under: Pattern Reviews

Infant Bow Tie – Free Crochet Pattern

November 11, 2015 By stitch11 13 Comments

Infant Bow Tie - Free Crochet Pattern - Design by Stitch11

Infant Bow Tie Crochet Pattern

Stitches Used 
CH – Chain
Slip Stitch
SC – Single Crochet
HDC – Half Double Crochet
DC – Double Crochet

Supplies
Medium/worsted weight yarn
5 MM crochet hook
Yarn needle
Small button (about 1 CM)

The Bow
Row 1: CH 25. Turn. Skip 1 CH. **DC in next 3 stitches. HDC in next 2 stitches. SC in next 2 stitches. HDC in next 2 stitches. DC in next 3 stitches. Repeat from ** one more time.
Row 2: CH 1, turn. **DC in next 3 stitches. HDC in next 2 stitches. SC in next 2 stitches. HDC in next 2 stitches. DC in next 3 stitches. Repeat from ** one more time.
Row 3: CH 1, turn. **DC in next 3 stitches. HDC in next 2 stitches. SC in next 2 stitches. HDC in next 2 stitches. DC in next 3 stitches. Repeat from ** one more time.
Finish off leaving a long tail. Weave the ends together. The SC stitches from each row should fold over to be on top of one another in the center of the bow.  Leaving the DC stitches on the sides of the bow.
Weave your yarn end towards the center of the bow. Wrap it around the center of the bow a few times.. Do not cut the remaining yarn off. You will use this to attach the bow to the band.
The Band 
Make a CH that is 12-13 inches long. If you need to adjust the size, measure the neck and add about 2 inches. Keep in mind that this band will be adjustable. The button can slide between any stitch.
Turn, skip 1 CH and HDC into each of the remaining chains.
Finish off leaving a long enough tail to attach a button to the end.
Attach the bow to the center.

Filed Under: Boys, Costumes, Free Patterns, Newborn

Warm Snow Cowl

November 7, 2015 By stitch11 2 Comments

Snow Cowl - Free Crochet Pattern by Stitch11

Supplies
N-9mm crochet hook
Red Heart “Velvety” – Bulky 5
Yarn Needle

Stitches 
FSC – Foundation Single Crochet 
CH – Chain 
SC – Single Crochet 
Puff Stitch

Before I share the pattern, I want to take a moment to share with you how much I am loving this “Velvety” yarn from Red Heart. It's super soft which is a given for the “love” factor.. but even when you make a mistake and go to ribbit it all out, it pulls back out so easily! Major bonus!

-note- If you need to adjust the width, you are making your starting FSC in counts of 2 + 1.

Row 1: FSC 25
Row 2-4: CH 1. Turn. SC into each stitch across.

Row 5: CH 1. Turn. Puff stitch into first stitch. CH 1. Skip 1 stitch. *Puff stitch into next stitch. CH 1. Skip 1 stitch.  Repeat from * 11 more times.  Puff stitch into the last stitch. (13 puff stitches)
Row 6-9: Ch 1. Turn. SC into each stitch across. (25 SC)
Repeat rows 5-9 until you reach the end of the skein. Attach both ends together using your yarn needle.

For more beautiful scarf patterns, check out these from the past!

Stitch11 Snow Cowl - Free Crochet Pattern

For the snow cowl in the photo above- I used Caron Simply Soft, size I crochet hook and started with a FSC of 35.

Filed Under: Free Patterns, Scarfs, Uncategorized

Unicorn Hat – Free Pattern – Review

October 26, 2015 By stitch11 Leave a Comment

Unicorn Hat - Free Pattern - Review

When a friend asked me if I could make a unicorn hat, THIS FREE PATTERN by Repeat Crafter Me quickly came to mind.
I love how she writes most of her hat patterns in multiple sizes! It makes her designs very reliable when you get requests such as “6-9 month size”. Thanks Repeat Crafter Me!

Filed Under: Costumes, Free Patterns, Hats, Pattern Reviews

Free DIY Rainbow Pony Costume Tutorial

October 24, 2015 By stitch11 Leave a Comment

Free DIY Rainbow Pony Costume Tutorial

It's finally finished and ready to share! The last touches included using RIT DYE for the sweater and shoes. I was able to find pants at JC Pennys the correct color. I  Hot glued the rainbow lightning to the sweater and added a button to the back of the pants for attaching the tail.
Free Pony Hat Crochet Pattern
Free Rainbow Tail Crochet Pattern
Free Leg Warmer and Fingerless Gloves Patterns 
Free Lightning Bolt and Cloud Crochet Pattern 
How To Make Wings (no sew & no crochet) 

You may also like last years FOX COSTUME TUTORIAL!

Filed Under: Costumes, Crafts, Free Patterns, Inspired, Toys

Photo Tutorial – How to make WINGS!

October 23, 2015 By stitch11 Leave a Comment

How to make WINGS - Photo tutorial

These wings are one of the last pieces to my daughters costume. To see the previous pieces/tutorials check out Rainbow Pony Hat, Rainbow Tail, Rainbow Lightning Bolt, and the Leg Warmers and Fingerless Gloves.

For these wings you will need:

Less than 1 yard of fleece
Cardboard (about 4 cereal boxes)
Hot glue gun and sticks
3/8 elastic
Scissors

How to make WINGS - Photo tutorial

First, you will want to draw the back layer of the wing.

How to make WINGS - Photo tutorial

Cut it out, and trace it the other direction for the other wing.

How to make WINGS - Photo tutorial

Cut the other out, and now you will trace them both again. We will be layering them to make them stronger.

How to make WINGS - Photo tutorial

Cut out your second set like you did the first. Now lay them on more cardboard and trace the inside of the pieces. This is just to make sure your second layer has the same size and shape as the back layer.

How to make WINGS - Photo tutorial

See….

How to make WINGS - Photo tutorial

Cut out your first one, flip it, and trace it for the other side.

How to make WINGS - Photo tutorial

And, trace them again. Cut them out as well!

How to make WINGS - Photo tutorial

Next, you will hot glue the matching pieces together. So instead of 8 pieces, you now have 4. Each wing is stronger with them doubled and glued together. Go around the edges and cut the wonky looking pieces off to smooth it out.

How to make WINGS - Photo tutorial

Trace each piece onto your fleece, from both sides of each piece.

How to make WINGS - Photo tutorial

Start hot gluing each piece to the already glued together cardboard pieces.

How to make WINGS - Photo tutorial

While gluing, you will have to glue little parts at a time. If you try to glue the entire thing at once, half of your glue will dry before you place the fleece on it. (Learn from my mistakes! ha!)

How to make WINGS - Photo tutorial

After you glue all the pieces together, trim the wonky edges. If you do not have wonky edges, you are a much better tracer and cutter than I am. 😉

How to make WINGS - Photo tutorial

This is what you have!

How to make WINGS - Photo tutorial

Now make a rectangle the same way you made your wings. 2 layers of cardboard hot glued together with fleece hot glued around it.

How to make WINGS - Photo tutorial

Hot glue the rectangle onto the large wings.

How to make WINGS - Photo tutorial

Hot glue the smaller wings onto the top of the rectangle piece.

How to make WINGS - Photo tutorial

Cut your elastic at about 18 inches (adjust for the person who will be wearing it) tie them into a knot to make them a loop. Hot glue it down. I used an overload of glue. 😉
How to make WINGS - Photo tutorial

Cut another rectangle of fleece and hot glue it all over, over the elastic.
TA DA!

How to make WINGS - Photo tutorial

Filed Under: Costumes, Crafts

Rainbow Lightning Applique

October 19, 2015 By stitch11 Leave a Comment

Rainbow Lightning - Free Applique Crochet Pattern

The crocheted Rainbow Lightning shooting out of a cloud is the latest piece to my daughters Halloween costume. Check out the previous Rainbow Pony costume patterns; The Pony Hat, Rainbow Tail and the Fingerless Gloves and Leg Warmers!
Next I will be figuring out the wings!

Supplies
F/G- 3.75 mm crochet hook
White, Purple, Blue, Green, Yellow, Orange, and Red Med/Worsted Weight Yarn
Yarn needle.

[Read more…]

Filed Under: Costumes, Free Patterns, Inspired, Toys

Rainbow Tail

October 10, 2015 By stitch11 Leave a Comment

Rainbow Tail free crochet pattern by Stitch11

I wanted to share with everyone how to make your own rainbow tail!
If you love this, you will also love the Rainbow Pony Hat and the matching legwarmers and fingerless gloves.
Keep watching for the next pieces of the costume!

Stitches
Magic Circle
HDC – Half Double Crochet
HDC DEC – Half Double Crochet Decrease

Supplies
Medium/Worsted Weight yarn (yellow, green, blue, purple, red, and orange.)
6 mm crochet hook
Yarn Needle

[Read more…]

Filed Under: Costumes, Free Patterns, Inspired, Toys

Free Crochet Patterns that use Bernat Baby Blanket Yarn

October 9, 2015 By stitch11 Leave a Comment

8 free baby blanket yarn crochet patterns

I often hear people say “I have so much Bernat Blanket Yarn but never know what to make with it!” I tried to help out with my crochet bear and bunny patterns… but realized that big soft crochet stuffies aren't always what people are looking for.

I have searched the web and asked my other designer friends to help! Here are EIGHT-free crochet patterns that will help you use up your Bernat Baby Blanket Yarn stash! Now go grab your size L11/8mm crochet hook and get ready to use up your yarn.

Bunny Hat  – Stitch11 pattern review of a free Moogly Bunny Hat.
Rainbows In The Clouds – Free pattern by Moogly.
Huggy Bunny – Free pattern by Stitch11.
Toot-Sweet Newborn Bonnet – Free pattern by Moogly.
Seat Belt Cushion – Free Ravelry download by Christine Frazier
Grumpy Bear – Free pattern by Stitch11
Big Wheel Blanket – Free pattern from Michael's
Cloud 9 Slippers – Free pattern by The Lavender Chair

Are You a fan of all things crochet? Check out my Crocheters Care Package. I’m giving away 100 care packages to new I Love Stitches members here. Plus you’ll get lifetime access to 60+ Crochet classes, 100s of patterns and workshops and so much more.

Filed Under: Free Patterns, Round Ups

Child Size Leg Warmers and Fingerless Gloves

October 5, 2015 By stitch11 Leave a Comment

Child Size Leg Warmers and Fingerless Gloves - Free Crochet Pattern

In addition to my daughters Rainbow Pony Hat, she now has matching leg warmers and fingerless gloves. The next part of her costume will be the rainbow tail! Make sure you are following me on Facebook to see all the updates to the free Halloween costume patterns!

Don't want to wait? Check out this Halloween Post! 

Medium/WW Yarn – (Red Heart, Crafters Choice, or I Love This Yarn will each work great for this pattern) –
Yarn needle – for weaving in ends
J-6.00 MM crochet hook

[Read more…]

Filed Under: Boys, Costumes, Free Patterns, Girls

Puppy Blanket

October 2, 2015 By stitch11 2 Comments

Puppy Blankets

While following the Mystery Group CAL, I had the chance to finally learn the C2C. Following THIS PATTERN by the Underground Crafter gave me the inspiration to make my sisters puppies each a blanket for them to take to their new homes. <3
You can also find the paw print pattern HERE.

Filed Under: Free Patterns, Grannys, Pattern Reviews

Child Size Rainbow Pony Hat

September 27, 2015 By stitch11 2 Comments

Rainbow Pony - Free Child Size Crochet PatternThis year, my daughter has requested to be a rainbow Pegasus pony. Last year, she was a fox. You can find the fox costume tutorial HERE!
The hat is the first piece of her costume.

Supplies
5 mm crochet hook
#4 Medium-Worsted Weight Yarn. (I used a mix of Crafter's Secret, Red Heart Super Saver, and I Love This Yarn. You will need Teal/Blue, Dark blue, Purple, Red, Orange, Yellow, and green)
Yarn needle for weaving in ends and attaching pieces.
You will need felt for the eyes. I used a magenta, white, and black.
Hot glue gun for piecing together and attaching the eyes.

Stitches
Magic Circle
CH – Chain
SC – Single Crochet
HDC- Half Double Crochet
FPSC – Front Post Single Crochet
Note- Number between ( ) is the final stitch count of each round.

HAT PATTERN
Round 1: Magic Circle. CH 1. 12 HDC into magic circle. Join to first HDC. (11)
Round 2: CH 1. 2 HDC into each HDC around. Join to first HDC. (22)
Round 3: CH 1. HDC into each stitch around. Join to first HDC. (22)
Round 4: CH 1. 2 HDC into first HDC. 1 HDC into next HDC. *2 HDC into next HDC. 1 HDC into next DC. Repeat from * around. Join to first HDC. (33)
Round 5: CH 1. 2 HDC into first HDC. 1 HDC into each of the next 2 HDC. *2 HDC into the next HDC. 1 HDC into each of the next 2 HDC. Repeat from * around. Join to the first HDC. (44)
Round 6: CH 1. 1 HDC into each stitch around. Join to first HDC. (44)
Round 7: CH 1. 2 HDC into first HDC. 1 HDC into each of the next 3 HDC. *2 HDC into the next HDC. 1 HDC into each of the next 3 HDC. Repeat from * around. Join to the first HDC. (55)
Round 8: CH 1. 2 HDC into first HDC. 1 HDC into each of the next 4 HDC. *2 HDC into the next HDC. 1 HDC into each of the next 4 HDC. Repeat from * around. Join to the first HDC. (66)
Round 9-18: CH 1. 1 HDC into each stitch around. Join to first HDC. (66)
Round 19-20: CH 1. SC into each stitch around. Join to first stitch. (66)
Round 21: CH 1. FPSC over each stitch. Join to first stitch. (66)
Finish off and weave in ends.

EAR PATTERN
Make two.
Round 1: Magic Circle. CH 1. 6 HDC into magic circle. Join to first HDC. (6)
Round 2: CH 1. 2 HDC into the first HDC. 1 HDC into next HDC. *2 HDC into the next HDC. 1 HDC into next HDC. Repeat from * 1 more time. Join to first HDC. (9)
Round 3: CH 1. 2 HDC into the first HDC. 1 HDC into each of the next 2 HDC. *2 HDC into the next HDC. 1 HDC into each of the next 2 HDC. Repeat from * 1 more time. Join to first HDC. (12)
Round 4: CH 1. 2 HDC into the first HDC. 1 HDC into each of the next 3 HDC. *2 HDC into the next HDC. 1 HDC into each of the next 3 HDC. Repeat from * 1 more time. Join to first HDC. (15)
Round 5: CH 1. 2 HDC into the first HDC. 1 HDC into each of the next 4 HDC. *2 HDC into the next HDC. 1 HDC into each of the next 4 HDC. Repeat from * 1 more time. Join to first HDC. (18)
Round 6: CH 1. 2 HDC into the first HDC. 1 HDC into each of the next 5 HDC. *2 HDC into the next HDC. 1 HDC into each of the next 5 HDC. Repeat from * 1 more time. Join to first HDC. (21)
Round 7: CH 1. 1 HDC into each of the first 3 stitches. 1 SC into each of the next 15 stitches. 1 HDC into each of the last 3 stitches. Join to first HDC. (21)
Round 8: CH 2. 2 DC into the first stitch. 1 DC into the next stitch. HDC into next stitch. 1 SC into each of the next 15 stitches. HDC into next stitch. 1 DC into last 2 stitches. Join to first DC. (22)
Round 9: CH 2. 2 DC into the first stitch. 1 DC into the next stitch. HDC into the next stitch. 1 SC into each of the next 16 stitches. HDC into the next stitch. 1 DC into last 2 stitches. Join to first DC. (23)
Round 10-11: CH 1. 1 HDC into each of the first 5 stitches. SC into next 13 stitches. 1 HDC into each of the last 5 stitches.
Finish off leaving long end for attaching.

When attaching the ears, notice how I curled the inner side of the ear in a little… attaching down row 5.  The ears are attached between rows 5 and 10.

Hair Pattern
Make six. (red, yellow, orange, green, blue, and purple)

Round 1: Magic Circle. CH 1. 4 HDC into magic circle. Join to first HDC. (4)
Round 2: CH 1. 2 HDC into first stitch. 1 HDC into the next stitch. 2 HDC into the next stitch. 1 HDC into the next stitch. Join to first HDC. (6)
Round 3: CH 1. 1 HDC into each HDC. Join to first HDC. (6)
Round 4: CH 1. 2 HDC into first stitch. 1 HDC into each of the next 2 stitches. 2 HDC into the next stitch. 1 HDC into each of the next 2 stitches. Join to first HDC. (8)
Round 5: CH 1. 1 HDC into each HDC. Join to first HDC. (8)
Round 6: CH 1. 2 HDC into first stitch. 1 HDC into each of the next 3 stitches. 2 HDC into the next stitch. 1 HDC into each of the next 3 stitches. Join to first HDC. (10)
Round 7: CH 1. 2 HDC into first stitch. 1 HDC into each of the next 4 stitches. 2 HDC into the next stitch. 1 HDC into each of the next 4 stitches. Join to first HDC. (12)
Round 8: CH 1. 1 HDC into each HDC. Join to first HDC. (12)
Finish off and set aside.
Using same color-
Round 1: Magic Circle. CH 1. 4 HDC into magic circle. Join to first HDC. (4)
Round 2: CH 1. 2 HDC into first stitch. 1 HDC into the next stitch. 2 HDC into the next stitch. 1 HDC into the next stitch. Join to first HDC. (6)
Round 3: CH 1. 2 HDC into first stitch. 1 HDC into next stitch. *2 HDC into next stitch. 1 HDC into next stitch. Repeat from * 1 more time. Join to first HDC. (9)
Round 4: CH 1. 1 HDC into each HDC. Join to first HDC. (9)

Slip stitch into the piece you sat aside.  You will be working around the two parts to make them one piece.
We will call the next round “Round 9” to take off from where we left off after the first piece.

Round 9: CH 1. 1 HDC into each stitch around. Join to first HDC. (21)
Round 10: CH 1. HDC into first 6 stitches. 2 HDC into next stitch. 1 HDC into each of the next 9 stitches. 2 HDC into next stitch. 1 HDC into each of the next 4 stitches. Join to first HDC. (23)
Round 11-18 : CH 1. 1 HDC into each stitch around. Join to first HDC. (23)
Each one will end at a different Round- repeating round 18.
RED – End at Round 18.
ORANGE – End at Round 20.
YELLOW – End at Round 22.
GREEN – End at Round 22.
BLUE  – End at Round 20.
PURPLE -End at Round 18.
-Note- Use your own judgement. You may want to add or subracts rounds for your own liking. You may also want to change them if one color works up thinner/tighter than the other.

Finish off leaving long tail for attaching. Repeat for each color.

When attaching the hair, I attaches the entire way around the first round of each piece. I also then secured the red, orange, and yellow by attaching it in more than one area to make it lay where I wish.

Eyes

I used THIS TUTORIAL as a guide for making the eyes. My daughter wanted “normal” eyes…. but a part of me wishes she would have went for the angry look. Either way, get crafty and have fun! Remember, google images is your friend! You will also find crochet tutorials for eyes like this.
I used a hot glue gun to piece together and attach the eyes.

Filed Under: Costumes, Free Patterns, Girls, Hats

16 Crochet Hat Patterns – Available in Teen and Adult Size!

September 22, 2015 By stitch11 1 Comment

16 Crochet Hat Patterns - Available in Teen and Adult Size!

I have had a lot of people asking me what kind of hat's I've made for adults. This is the perfect excuse for me to bring together the most popular crochet hat designs for adults that have been written or reviewed by me!

Time to bust your yarn stash!

The Giraffe Hat 
Sweet Stitches Teen-Adult Beanie
Granny Slouch 
The EveryBeanie
Sun Hat For The Ladies 
5 Crochet Beanies for Men
Leaping Stripes Beanie 
All Seasons Beret Hat 
Skulls Beanie 
Minnie Mouse 
Samantha Slouch 
Double The Flop Hat 

Check out my other page if you're looking for more crochet patterns: 35+ Free Crochet Hat Patterns For Adults

Filed Under: Free Patterns, Hats, Pattern Reviews, Round Ups

Ghostly Activities

September 19, 2015 By stitch11 Leave a Comment

Ghostly Activities - Crochet and Crafts - Stitch11

My neighbors started decorating for Autumn. The moment my daughter noticed their pumpkins and scarecrows, she started begging for us to start decorating too.
We pulled out the Halloween boxes and played with all the old costumes and masks. Made a mess with fake spider webs… and realized we are missing decorations from the move.
I'm not too worried about all the missing decorations as I am sure they are packed away in the back of one of the closets with an invisibility cloak draped over them. >.<
Besides… this is a perfect opportunity to get crafty!
I decided to share with you my adventure for finding the funnest decorations and activities. Each week until Halloween, we will be creating a few different things from different categories. The first is Ghostly Activities! Have fun!

First, the non crochet related Ghostly Activities.

  1. Simple Coffee Filter Ghosts
  2. Ghost Jugs
  3. Ghost Garland 
  4. Ghost Rocks
  5. Glue Ghosts 
  6. Smoking Boo Bombs

Now, the (free) Crochet Ghostly Activities! 

  1.  Lollipop Ghost Crochet Pattern
  2. Ghost Candy Bowl 
  3. Amigurumi Ghosts (photo tutorial)
  4. Ghost Puppet
  5. Ghost Applique/Coaster

Filed Under: Costumes, Crafts, Free Patterns, Round Ups

Free Butterfly Leg Warmer Pattern & Yarn Review

September 18, 2015 By stitch11 1 Comment

100_7410

AllFreeCrochet gave me the opportunity to review some delicious Mango Moon Yarn. Check out the review HERE!

100_7334

With the review, I also wrote a free pattern for these stunning Butterfly Leg Warmers. You can view the pattern HERE.

100_7413

As soon as I received the yarn in the mail.. my daughter started naming off everything she wanted me to make with them. If you have been following Stitch11 over the last few years, you know we have a special love for leg warmers. 🙂 When she told me she wanted me to make her new leg warmers, I was very excited and took it as a chance to come up with something unique.

The pattern is written in child size but is VERY easy to adjust. You will  just need change your starting CH in counts of 10.

Happy hooking!


Filed Under: Free Patterns, Girls, Pattern Reviews

Four Bear Crochet Patterns – Written or Reviewed by Stitch11

September 17, 2015 By stitch11 Leave a Comment

Four Bear Crochet Patterns Written or Reviewed by Stitch11 My daughters first stuffed animal was a bear. She is now 4 years old and still loves that first bear. Teddy Bears will always have a special place in her heart. <3
You just can't go wrong when making a bear for a child.
If you like these patterns, also check out the Pet Net and Back Pack to Care-A-Lot!

Below is a list of the patterns from the featured photo. Click the name of the pattern to get to the the pattern or review.

Blue Bear Hood 
Curtain Hugging Bear 
0-3 Month Bear Hat 
Grouchy Bear 

If the blues in the photo is what caught your attention, you may also like the pattern listed in Crochet Your Blues Away!

Filed Under: Free Patterns, Round Ups

  • « Previous Page
  • 1
  • …
  • 5
  • 6
  • 7
  • 8
  • 9
  • …
  • 25
  • Next Page »
  • Email
  • Facebook
  • Pinterest
  • RSS

Stitch11 is a Red Heart Blogger!

unnamed

.

Grab My Button

Archives

Privacy Policy

Copyright © 2026 Stitch11.com · All Rights Reserved · Log in