• Home
  • Free Patterns
    • Toys
    • Costumes
    • Bags
    • Flowers
    • Hats
    • Pattern Reviews
    • Household
    • Newborn
    • Scarves
    • Sports
  • Disclosure
  • Contact
  • Yummy Food
  • Round Ups

Stitch11

A Yarntastic Life!

  • Girls
  • Boys
  • Hats
  • Newborn
  • Flowers
  • Household
  • Costumes
  • Toys
  • Pattern Reviews
  • Grannys
You are here: Home / Archives for stitch11

Children’s Spring Crochet Leg Warmers

March 7, 2017 By stitch11 1 Comment

Spring Leg Warmers - Free Crochet Pattern by Stitch11

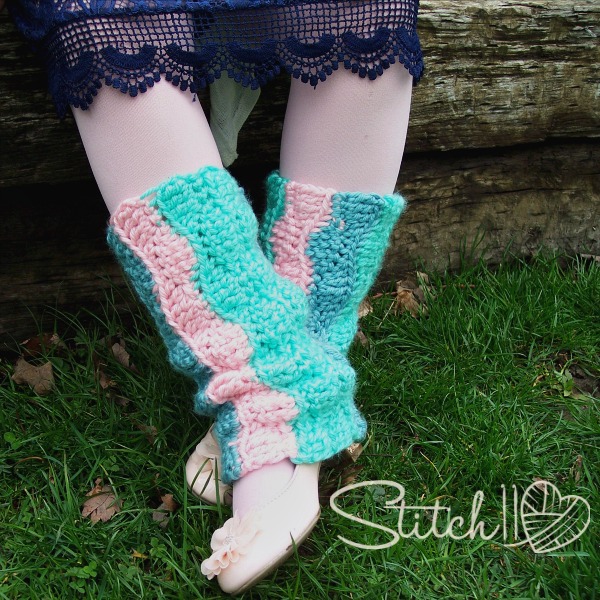
My daughter LOVES her leg warmers! If you are new to Stitch11, check out our past crochet leg warmers! The Spring Leg Warmers are designed for children, but in the notes below you will see how easily you can adjust the size.
I highly suggest using Red Heart Soft Essentials yarn. It's very soft, strong, and works up quickly.  If it's not at your local Michaels Store, check it out online at Red Heart!

[Read more…]

Filed Under: Free Patterns, Girls

Minty Mandala Purse

January 26, 2017 By stitch11 17 Comments

Minty Mandala Purse doesn't only feature a mesmerizing pattern, the colors are absolutely gorgeous, too! The pattern uses a variety of stitches that can help you polish up on the basics. Try the free pattern below or get the ad-free printable PDF pattern here.

Check out this fun Bohemian style mandala purse crochet pattern. You'll never need to buy a purse or bag ever again. it would be a perfect gift for someone you love because it's beautiful and at the same time pretty easy to make. #crochet #crochetlove #crochetlife #crochetaddict #crochetpattern #crochetbag #ilovecrochet #crochetgifts #crochetpurse #addictedtocrochet #yarnaddict #yarnlove

I designed the Minty Mandala Purse for me! As much as I love to crochet projects and patterns, I rarely make anything for myself.

My Fat Bottom Bag has been through a lot, and needed to be replaced.  I wanted something with a fun Bohemian style. Enjoy your new free crochet pattern!

You know what else I love about this pattern? Most of the pattern is made using just a simple rectangle. There are so many crochet patterns you can make with just rectangles. I show you how in my Crocheting Anything with Rectangles course. Check it out here.

Minty Mandala Purse Crochet Pattern

Skill Level: Intermediate 

Materials: 

• Hook: 

– US Size H/8 (5 mm) crochet hook or  size needed to obtain gauge 

• Yarn: Bulky weight yarn 

– 125 yds beige (A) 

– 250 yds dark grey (B) 

– 125 yds green (C) 

• Notions: 

– Scissors 

– Yarn needle 

– 1-inch – 1.5-inch button 

Size: 

8 x 11 inches 

Gauge:  

16 dc x 7 rnds = 4 inches 

Get the ad-free printable PDF pattern here

ABBREVIATIONSDESCRIPTION
bloBack loop only
chChain
dcDouble crochet
fptrFront post treble crochet
hdcHalf double crochet
rndRound
scSingle crochet
skSkip
sl stSlip stitch
spSpace
st(s)Stitch(es)
yoYarn over

Special Stitch:  

Puff Stitch (puff): [Yo, insert hook in indicated st or sp, pull up a loop] 

3 times, yo and pull through all 7 loops on hook, ch 1 to close.  

Pattern

FLAP: 

With A, make a magic circle. 

Row 1 (RS): Ch 1, 5 hdc in magic circle, close magic circle. (5 dc) 

Row 2: Ch 1, turn, 2 sc in first st, sc in next st, 2 sc in next st, sc in next st, 2 sc in next st. (8 sc) Change to B 

Row 3: Ch 2, turn, dc in first st, 2 dc in next st, [dc in next st, 2 dc in next st] across. (12 sts) Change to A 

Do NOT skip any sts behind the fptrs in row 4. The fptrs are extra sts and you will still work into  every st from row 3.  

Row 4: Ch 1, turn, sc in each of first 2 sts, fptr around 2nd st from row 1, sc in next 2 sts, fptr around  same st as previous fptr, sc in next 2 sts, [fptr around next st from row 1, sc in next 2 sts] twice, fptr  around same st as previous fptr, sc in last 2 sts. (12 sc, 5 fptr) 

Change to B 

Row 5: Ch 1, turn, sc in each st across. (17 sts) 

Change to C 

Row 6: Ch 1, turn, hdc in first st, [puff in next st, hdc in next st] across. (9 hdc, 8 puffs) Change to B 

Row 7: Ch 1, turn, hdc in first st, [2 hdc in next puff, hdc in next st] across. (25 hdc)

Row 8: Ch 1, turn, 2 hdc in first st, hdc in each of next 4 sts, [2 hdc in next st, hdc in each of next 4  sts] across. (30 sts) 

Change to A 

Row 9: Ch 1, turn, 2 hdc in first st, hdc in each of next 5 sts, [2 hdc in next st, hdc in each of next 5  sts] across. (35 sts) 

Change to C 

Get the ad-free printable PDF pattern here

Row 10: Ch 1, turn, hdc in first st, [puff in next st, hdc in next st] across. (18 hdc, 17 puffs) Change to B 

Row 11: Ch 1, turn, hdc in first st, [2 hdc in next puff, hdc in next st] across. (52 hdc) Change to A 

Row 12: Ch 1, turn, hdc in each of first 24 sts, ch 4, sk next 4 sts, hdc in each of last 24 sts. (48 hdc,  1 ch-4 sp) 

Row 13: Ch 1, turn, hdc in each of first 12 sts, 2 hdc in next st, hdc in each of next 5 sts, 2 hdc in  next st, hdc in each of next 5 sts, 5 hdc in ch-4 sp, [hdc in each of next 5 sts, 2 hdc in next st]  twice, hdc in each of last 12 sts. (57 sts) 

Change to C 

Row 14: Ch 1, turn, hdc in each st across.  

Fasten off. Weave in all ends. 

BODY: 

With B, ch 31.  

Row 1 (RS): Hdc in 2nd ch from hook and in each ch across. (30 hdc) 

Rows 2-25: Ch 1, turn, hdc in each st across.  

Row 26: Ch 1, turn, sc in blo of each st across. (30 sc) 

Rows 27-29: Ch 1, turn, sc in each st across.  

Row 30: Ch 1, turn, hdc in blo of each st across. (30 hdc) 

Rows 31-54: Ch 1, turn, hdc in each st across.  

Edging rnd: Ch 1, turn, 2 sc in first st, sc in each st across to last st, 2 sc in last st, working in sides  of rows, sc in each row across, working in bottom of foundation ch, 2 sc in first ch, sc in each ch  across to last ch, 2 sc in last ch, working in sides of rows, sc in each row across, join with sl st in  first st. (172 sc) 

Fasten off, leaving a long tail for sewing. 

SIDES (MAKE 2): 

With B, ch 27.  

Row 1 (RS): Sc in 2nd ch from hook, sc in each of next 6 chs, hdc in each of next 4 chs, dc in each  of next 10 chs, hdc in each of next 2 chs, sc in each of last 3 chs. (10 sc, 6 hdc, 10 dc)

Row 2: Ch 1, turn, sc in each of first 5 sts, hdc in each of next 14 sts, sc in each of last 7 sts. (12 sc,  14 hdc) 

Change to C 

Row 3: Ch 1, turn, sc in each st across. (26 sc). 

Change to B. 

Row 4: Repeat row 2.  

Row 5: Ch 1, turn, sc in each of first 7 sts, hdc in each of next 4 sts, dc in each of next 10 sts, hdc in  each of next 2 sts, sc in each of last 3 sts. (10 sc, 6 hdc, 10 dc) 

Fasten off, leaving a long tail for sewing.  

STRAP: 

With B, ch 10, being careful not to twist the ch, join with a sl st to first ch to make a circle.  Strap is worked in spiral rnds, do not join rnds, do not ch to start rnds.  

Rnd 1: Hdc in each of first 9 chs, remove loop of B from hook and secure with a stitch marker, join  C with sl st in last st, hdc with C in last st.  

Rnd 2: Hdc with C in each st of B until you reach the free loop of B, remove loop of C from hook  and secure with a stitch marker, remove marker from loop of B and place that loop on hook. 

Rnd 3: Hdc with B in each st of C until you reach the free loop of C, remove loop of B from hook  and secure with a stitch marker, remove marker from loop of C and place that loop on hook. Repeat rnds 2-3 until work measures 30 inches or desired length.  

Last rnd: Hdc with C in each of next 6 sts, sl st in next st, fasten off C. Remove marker from loop  of B and place that loop on hook, sl st in next st, fasten off B.  

Fasten off. 

ASSEMBLY: 

The blo stitches on the body create 2 fold lines. The area between these lines is the bottom of the  purse. 

With RS together, place one side piece along one side edge of the purse so that the winder end  aligns with the bottom. Sew together around side and bottom edges, using long tail. Repeat for  the other side piece.  

With RS together, align straight edge of flap with one of the top edges of the purse (this is now the back of the purse). Sew together using long tail.  

Sew one end of handle to top edge of each side piece.  

Weave in all ends.  

Turn bag right side out.  

Sew button to center front of purse. Insert button between dc stitches on flap to close.

Did you enjoy making this sweet purse?

Get the ad-free printable PDF pattern here

If you're looking for more great patterns, check out more of my posts below:

  • Primrose Stitch Cowl Crochet Pattern
  • Lemon Peel Fingerless Gloves Crochet Pattern
  • Pom Pom Cushion Crochet Pattern
  • Cozy Fall Headband Crochet Pattern

Filed Under: Bags, Free Patterns Tagged With: bag, crochet pattern, crochet purse pattern, pattern, purse, purse pattern

Elf Stocking Hat – All Sizes

December 1, 2016 By stitch11 10 Comments

Elf Stocking Hat - All Sizes

I am excited to share with you my first attempt at including all sizes at once! Please show me your finished pieces so I know I did my job correctly. Enjoy this fun & free Elf Stocking Hat crochet pattern by Stitch11!

Supplies 
I/9 – 5.5 mm Crochet Hook 
Medium/Worsted Weight  –  Red Heart Super Saver
Color A – Neon Red
Color B – Neon Green 
Color C – Purple
Color D – Dark Red
Yarn Needle for weaving in your ends. 

Stitches and Terms
Magic Circle 
CH – Chain
SC – Single Crochet
HDC – Half Double Crochet
DC – Double Crochet
Join –  join using a slip stitch.
FPDC – Front Post Double Crochet
FPSC – Front Post Single Crochet

[Read more…]

Filed Under: Boys, Free Patterns, Girls, Hats, Newborn

Scarf of Personal Growth – Crochet Scarf Pattern

November 17, 2016 By stitch11 21 Comments

This adorable dragonfly crochet scarf pattern is a fun and easy crochet pattern. This scarf makes a perfect accessory to any outfit. The open spaces in the scarf represent change and reflection. #crochet #crochetlove #crochetlife #crochetaddict #crochetpattern #crochetinspiration #ilovecrochet #crochetgifts #crochet365 #addictedtocrochet #yarnaddict #yarnlove #crochetscarf

The Scarf of Personal Growth reflects exactly what the name suggests. This free crochet pattern is designed for you or for you to gift to someone you know. The open spaces in the scarf represent change and reflection. What are they? They are what your eyes see. Whether it be a dragonfly, fairy, angel…it's all about personal perception.

Supplies 
2 balls of yarn (Red Heart Unforgettable – Candied used in photos)
K – 6.5 mm crochet hook
Yarn needle for weaving in your ends.

Stitches 
CH – Chain
SC – Single Crochet
DC – Double Crochet
3-DC-Cluster – 3 Double Crochet Cluster stitch

[Read more…]

Filed Under: Free Patterns, Scarfs Tagged With: crochet, crochet pattern, crochet scarf, crochet scarf pattern, dragonfly, pattern, scarf, scarf pattern

Headphone Beanie for Children

November 3, 2016 By stitch11 1 Comment

stitch11-headphone-beanie-child-size

This free crochet pattern is inspired from the mind of my cousins 4 year old son. He made the request, and I was thrilled to bring his idea to life!

Supplies
6 mm crochet hook
Red Heart With Love – Black, Gray, and Blue.
Cherub DK yarn (for music note)
E/ 3.5 mm crochet hook  (for music note)
Yarn needle

Stitches
Magic Circle
Slip Stitch
SC – Single Crochet
HDC – Half Double Crochet
FPSC – Front Post Single Crochet

This pattern is Child Size. Fits most 3-10 year olds.

[Read more…]

Filed Under: Boys, Costumes, Free Patterns, Hats

Child Size Pumpkin Hat

October 28, 2016 By stitch11 1 Comment

child-draws-pumpkin-hat-and-mom-designs-it-free-stitch11-crochet-pattern

My daughter requested a hat. She drew a photo and picked out the yarn colors. Although I know not everyone will want a pumpkin face exactly the way my daughter designed, I am sharing with you the pattern.
If you would like a more traditional face, I'm sure you could find a pattern with a quick online search.

Supplies
6 mm crochet hook
Red Heart Super Saver (orange) Red Heart With Love (Gray and Black)
Yarn needle

Stitches
Magic Circle
Slip Stitch
CH – Chain
SC – Single Crochet
HDC – Half Double Crochet
DC – Double Crochet
DC 2 TOG – Double Crochet Two Together
FPSC – Front Post Single Crochet

[Read more…]

Filed Under: Costumes, Free Patterns, Hats

Child & Adult – Cutie Pie Mittens

October 6, 2016 By stitch11 2 Comments

stitch11-child-teen-adult-mittens-freecrochetpattern

If you have read my About Me, you know that one of the reason I wanted to learn how to crochet, was to crochet my daughter some mittens. After 4 quick years, I FINALLY created her a pair; and me a pair to match!
Enjoy this free crochet pattern for mother-daughter mittens!

Supplies
G/6 – 4.25 mm crochet hook
Yarn Needle
Red Heart – Cutie Pie yarn (I used Grape and Koala) #3 Light

Stitches
Magic Circle
SC – Single Crochet
HDC – Half Double Crochet
HDC DEC – Half Double Crochet Decrease.
FPSC – Front Post Single Crochet
FPDC – Front Post Double Crochet

-Note- I only used 1/2 skein for 2 pairs of mittens.

Let's get started!

Child
Round 1: Magic Circle. CH 1. 8 HDC into magic circle. Join to first HDC. Pull ring tight.
Round 2: CH 1. *2 HDC into next stitch. 1 HDC into next stitch. Repeat from * 3 more times.  Join to first HDC. (12 HDC)
Round 3: CH 1. *2 HDC into next stitch. 1 HDC into each of the next 2 stitches. Repeat from * 3 more times. Join to first HDC. (16 HDC)
Round 4: CH 1. 2 HDC into next stitch. 1 HDC into each of the next 3 stitches. Repeat from * 3 more times. Join to first HDC. (20 HDC)
Round 5-11: CH 1. 1 HDC into each HDC. Join to first HDC.  (20 HDC)
Note: For longer hands, repeat round 5 until desired length.
Finish off.

Child Thumb Piece
Round 1: Magic Circle. CH 1. 8 HDC into magic circle. Join to first HDC. Pull ring tight.
Round 2-6: CH 1. 1 HDC into each HDC. Join to first HDC.
Joining Thumb and Mitten
(Photos below will show how I joined the thumb)
Round 12:  Slip stitch into any stitch from the mitten. This will join your thumb piece and mitten piece.
CH 1. HDC into same stitch and each of the stitches around. Join to first HDC. This will be a total of 28 stitches.
Round 13-14: CH 1. 1 HDC into each stitch around join to first HDC. (28 HDC)
Round 15: CH 1. *HDC into next 5 stitches. HDC DEC.  Repeat from * 3 more times. Join to first HDC. (24 Stitches)
Round 16-18: CH 1. 1 HDC into each stitch around. Join to first HDC. (24 HDC)
Round 19-20: CH 1. SC into first stitch. FPDC around next stitch. * SC into next stitch. FPDC around next stitch. Repeat from * around. Join to first SC. (24 stitches)
Change to contrasting color. 
Round 21: CH 1. SC into first stitch. FPDC around next stitch. * SC into next stitch. FPDC around next stitch. Repeat from * around. Join to first SC. (24 stitches)
Change back to main color. 
Round 22: CH 1. SC into first stitch. FPDC around next stitch. * SC into next stitch. FPDC around next stitch. Repeat from * around. Join to first SC. (24 stitches)
Round 23: CH 1. FPSC around each stitch. Join to first FPSC. (24 FPSC)

Finish off. Turn your glove inside out. Weave in your ends. You can use the end from attaching your thumb piece to close up any holes that may seem too big where you slip stitched to join the thumb.
Repeat for second glove.

Joining

Teen/Adult
Round 1: Magic Circle. CH 1. 8 HDC into magic circle. Join to first HDC. Pull ring tight.
Round 2: CH 1. 2 HDC into each HDC around. Join to first HDC. (16 HDC)
Round 3: CH 1. *2 HDC into next stitch. 1 HDC into next stitch. Repeat from * 7 more times. Join to first HDC.  (24 HDC)
Round 4-16: CH 1. 1 HDC into each HDC around Join to first HDC. (24 HDC)
Note: For longer hands, repeat round 4 until desired length.
Finish off.
Teen/Adult Thumb Piece
Round 1: Magic Circle. CH 1. 10 HDC into magic circle. Join to first HDC. Pull ring tight.
Round 2-8: CH 1. 1 HDC into each HDC. Join to first HDC.
Joining Thumb and Mitten
(Photos above will show how I joined the thumb)
Round 17:  Slip stitch into any stitch from the mitten. This will join your thumb piece and mitten piece.
CH 1. HDC into same stitch and each of the stitches around. Join to first HDC. This will be a total of 34 stitches.
Round 18-21: CH 1. 1 HDC into each stitch around join to first HDC. (34 HDC)
Round 22: CH 1. *1 HDC into next 6 stitches. HDC DEC. 1 HDC into next 7 stitches. HDC DEC. Repeat from * one more time.  Join to first HDC. (30 HDC)
Round 23: CH 1. 1 HDC into next 13 stitches. HDC DEC. Repeat from * one more time. Join to first HDC. (28 HDC)
Round 24- 26 CH 1. SC into first stitch. FPDC around next stitch. * SC into next stitch. FPDC around next stitch. Repeat from * around. Join to first SC. (28 stitches)
Change to contrasting color. 
Round 27: CH 1. SC into first stitch. FPDC around next stitch. * SC into next stitch. FPDC around next stitch. Repeat from * around. Join to first SC. (28 stitches)
Change back to main color. 
Round 28: CH 1. SC into first stitch. FPDC around next stitch. * SC into next stitch. FPDC around next stitch. Repeat from * around. Join to first SC. (28 stitches)
Round 29: CH 1. FPSC around each stitch. Join to first FPSC. (28 FPSC)

Finish off. Turn your glove inside out. Weave in your ends. You can use the end from attaching your thumb piece to close up any holes that may seem too big where you slip stitched to join the thumb.
Repeat for second glove.

Filed Under: Boys, Free Patterns, Girls

Dancing Pixie – Jumbo Cowl

September 29, 2016 By stitch11 2 Comments

dancing-pixie-jumbo-cowl

While designing the Eccentric Pixie -Super Scarf for Red Heart Yarns, I knew I wanted to use the same “Sweet” Jumbo yarn for a cowl. The stitches in the Dancie Pixie are a lot like the Eccentric Pixie, but with more single crochet rows between the double crochet rows.
Enjoy the latest free pattern from Stitch11!

Supplies
Size P – 11.5 mm crochet hook
Red Heart “Sweet” – Jumbo (7) yarn – 1.5 balls.
Yarn needle

Stitches
CH – Chain
SC – Single Crochet
HDC – Half Double Crochet
HDC-2-TOG – Half Double Crochet Two Together.

Note- While using this yarn, if you have to frog a part of your project, do it slowly.
Row 1: CH 22. Turn. Skip 1 CH. SC into next 21 CH.
Row 2: CH 1. Turn. SC into each of the 21 stitches.

Row 3: CH 2. Turn. DC into first stitch. *CH 1. Skip 1 Stitch. DC into next stitch. Repeat from * across.
Row 4: CH 1. Turn. SC into DC. *SC into CH space. SC into next DC. Repeat from * across.
Row 5: CH 1. Turn. SC into each of the next 21 stitches.

Repeat rows 3-5 until cowl measures 40 inches.

Finish off leaving long yarn end. With large yarn needle, and your yarn end, weave together both ends of your cowl.

Filed Under: Free Patterns, Scarfs

Eccentric Pixie – Jumbo Scarf

September 12, 2016 By stitch11 Leave a Comment

eccentric-pixie-jumbo-scarf-design-by-stitch11-red-heart-yarns

The Red Heart Joy Creators have been given the fun and exciting challenge of designing Red Heart Super Scarves! These scarves are fun because they are HUGE! Definitely warm and trendy!
HERE is the link to the Joy Creators Super Scarves and schedule.
Also check out the Super Scarves already available on the Red Heart website HERE.

With the Eccentric Pixie – Jumbo Scarf, I used Red Heart “Sweet” jumbo yarn. It has a similar texture as Baby Blanket Yarn but is much thicker! I tested out a few sizes of hooks, and the P – 11 mm (recommended on yarn label) was by far the easiest to work with.
Using simple Single Crochet and Double Crochet I was able to create an AMAZING texture.
The Eccentric Pixie scarf will be this season's wonderful and quick project for gifting, craft fairs, quick cash, and of course…YOU!

Supplies
Size P – 11.5 mm crochet hook
Red Heart “Sweet” – Jumbo (7) yarn (3 Balls)
Yarn needle

Stitches
CH – Chain
SC – Single Crochet
DC – Double Crochet

Notes
– While using this yarn, if you have to frog a part of your project, do it slowly.
-Be sure to use a yarn needle that is sized for thick yarn.
-Time to complete – 1 day = 24 hours  -while also being a wife, mother, chef, taxi, maid…. you get the idea! This scarf is super quick to work up!
-Although I say 3 balls of yarn, you really only need about 2.5.  In other words, 5 balls + 2 days = Two beautiful jumbo scarves!
-Each scarf would ideally be sold for 40-50 dollars.
-You can choose your own colors of Red Heart “Sweet” HERE! 

Eccentric Pixie – Jumbo Scarf
Row 1: CH 16. Turn. Skip 1 CH. SC into next 15 CH.

Row 2: CH 2. Turn. DC into first stitch. *CH 1. Skip 1 Stitch. DC into next stitch. Repeat from * across.
Row 3: CH 1. Turn. SC into DC. *SC into CH space. SC into next DC. Repeat from * across.

Repeat rows 2-3 until scarf measures 90 inches (7.5 ft).

Finish off and weave in your ends.
Easy peasy!

Below, you can see the fun you have to look forward to! 

Friday September 9: Coraline in Rome Super Scarf Crochet Pattern from Simply Collectible Crochet
Monday September 12: Eccentric Pixie Jumbo Scarf from Stitch11
Wednesday September 14: September Jewel Super Scarf from Beatrice Ryan Designs
Friday September 16: Glitter and Gleam Super Scarf from Jessie at Home
Monday September 19: Go with the Flow Super Scarf from My Hobby is Crochet
Wednesday September 21: Super Sweet 2 Hour Super Scarf from Oombawka Design
Friday September 23: Mandarin Super Scarf from Crochet Kim
Monday September 26: A Poppy in the Storm Super Scarf from Cre8tion Crochet
Wednesday September 28: ELK Studio
Friday September 30: Totally Snappy Tots

Filed Under: Free Patterns, Scarfs

Halloween by Stitch11

September 1, 2016 By stitch11 Leave a Comment

Halloween Costumes by Stitch11 - free crochet patterns

Although we have A LOT of Halloween crochet patterns here at Stitch11 (See them all here), these are the crochet Halloween costumes I have designed for my daughter!
Get your free copies of all the patterns and tutorials!

Princess Hat with Braids
How to Make a Tutu
Kitty Hat 
Kitty Fingerless Mittens 
Leg Warmers 
Fox Costume
Rainbow Dash Costume

Filed Under: Costumes, Free Patterns

Golf Cap – Free Crochet Pattern – Review

August 19, 2016 By stitch11 2 Comments

Golf Cap - Free Crochet Pattern - Review by Stitch11- Design by Moogly

The men my husband works with have been planning a company golf outing. My husband begged me to crochet him a golfers hat. I'm not 100% sure if he's wanting it to be cool, or funny- probably both! Ha!

I remember Moogly sharing a free pattern for both adult and child size Golf Caps, so I didn't even have to hunt a pattern down!

GET YOUR FREE COPY HERE! 

As always, Moogly's pattern is very easy to follow! I was so very happy to find out how quickly the golf cap worked up! It took no time at all!!

I didn't want to ask my husband to model for me… but maybe I can talk him into snapping a selfie on the golf course!

Filed Under: Boys, Free Patterns, Hats, Pattern Reviews, Sports

Boho Moon and Sun Bag – FREE Crochet Pattern – with Bernat Fashion Maker Review

August 16, 2016 By stitch11 1 Comment

Thanks to AllFreeCrochet, I have had another opportunity to review some fun and fabulous yarn!
Check out my Bernat Fashion Maker Yarn review HERE!

I was also able to write a new pattern with the yarn! All inspired by the artistic Bohemian style! Get your copy of this free Boho Moon and Sun Bag HERE!

Boho bag - afc- for Stitch11

Filed Under: Bags, Free Patterns

Dish Scrubbing Glove for Kids

July 20, 2016 By stitch11 1 Comment

Dish Scrubby Glove - for kids - free crochet pattern

I am a firm believer in children knowing how to take care of themselves, the home, and to appreciate the simple things in life.  That being said, my 5 year old wants to get a new 20 dollar game for her leapfrog tablet. One of those games that she will be SO EXCITED to have.. for about an hour. With school sign ups just around the corner, and the cost of school supplies and clothes, I find it REALLY hard to spend 20 dollars on a game that will be forgotten within 24 hours of purchasing.
So I made a deal. I told my daughter I would let her buy the game with her own money.. that she earns doing chores.
One of those chores is “helping” me with the dishes.
My daughter already knew I had the Red Heart Scrubby and Scrubby Sparkle yarns… she suggested I make her a “Cat Paw Print Glove” (because she is convinced that she is really a cat) to help her wash dishes.
How could I say “no” to this?
Not only will she be learning that things are worth more than just money (also worth our time), but she is learning how to do the dishes, count, and appreciate her own hard work!
I feel like this is a win for everyone! I hope you and your children enjoy this fun free kitty dishcloth glove too!

Supplies
Red Heart Scrubby (Green Tea)
Red Heart Scrubby Sparkle (Grape Raisin)
5.5 mm Crochet Hook
Yarn Needle

Stitches 
Magic Circle
SC – Single Crochet
HDC – Half Double Crochet
HDC DEC – Half Double Crochet Decrease
FPSC – Front Post Single Crochet

This is my first experience working with Red Heart Scrubby Yarn. As most of us know, using fluffy yarns or yarns with strings hanging off can be tricky, especially when first starting on the project. For me, the only hard part was the first round. After this, it's MUCH easier to see and know where to put my stitches. If you are nervous, don't be!!! This yarn is so perfect for dishcloths!!!

Get Started! Using the Red Heart Scrubby Yarn. 
Round 1: Magic Circle. 8 HDC into magic circle. Pull ring tight. Join to first HDC.
Round 2: CH 1. 2 HDC into first HDC. 1 HDC into the next HDC. *2 HDC into next HDC. 1 HDC into the next HDC. Repeat from * 2 more times.  Join to first HDC.  (12 HDC total)
Round 3: CH 1. 2 HDC into the first HDC. 1 HDC into each of the next 2 HDC. *2 HDC into next HDC. 1 HDC into each of the next 2 HDC. Repeat from * 2 more times. Join to first HDC. (16 total HDC)
Round 4-7: CH 1. 1 HDC into each HDC around. Join to first HDC.
Round 8: CH 1. 2 HDC into the first stitch. 1 HDC into each of the next 15 stitches. Join to first HDC (17 total HDC)
Round 9: CH 1. 2 HDC into the first stitch. 1 HDC into each of the next 7 stitches. 2 HDC into the next stitch. 1 HDC into each of the next 8 stitches. Join to first HDC. (19 total HDC)
Round 10: CH 1. 1 HDC into each HDC. Join to the first HDC.

*Note* for children older than 7, you may want to repeat round 10 a few more times.

Next we will be making the thumb covering. But first, lets finish off and weave in our ends. After we make the thumb, we will continue crocheting around this piece with the thumb yarn end. This will make the finger covering, and thumb covering become one piece/mitten.

*Note* Do not think you are the hulk and break this yarn with your bare hands! This yarn is STRONG! Use scissors! 🙂

The Thumb of your Glove
Round 1: Magic Circle, 7 HDC into magic circle. Pull ring tight. Join to first HDC.
Round 2-5: CH 1. 1 HDC into each of the 7 stitches. Join to first HDC.

Round 6: Holding your thumb piece next to the rest or your glove, crochet 1 HDC into each of the 19 stitches. (you are using the yarn end from your thumb piece) Do NOT crochet into the thumb piece. Slip stitch into the starting stitch of the thumb piece.

Now you have one piece instead of two.

Round 7: CH 1. HDC into each of the 7 stitches from the thumb (do not join) HDC into each of the 19 stitches from the original piece. Join to first HDC. (26 total HDC)

Round 8: CH 1. HDC into the first stitch.  HDC DEC 2 times. 1 HDC into each of the next 2 stitches. HDC DEC.  HDC into each of the next 7 stitches. HDC DEC. HDC into next stitch. HDC DEC.  HDC into each of the last 5 stitches. Join to first HDC.  (21 total stitches)
Round 9-10: CH 1. 1 HDC into each stitch around. Join to first HDC (21 total HDC)
Round 11: CH 1. SC into each stitch around. Join to first SC.  (For longer hands, you may want to repeat this round)
Round 12: CH 1. FPSC into each stitch around. Join to first FPSC

Now for the Paw Prints using Red Heart Scrubby Sparkle

The Red Heart Scrubby Sparkle yarn was a pretty fun experience for me. The center of the yarn almost feels like a thin elastic cord. It was REALLY easy to see my stitches and know where to slide the hook. If you have never used the Red Heart Scrubby Sparkle, I suggest you try it out!

Stitches
SC – Single Crochet
HDC – Half Double Crochet
DC – Double Crochet
Magic Circle

Make 4 Finger Prints

Round 1: Magic circle, 5 SC inside magic circle. Join to first SC and pull circle tight. Finish off leaving long end for attaching. Weave in your starting tail.

Make 1 Palm Print

Round 1: Magic circle. 9 SC inside magic circle. Join to first SC and pull ring tight.
Round 2: Ch 1, **SC and HDC into the next stitch. 2 DC into the next stitch. HDC and SC into the next stitch. Repeat from ** 2 more times.
Finish off leaving tail for attaching. Weave in your starting tail.

Attach the paw print to the glove.

Filed Under: Free Patterns, Household

Joyful Star Teething Ring

July 6, 2016 By stitch11 1 Comment

Joyful Star Teething Ring - Free Crochet Pattern

I have joined together with the Red Heart Joy Creators to celebrate Christmas in July. (Which also happens to be my BIRTHDAY! Woohoo!)

We were wanting to run with the theme “joy”. What better way to celebrate a joyful Christmas in July than giving a Joyful Star Teething Ring to a fussy teething baby nearest & dearest to you!? (say that 5 times fast)

Below, you will see how to purchase the all natural teething rings. I REALLY love these! I can imagine this project selling like CRAZY at craft fairs. They will be great for baby showers and surprise gifts for babies suffering from teething pain.
I have also fallen in LOVE with the Red Heart Baby Hugs yarn. It's soft, works up clean, and is easy on your hands. Perfect for hooking up projects for babies. This yarn would also be great for amigurumi and could possibly completely replace your “go to” medium weight yarn!

Be sure to check out the other Red Heart Joy Creators of this fun celebration. The list will be located bellow the pattern.

Supplies 
Baby Hugs – Red Heart  (Medium Weight)
5 mm crochet hook
Natural Wooden Teething Rings
Yarn Needle

Stitches Used
Magic Circle
Slip Stitch
CH – Chain
SC – Single Crochet
HDC – Half Double Crochet 
DC – Double Crochet
TRE – Treble Crochet

Let's crochet the star!
Make Two.

Round 1: Magic circle. CH 1. 10 DC into magic circle. Join to top of first DC.
Round 2: CH 1. 2 DC into each DC around. Join to first DC.
Round 3: *CH 5. Skip 1 CH. SC into next CH. HDC into next CH. DC into next CH. TRE into next CH. Skip 2 stitches. Slip stitch into next 2 stitches.  Repeat from * around.
Round 4: *HDC up next 4 CH (side of star point). 3 SC into tip of star point. HDC into next 4 stitches (down other side of star point). Slip stitch into next 2 stitches. Repeat from * 4 more times.
Finish off. Weave in your ends.

Piece for connecting to teething ring
Using a contrasting color.

Row 1: CH 3. Skip 1 CH. HDC into next 2 CH.
Row 2-8: CH 1. Turn. HDC into next 2 stitches.

Fold piece around your teething ring. join both ends together.
CH 1, Turn, SC through both ends into the next 2 stitches, attaching them.
Finish off and weave in your ends.

Using your yarn needle, embroider a happy face on your joyful star.

Using your yarn needle, attach the stars together with the Whip Stitch. At the tip of one star point, you will want to tuck in the end of the piece attached to the teething ring. You will attach the star together directly though this piece.

Be sure to check out all the other Red Heart Joy Creators that are celebrating Christmas in July! 
Wednesday, July 6: Stitch11
Friday, July 8: Jessie at Home
Monday, July 11: Beatrice Ryan Designs
Wednesday, July 13: Snappy Tots
Friday, July 15: ELK Studio
Monday, July 18: Marly Bird
Wednesday, July 20: Myhobbyiscrochet
Friday, July 22: Oombawka Design
Monday, July 25: Simply Collectible
Wednesday, July 27: Cre8tion Crochet
Friday, July 29: Pattern Paradise

Filed Under: Crafts, Free Patterns, Newborn, Toys

Stitch11 is learning to SEW!

July 4, 2016 By stitch11 2 Comments

Stitch11 is learning NEW stitches!

I've been facing a battle with my own creative mind. I LOVE crochet… but am getting jaded. I keep trying to mix it up so I can get my crojo back, but I finally realized that I just need to open my world to new stitches!
After a few day hunt, I located my dusty sewing machine. The one I BEGGED my mother to buy me years ago… not realizing how different it was compared to the one I used growing up.
I packed it away, with hate for it… because I just-couldn't figure the darn thing out.
FINALLY! I am breaking the chains in my own mind, and I am determined to conquer this machine once and for all!
I decided to start small, and repurpose some old clothes. Check it out!

13600125_1097637270275185_5695978483460883160_n

I used a pair of yoga pant's my daughter had grown too tall for, and the bottom of a dress that she also had grown too tall for. SO CUTE!

Next, I used the bottom of one of my old dresses, and for the waste band I used my daughters T-shirt she had outgrown. She loves it so much that she wants to wear it on her first day of school. She said “It's PERFECT!” with the biggest smile. <3 Warmed my heart!

100_8265

Do you sew? Are you trying to learn? Tell me your own experiences, battles, and advice for someone like me who just can't seem to keep the tension right. 😉

Filed Under: Crafts, Inspired

Cat Puppet

June 20, 2016 By stitch11 3 Comments

Kitty Puppet - Free Crochet Pattern- Design by Stitch11

It all started with the Stitch11 Snake Puppet. It wasn't long before my daughter and I also designed the Puppy Puppet.  And now a few years later, my daughter still requests the puppy puppet during bath time. <3 When I told her how long she has had her puppet, she agreed that she really LOVES it, and requested I make a cat puppet too.
I hope the children in your life love this free cat puppet pattern too. <3

Stitches
Slip Stitch
CH – Chain
SC – Single Crochet
HDC – Half Double Crochet
DC – Double Crochet

Supplies
Medium/worsted weight yarn (I prefer Red Heart brands) I used red.
H-5 mm crochet hook
DK weight yarn (I used Cascade Yarns) I used eggshell, brown, pink and teal.
D- 3.25 mm crochet hook
Yarn needle

Get Started!

Body (make 2)
Using Med/Worsted weight and 5 mm hook

Round 1: Magic circle, 10 HDC into magic circle. Join to first HDC. Pull ring tight. (10 HDC)
Round 2: CH 1, 2 HDC into each HDC. Join to first HDC. (20 HDC)
Round 3: CH 1. 2 HDC into first stitch. HDC into next stitch. **2 HDC into next stitch. HDC into next stitch. Repeat from ** around. Join to first HDC. (30 HDC)
Round 4: CH 1, 2 HDC into first stitch. HDC into next 2 stitches. **2 HDC into next stitch. HDC into next 2 stitches. Repeat from ** around. Join to first HDC. (40 HDC)
Now you will start working in rows.
Row 1: CH 1, HDC into same stitch and next 8 stitches ( 9 HDC)
Finish off.
Row 2: CH 8 And then slip stitch into the stitch where you finished off. Slip stitch into next 8 HDC. CH 9, turn. Skip 1 CH. HDC into next 8 chain. HDC into each of the 9 HDC. (over the slip stitch) HDC into next 8 CH. (25 HDC)
Row 3-4: CH 1, Turn, HDC into same stitch and next 24 stitches. (25 HDC)
Row 5: CH 1. Turn, Slip stitch into same stitch and next 6 stitches. CH 1, HDC the same stitch and into next 10 stitches. (11 HDC)
Row 6-14: CH 1, turn, HDC into same stitch and next 10 stitches. (11 HDC)
Row 15: CH 1, SC around the entire piece. (1 SC for each HDC. 2 SC on the corners. & when you get to the part of the arm that has slip stitches, SC right over the slip stitch- not into it) Join to first SC. Finish off. and weave in your ends.

Repeat steps 1-15 for the other side.

Cat Eyes (make 2)
Using white/eggshell DK weight and 3.25 mm hook.

Round 1: Magic circle. Ch 1, 8 HDC into magic circle. Join to first HDC. (8)
Round 2: CH 1. 2 HDC into each stitch around. Join to first HDC. (16)
Using your yarn needle and the other DK weight colors, embroider the eyes to look like cat eyes.

Weave in ends and attach them to the face of the puppet.

Embroider the nose and mouth, and whiskers onto the face of the puppet.

Attach both sides of the puppet together. Make sure the clean sides of the puppet are facing out. Attach the red yarn to any outer stitch. Using the 5 mm crochet hook, CH 1, SC around to join the pieces. I put 2 SC into the corners of each arm. DO NOT crochet the bottom of the puppet closed.

Cat Ears (make 2)
Using med/worsted yarn. I used red. Use a 5 mm hook.

Row 1: CH 6, skip 1 CH. HDC into next 5 CH.
Row 2: CH 1, turn. 1 SC into each of the 5 SC.
Row 3: CH 1, turn. 1 SC into each of the 5 SC.
Row 4: CH 1, turn. HDC DEC. HDC. HDC DEC.
Row 5: CH 1, turn. HDC 3 together.
Using your yarn needle, attach the ears to your kitty puppet.

Filed Under: Boys, Crafts, Free Patterns, Girls, Toys

Crochet Mermaid Tail

June 4, 2016 By stitch11 2 Comments

Crochet Mermaid Tail

I will do my best to share with everyone how I made this mermaid blanket. I had planned on simply following MJ's Off The Hook Designs Mermaid Blanket – but I misread the yarn weight. :O I know, I know… I can hardly believe it myself. I used 2 strands of Worsted Weight instead of using the Bulky. I have no clue what I was thinking!!!
So instead, I based the blankets measurements from the pattern. I used a shell stitch instead of HDC.
Then when it came to the fin, I used the Mad Fruit Angel Wing Mermaid Fin. I did skip a few steps on the fin, because I felt it was turning out large enough. I LOVE this pattern!! Simply beautiful!

We have all seen the many mermaid tail photo's floating around our FB groups and walls.. my best advice to anyone who wants to make one is to pick through all your favorite designs, combine them, and make them unique with your own imagination. <3 Happy Hooking!

Filed Under: Costumes, Pattern Reviews

Puppy Love – Crochet Patterns Designed or Reviewed by Stitch11

May 26, 2016 By stitch11 2 Comments

Puppy Love Crochet Patterns Reviewed or Designed by Stitch11

Although I am mostly a cat lover, I still love my pooch and visiting with other sweet dogs. This crochet pattern round up is for all the dog lovers!

I Love Mom Bandana
Boston Terrier Scarf 
C2C puppy (mommy scent) blanket 
Bow Tie – slides onto collar 
Boston Terrier Hat 
Grumpy Cat Hat 
Puppy Puppet 
Small Dog Sweater 

Would you like to make a difference for the homeless dog community? Read how here!

Filed Under: Round Ups

Boston Bow Tie

May 22, 2016 By stitch11 2 Comments

13285600_10210078499065517_399005138_n

My sister has Boston Terrier puppies. I decided to make their adoption a little extra special by making them each their own bow tie.
For this I just followed the Infant Bow Tie bow pattern. Instead of wrapping yarn around the center, I made a CH 8, skip one CH and  7 HDC across. This will be attached on the center. Do not actually attach it to the bow though. You will want it to be open so you can slide the bow onto the puppy dog collar.
If you really want to go overboard with the bow, check out the Boutique Bow pattern.

Filed Under: Free Patterns

Crochet Diaper for Doll Babies

April 27, 2016 By stitch11 25 Comments

Crochet Diapers for Doll Babies

My sister asked me if I could crochet some diapers for my nieces Baby Alive Doll. After a few attempts, I finally got the shape and size perfected. I am so excited to see the look on my nieces face, especially when she sees the fake poop I painted into one of them.
I hope everyone enjoys following this free crochet doll diaper pattern as much as I enjoyed creating it!

Crochet Diaper for Doll Babies Pattern

Supplies 
5 mm Crochet Hook
Red Heart Super Saver (or Red Heart with Love)
Random super fine yarns from your stash (I have no clue what brands I used…. but it's just for the highlighting color)
Yarn Needle
2 Buttons

Stitches Used 
CH – Chain
TRE – Treble Crochet
SC – Single Crochet
HDC – Half Double Crochet
DC – Double Crochet
Slip Stitch

Row 1: CH 29. Turn.  Skip 3 CH. (Counts as first TRE) 1 TRE into each of the next 26 CH. (27 TRE)
Row 2: CH 1, 3 SC into the side of the TRE. 1 SC into the each bottom of the next 27  TRE. 3 SC into the side of the TRE. 1 SC into the top of the next 27 TRE. Join to first SC. (60 SC)
Row 3: CH 1, Turn. Do not slip stitch into same stitch. Slip stitch into the next 7 stitches. CH 1. SC into next 2 stitches. DC into each of the next 8 stitches. SC into next two stitches. (19 stitches)
Row 4: CH 1. Turn. Skip 1st SC. SC into next SC. DC into each of the next 8 stitches. SC into next stitch. Slip stitch into the next SC. (11 stitches)
Row 5-6: CH 1. Turn. HDC into first stitch. DC into each of the 8 DC. HDC into last stitch. (10 stitches)
Row 7: CH 1, Turn. HDC-2-TOG. DC into each of the next 6 stitches. HDC-2-TOG. (8 stitches)
Row 8-12: CH 1. Turn. DC into each of the 8 stitches. (8 DC)
Row 13: CH 1. Turn. 2 DC into the first stitch. 1 DC into each of the next 6 stitches. 2 DC into last stitch. (10 DC)
Row 14: CH 1. Turn. 2 DC into the first stitch. 1 DC into each of the next 8 stitches. 2 DC into the last stitch. (12 DC)
Row 15: CH 1. Turn. SC into next 12 stitches. Finish off and weave in your ends.
Using contrasting color, slip stitch around the entire piece.
Attach buttons.

For added fun and laughter, mix orange, lime green, and brown paint. Paint some poop into a diaper. 😉
painted poop into crochet diaper

Filed Under: Free Patterns, Toys

  • « Previous Page
  • 1
  • …
  • 3
  • 4
  • 5
  • 6
  • 7
  • …
  • 25
  • Next Page »
  • Email
  • Facebook
  • Pinterest
  • RSS

Stitch11 is a Red Heart Blogger!

unnamed

.

Grab My Button

Archives

Privacy Policy

Copyright © 2026 Stitch11.com · All Rights Reserved · Log in