• Home
  • Free Patterns
    • Toys
    • Costumes
    • Bags
    • Flowers
    • Hats
    • Pattern Reviews
    • Household
    • Newborn
    • Scarves
    • Sports
  • Disclosure
  • Contact
  • Yummy Food
  • Round Ups

Stitch11

A Yarntastic Life!

  • Girls
  • Boys
  • Hats
  • Newborn
  • Flowers
  • Household
  • Costumes
  • Toys
  • Pattern Reviews
  • Grannys
You are here: Home / Archives for Free Patterns / Girls

The Perfect Rainbow Pet Net Hammock

July 30, 2015 By stitch11 24 Comments

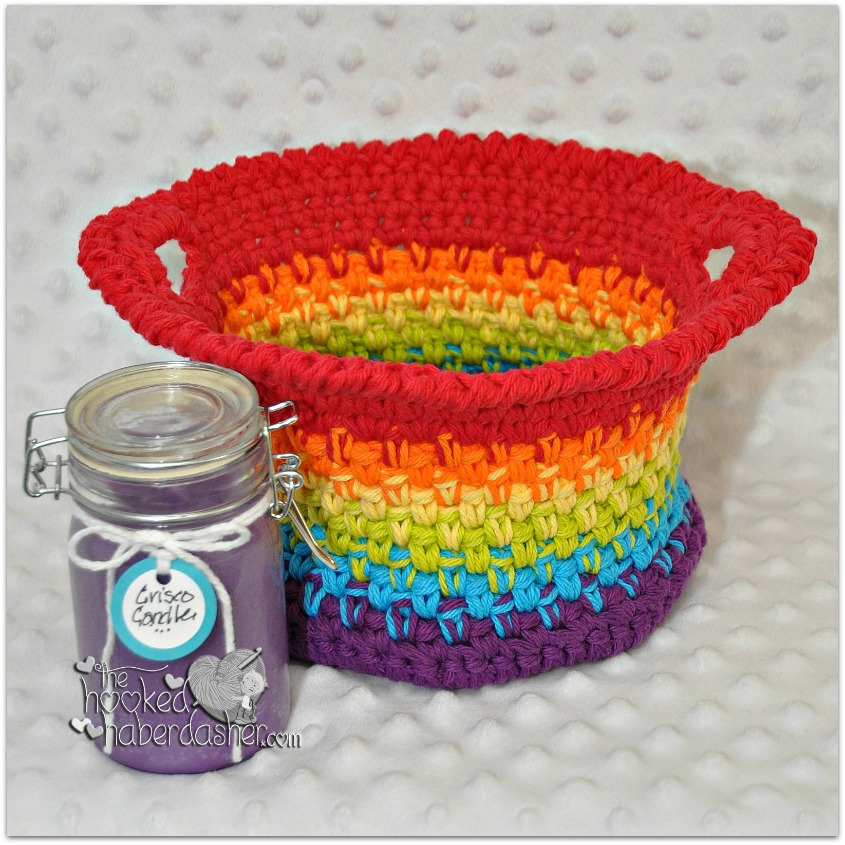
This pretty pattern isn't only lovely to look at. It also has a lot of other purposes, including keeping those messy toys off the floor. It's also one of the best ways to make use of those yarns you want to get rid off! See it come to life with the free pattern below or get the ad-free printable PDF pattern here.

This Toy Net Hammock crochet pattern is a cute hammock where you can place all the sweet stuffies. Instead of the stuffed toys hogging the space on your child's bed, shelves, or floor - you can rest them all on this pretty rainbow hammock! #crochet #crochetlove #crochetlife #crochetaddict #crochetpattern #crochetinspiration #ilovecrochet #crochetgifts #crochet365 #addictedtocrochet #yarnaddict #yarnlove

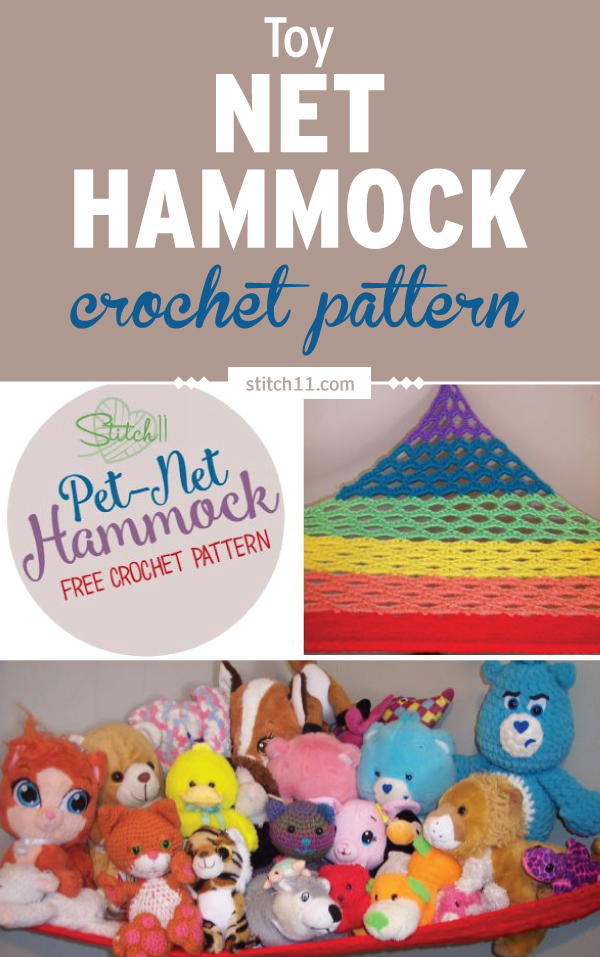
A few days ago, my daughter came to me and asked me to “please get rid of my creepy dolls.” She was quick to explain that she didn't need creepy dolls because she has so many stuffed animal babies.  Within twenty minutes she comes back to inform me…. she needs *another* crocheted toy net hammock.

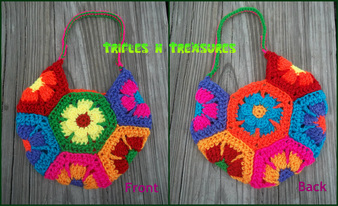
I was quick to jump at this request because I desperately needed to update my previous crochet hammock. So really, this is *Take Three* of attempting the perfect hammock. I feel as if I finally did it! One that I am truly proud of designing and sharing with all of you…. for FREE! 🙂

The Perfect Rainbow Pet Net Hammock Crochet Pattern has now arrived.

Before we get to the pattern, if you enjoy crocheting things for the little people in your life, check out these incredibly cute stuffies in the Crochet Anything with Hexagons class.

[Read more…]

Filed Under: Boys, Free Patterns, Girls, Toys Tagged With: crochet pattern, hammock, pattern, toy hammock, toy hammock crochet pattern

Summer Tank – Free Crochet Pattern – Review

July 22, 2015 By stitch11 5 Comments

Summer Tank - Free Crochet Pattern - Review

Walking through shopping centers can be so inspiring for us who know how to crochet. It is really hard to let myself spend money on pricey machine crocheted items when I know I can make it myself.

That being said, I have spent the last year searching for the perfect pattern to open my crochet world to adult clothing. When I spotted >>THIS<< free crochet pattern by EmmHouse I knew it was “The One”!

I was so thrilled to see how easily the shirt is made. It reminds me of making two big doilies and adding straps, then piecing it together. Very simple, and even the crochet beginner could figure it out with determination.

I did have to make adjustments on the shoulder parts so my numbers added up. You do not have to trust mine, but if you find your numbers don't add up you are more than welcome to come back to my notes when you reach that point.

-note- The round parts of the pattern worked up perfectly and needed no changes at all.

-note- I used a 3.25 hook for starting CH circle and a 4 mm hook for rest.

-note- I used Cascade DK Cherub that is always on sale at Craftsy!

-note-  When you reach the crochet sleeves, I did not CH 5 after or before the shells on shoulder pieces…. besides on row 24. On row 26, CH 5 after shell. but not before the finishing shell. Follow rows 28- 30 exactly as directed. On second sleeve, on row 26 you will CH five before finishing shell but not after starting shell.

This was the perfect top! After posting a photo, I had people lining up begging for me to accept crochet orders!

Filed Under: Free Patterns, Girls, Pattern Reviews

Rainbows for Love -Free Crochet Patterns and Other Rainbow Tutorials

June 27, 2015 By stitch11 Leave a Comment

Rainbows for Love - Free crochet patterns and tutorials


Let's take a moment to sit back, take a deep breath…. and smile. The right to LOVE is sweeping across the states! Let's keep sharing the love! The more we love, the less room there is for hate. <3 <3

Here are 19 rainbow tutorials. Most of these tutorials are crochet, but some are cooking and some are crafty. Share the love!


Hood For Tots
– Design by Stitch11

SPSD3-Simply-Pampered-Basket-The-Hooked-Haberdasher
Simply Pampered DIY Crisco Candle Recipe and Basket Crochet Pattern
– Design by The Hooked Haberdasher

sweetheart-love-flowers
Sweetheart Love Flower
– Design by Stitch11

Simply-Pampered-Spa-Day-2-The-Hooked-Haberdasher
Simply Pampered Lacy Round Washcloth and Bath Salts
– Design by The Hooked Haberdasher

How-to-make-Rainbow-Jello
Rainbow Jello
– Design by Stitch11

9880993
Flower Child Bag
– Design by Trifles N Treasures

Crochet-Lalaloopsy
Lalaloopsy Doll
– Design by Stitch11

Rainbow-Daze-Washcloth-e1429812502111
Rainbow Daze Washcloth
– Design by Simply Collectible Crochet

1150153_10152113236157713_299595242_n
Boutique Bow
– Design by Stitch11

A-Very-Good-Hat-FB
Good Hat
– Design by Moogly

Kaleido-Dreams_medium
Kaleido Dreams Square
– Design by Stitch11

magic-rainbow-baby-fb-1
Magic Rainbow Baby Blanket
– Design by Moogly

024_medium
Curly Q Hat
– Design by Stitch11

Eloise-Girls-Folded1
Eloise Sweater
– Design by Moogly

000_1077_medium
Baby Robot
– Design by Stitch11

bfeff8b658dfc62497bb6249d902d503
Rainbow Fan
– Tutorial by DIY Home Tips and Tricks

6-12_month_leg_warmers_medium
6-12 Month Leg Warmers
– Design by Stitch11

4da853e32097d038ee536a60f82c65dc
Rainbow Wings
– Tutorial by Katie Kupcake

Crochet_Ninja_Mask_medium
Ninja Mask
– Design by Stitch11


Filed Under: Boys, Costumes, Crafts, Free Patterns, Girls, Inspired, Round Ups

Crochet Hemp Bracelet – Free Crochet Pattern

June 24, 2015 By stitch11 Leave a Comment

Crochet Hemp Bracelet - free crochet pattern

This bracelet is designed for a 6 inch wrist. I made mine 6.5-7 inches around for comfort. This bracelet is designed so you can easily make them smaller or larger. You may not need to adjust the pattern though.. this bracelet fit's my small wrist, my husbands huge wrist, and my 4 year olds ankle.

Supplies
2 colors of hemp cord. 10 yrds each.
4.25 MM crochet Hook
Yarn needle

Stitches
CH – Chain
SC- Single Crochet
Slip Stitch

Step 1: CH 5. Slip stitch into first CH.
Step 2: CH 1. 3 SC into loop you just made. Do not join.
Step 3: CH 1. SC into each of the 3 SC.
Repeat step 3 to desired length. I repeated step 3 twenty six times.
Step 4: CH 10. Finish off.
Change colors
Step 5: CH 9. Slip stitch into the starting SC of your last step 3 repeat. Slip stitch up the side of the bracelet… through the center of each SC. Slip stitch into each CH (of the loop you made from step 1). Slip stitch back up the other side of the bracelet. Finish off when you reach the last repeat row of step 3.
Weave in your ends and finish off.

You use the CH ends to tie through the loop end. Making this bracelet custom fit to many wrists.

Filed Under: Boys, Free Patterns, Girls

Child-Teen/Small Adult Size Mouse Hat with a Bow

June 7, 2015 By stitch11 3 Comments

Minnie Mouse Hat - Free Crochet Pattern - Preschool and child-teensmall adult sizes

For the next couple months, I will be working on birthday gifts and baby shower gifts. I will do my best to either write up what I make or review and link the patterns I decide on. This is going to be a fun summer in my little crochet world so make sure you follow Stitch11 on Facebook!

My niece is turning 6! Last week while she was at my house, she told me that she “REALLY REALLY loves Minnie Mouse”! I asked her if that means she needed a Minnie Mouse hat and of course she says “YES!!!”

This hat fits most heads 5 years and up! Although it won't fit all adults, it fits me great. If you are wanting to make it for a larger head just add an extra increase round. If you want it for someone younger than 5, check out my Preschool Minnie Mouse Hat pattern! It's free as well.

Supplies
I/9 – 5.5 mm crochet hook
black med-worsted weight yarn (I used I Love This Yarn)
Yarn needle
You will also need…
#5 Pink Bulky Weight Yarn and a 6.5 mm crochet hook for the bow. For THIS bow, I actually used two strands of Caron Simply Soft held together.

Stitches Used
Magic Circle 
CH- Chain
SC- Single Crochet
HDC- Half Double Crochet
FPDC – Front Post Double Crochet 
FPSC – Front Post Single Crochet

You will also be using these stitches when making the bow
DC- Double Crochet
HDC-2-TOG
DC-2-TOG


You will be working in continuous rounds.

Round 1: Magic Circle. 10 HDC in magic circle.  (10)
Round 2: 2 HDC into each of the next 10 stitches. (20)
Round 3: **2 HDC into the next stitch. HDC into the next stitch. Repeat from ** 9 more times. (30)
Round 4: **2 HDC into the next stitch. HDC into the next 2 stitches. Repeat from ** 9 more times. (40)
Round 5: **2 HDC into the next stitch. HDC into the next 3 stitches. Repeat from ** 9 more times. (50)
Round 6:  1 HDC into each of the next 50 stitches. (50)
Round 7: **2 HDC into the next stitch. HDC into the next 4 stitches. Repeat from ** 9 more times. (60)
Rounds 8-13: 1 HDC into each of the next 60 stitches. (60)
Round 14: 1 HDC into each of the next 56 stitches. SC into the next stitch. Slip stitch into the next stitch. (60)
Rounds 15-20: CH 1, HDC into same stitch. FPDC over next stitch. ** HDC into next stitch. FPDC over next stitch. Repeat from ** around. Join to first HDC. (60)
Round 21: CH 1, FPSC into each stitch around. Join to first FPSC. (60)

Finish off and weave in your ends.

Ears

Round 1: Magic Circle. CH 1. 6 HDC into magic circle. Do NOT join. Pull ring tight.(6)
Round 2: CH 1, turn. 2 HDC into each stitch across. (12)
Round 3: CH 1, turn. 2 HDC into the first stitch. 1 HDC into the next stitch. **2 HDC  into the next stitch. 1 HDC into the next stitch. Repeat from ** across. (18)
Round 4: CH 1, turn. SC into next 4 stitches. 2 SC into the next stitch. HDC into next 3 stitches. 2 HDC into each of the next two stitches. HDC into next 3 stitches. 2 SC into the next stitch. SC into next 4 stitches. (22)
Round 5: CH 1, turn. SC into next 6 stitches. 2 SC into the next stitch. HDC into next 3 stitches. 2 HDC into each of the next two stitches. HDC into next 3 stitches. 2 SC into the next stitch. SC into next 6 stitches. (26)
Round 6: CH 1, turn. SC into next 8 stitches. HDC into next stitch. 2 HDC into the next stitch. HDC into each of the next 6 stitches. 2 HDC into the next stitch. HDC into the next stitch. SC into next 8 stitches. (26)

Finish off and repeat for a total of 4 ears.

Layer 2 ears together and join from one side to the other with the Single Crochet stich. No need to join the bottom, you will do that when attaching it. This will make it a thicker and stronger ear. Attach the ear to the hat and repeat for other ear. I attached my ears across rounds 2-9.

Now all you need to do is make your Minnie Mouse Bow and attach it in front of your ears. For the bow in the picture, I used two strands of pink Caron Simply Soft held  together.
When I attached my bow, I used black yarn and not only attached the bottom center to the hat, but I also attached it to the ears a little bit.

Filed Under: Costumes, Free Patterns, Girls, Hats

Lanaloft Yarn Review & Free Beret Crochet Pattern

May 17, 2015 By stitch11 Leave a Comment

Stitch11 Beret Free Crochet Pattern

All Free Crochet gave me a wonderful opportunity! I was given the chance to review some amazing yarn, and share a free crochet pattern using it!
Check out the Lanaloft Yarn Review HERE!
Get your copy of the free Beret crochet pattern HERE!

Filed Under: Free Patterns, Girls, Grannys, Hats, Pattern Reviews

10 Free Leg Warmer Crochet Patterns

May 13, 2015 By stitch11 Leave a Comment

10 free leg warmer crochet patterns

Here in Indiana, our weather has been CRAZY! One day it's around 90 degrees outside and the next is in the 50's. When the weather is changing so rapidly, we like to have legwarmers on hand for my daughter. Not only are the great for keeping her warm, but they look adorable too! We use leg warmers all year round. On summer nights while watching fireworks, the stars, or while camping. In the winter over leggings, with costumes, and with her favorite dresses. There is always a reason!

Leg Warmers are also great gifts for babies who are learning to crawl, photo props, and craft fairs!

Below you will see each leg warmer linked through the title of the pattern. Get your hooks ready!

1. Little Crochet Leg Warmers (You will see the download button below the description of the book)
2. Fluff Cuff Leg Warmers by Stitch11
3. Cute Puff Stitch Leg Warmers by Busting Stitches
4.  Ladies Leg Warmers by PatternsForCrochet
5. Toddler Leg Warmers by Stitch11
6. 6-12 Month Leg Warmers by Stitch11
7. Snowy Lane Leg Warmers from Lion Brand
8. Owl Leg Warmers by Stitch11
9. Bobble Leg Warmers by Stitch11
10. Picot Baby Leg Warmers by Crochet N' Crafts

Filed Under: Free Patterns, Girls, Round Ups

Seven Crochet Bag Patterns – Designed or Reviewed by Stitch11

April 28, 2015 By stitch11 Leave a Comment

Seven Crochet Bags - Designed or Reviewed by Stitch11

I love crocheting bags. It's so rewarding to crochet something that can be used daily! Not only do they get used daily, but they sell quickly. Making them great for craft fairs no matter what season you are selling for.

Here is a list of seven crochet bags I have designed or reviewed. I am listing them based on the photo- going from left to right and top to bottom.

Stitch11 Crochet Purse 
On The Go Make-up Bag
Backpack to Care-A-Lot
Beach Bag for Momma 
Woven Crochet Bag 
A Mothers Purse 
Fat Bottom Bag

What is your favorite bag pattern? Leave a link to it in the comment section!

Filed Under: Bags, Free Patterns, Girls, Round Ups

16 FREE Stitch11 Crochet Patterns for Babies!

April 18, 2015 By stitch11 Leave a Comment

16 FREE Stitch11 Crochet Patterns for Babies

I have spent the last week on a new pattern. Just when I realized I was almost finished, I looked at the weather to see we have rain in our forecast for the entire coming week! I really want to get an outdoor photo. So, I decided to put the new pattern release on hold and put together a few Stitch11 round ups!

Here is a list of 16 free crochet patterns that I designed for sweet lil' babies! They are listed from the photo, working left to right and top to bottom.

Curtain Huggy Bear 
0-3 Month Frog Hat 
Owl Cuddle Lovey 
Puff Bonnet 
Newborn Sleepy Owl Hat 
Weight Set (photo prop) 
The Chloe – Newsboy Beanie 
Princess Hat 
Robot  
Turtle Photo Prop 
Witch/Wizard Hat 
Overalls 
Sock Monkey Hat 
Welcome Home Beanie 
Flower Photo Prop Cocoon 
Princess Crown 

Filed Under: Boys, Free Patterns, Girls, Newborn, Round Ups

Bunny Hat – Free Crochet Pattern – Review

March 24, 2015 By stitch11 Leave a Comment

Bunny Hat - free crochet pattern - review


I decided to follow the free “One Hour Bunny Hat” (<–link to pattern) by Moogly – because I wanted a quick and simple pattern to add to my Easter crochet stash… well, my daughters. 😉

After working up the base of the hat, Ella asked me if the ears would stick up like a “real bunny”. I told her I will see what I can do…

I decided to make two layers of each ear before doing the trim around the ears. I used one white layer and one blue layer for each ear. I then joined them together while doing the trim directed by the pattern. I also lightly stuffed them.
When attaching them, they wanted to flop straight forward. To solve this issue.. I just kept securing them, over and over. I also attached them a little bit together at the bottom of the ears. I would put the hat on, check to see if they stood up, and if not, I would go back and secure them to the base of the hat a little more. Then suddenly, they stayed straight up!

Ella was so excited, as you can see from the photos! This fun and quick pattern made my daughter so happy! Thanks Moogly!!!

Filed Under: Boys, Costumes, Free Patterns, Girls, Hats, Pattern Reviews

Infant Cocoon Flower Photo Prop – Free Crochet Pattern

March 8, 2015 By stitch11 14 Comments

Infant Cocoon Flower Photo Prop Free Crochet Pattern Stitch11

This project came to me while I was at the Dollar Store. I was buying some candles and My Little Ponies… when the man behind the register complimented my daughters hat. He proceeds to tell me he is expecting.. and would love to make a crochet order. I instantly knew what I wanted to make for his baby girl (due to arrive this Spring).
After chatting with his wife on Facebook.. we had settled on the direction I would run with the project.. and I also let her know I would be gifting the photo prop to her.
As many of you know, I do not take very many crochet orders. But for some reason, I felt the urge to crochet a flower pattern for photo prop for the wittle baby growing in her belly. 🙂 Gotta follow your heart!
This infant photo prop is very stretchy. It should work great for newborn to at the least 6 month old's. you may be able to make it work for even larger babies.. but since I do not have any babies on hand, I can't test it out. Maybe the mother will share some photos with us this Spring!

Supplies 
N – 9 mm crochet hook.
< One Skein of #5 Bulky- Lion Brand Homespun – Forest (green)
< One Skein of #5 Bulky- Lion Brand Homespun – Purple Haze (or whatever color you want the most of your flower to be)
1/2 Skein of #4 Medium- Simply Soft – Grape (purple)
< 1/4 Skein of #4 Medium – Simply Soft -Limelight (light green)
Yarn Needle

Stitches
Magic Circle
CH- Chain
SC – Single Crochet
HDC- Half Double Crochet
DC – Double Crochet
DC DEC – Double Crochet Decrease
DC 4 together
TRE – Treble Crochet

Gauge
4 rows of DC = 3.5 inches
5 DC = 3 inches.

Note – Starting CH does not count as a stitch. 

Leaves! 
Starting with the Lion Brand Homespun – Forest (green) 
Step 1: (Leaving long starting tail.) Magic Circle. CH 2. 11 DC into magic circle. Join to the top of first DC. (11 stitches)
Step 2: CH 2. 2 DC into each DC. Join to the top of first DC. (22 stitches)
Step 3: CH 2. **2 DC into the first SC. 1 DC into the next DC. Repeat from ** 10 more times. Join to the top of the first DC.  (33 stitches)
Step 4: Crochet in front loops of this round only. CH 2. **2 DC into the first DC. 1 DC into each of the next 2 DC.  Repeat from ** 10 more times. Join to top of first DC. (44 stitches)
Step 5: CH 2. **2 DC into the first stitch. 1 DC into the next 3 stitches. Repeat from ** 11 more times. Do NOT join. (55 stitches)
Step 6: Turn. CH 2. DC into each SC across. (55 stitches)
Step 7: Turn. CH 2. DC DEC.  DC in next 27 stitches. (28 stitches)

Step 8: Turn. CH 2.  DC DEC. DC in next 24 stitches. DC DEC. (26 stitches)
Step 9: Turn. CH 2. DC DEC. DC in next 22 stitches. DC DEC.  ( 24 stitches)
Step 10: Turn. CH 2.  Two DC DEC. DC in next 16 stitches. Two DC DEC. (20 stitches)
Step 11: Turn. CH 2. DC into each stitch across. (20 stitches)
Step 12: Turn. CH 2. DC DEC. DC in next 16 stitches. DC DEC. (18 stitches)
Step 13: Turn. CH 2. DC DEC.  DC in next 14 stitches. DC DEC. (16 stitches)
Step 14: Turn. CH 2. DC into each stitch across.  (16 stitches)
Step 15: Turn. CH 2. DC DEC. DC in next 12 stitches. DC DEC. (14 stitches)
Step 16: Turn. CH 2. DC DEC. DC into next 10 stitches. DC DEC. (12 stitches)
Step 17: Turn. CH 2. Two DC DEC. DC in next 4 stitches. Two DC DEC. (8 stitches)
Step 18: Turn. CH 2.  DC DEC. DC in next 4 stitches. DC DEC. (6 stitches)
Step 19: Turn. CH 2. DC DEC. DC in next 2 stitches. DC DEC. (4 stitches)
Step 20: Turn. CH 2. DC all 4 stitches together. Finish off leaving long tail for weaving in.

Join yarn to the turning (unworked) stitch from Step 7. Repeat Steps 8-20 for other leaf. 

Flower/ Cocoon!
Using Lion Brands Homespun Purple Haze 
Step 1: Join yarn to unworked back loops from step 4 of the leaves. CH 2. DC into each stitch around. Join to first DC. (33 stitches)
Step 2-12: CH 2. DC into each stitch around. Join to first DC. (33 stitches)
Step 13: Crocheting in front loops of this round only. CH 2. DC into each front loop around. Join to first DC. (33 stitches)
Step 14-15: CH 2. 1 DC into each DC around. Join to first DC. (33 stitches)
Step 16: CH 2.** 2 DC into the first DC. 1 DC into each of the next 2 DC.  Repeat from ** 10 more times. Join to first DC. (44 stitches)
Step 17: CH 2. 2 DC into each DC. Join to first DC. (88 stitches)
Step 18: CH 1. **SC into next 2 stitches. 2 DC into next stitch. 1 DC into next stitch. 3 TRE into each of the next 2 stitches.  1 DC into next stitch. 2 DC into next stitch. Repeat from ** 10 more times. (154 stitches)
Finish off leaving long tail for weaving in.

Flower/ Cocoon Edging
Using Simply Soft Grape (purple)
Step 1: Attach yarn where you finished off from Step 18. CH 1. **SC into each of the next 2 SC. SC into next 2 stitches. DC into next 2 stitches. 2 TRE into next stitch. 3 TRE into each of the next 2 stitches. 2 TRE into next stitch. DC into next 2 stitches. SC into next 2 stitches. Repeat from ** 10 more times. Join to first stitch. (220 stitches)
Step 2: CH 1, turn. SC into each stitch around. Join to first stitch. (220 stitches) You will be going the other direction since the petals fold down.. it will give it a nice finished edging.  

Inner Flower Petals
Using Simply Soft Grape (purple) 
Step 1: Attach your yarn to one of the back loops from Step 13 of the flower. But, attach it as if it were the front loop. You will want the nice side of the stitches showing when it folds down. CH 2. DC into same loop and each loop around. Join to first stitch. (33 stitches)
Step 2: CH 2. DC into each stitch around. Join to first stitch. (33 stitches)
Step 3: CH 2. 2 DC into each stitch around. Join to first stitch. (66 stitches)
Step 4: CH 1. **SC into next two stitches. DC into next stitch. 3 TRE into each of the next  2 stitches. DC into next stitch.  Repeat from ** 10 more times. Join to first stitch. (110 stitches)
Step 5: CH 1. ** SC into next 3 stitches. HDC into next stitch. 2 DC into next stitch. 3 TRE into next stitch. CH 3. Slip stitch into first CH. 3 TRE into next stitch. 2 DC into next stitch. HDC into next stitch. SC into the next stitch Repeat from ** 10 more times.  Join to the first stitch. (160 stitches)
Finish off with long enough tail for weaving in your end. 

Leaf Edging
Using Simply Soft – Limlight (light green) 
Join your yarn to the edge of one of the leaves. You will be putting 2 SC into the side of each DC while working around the edge. When you get to the places where the leaves join each other, you will just put 1 SC between the stitches. When you get to the tip of the leaves. {1 SC CH 3, slip stitch to first CH. 1 SC.} All into the tip of each leaf.  Work your way around and join to your starting SC.

You are almost done. Remember your starting end? The one at the bottom of the crochet piece? Take it and weave it back and forth between step one and two. Pull tight and secure your end. This make the first round you crocheted stick out like a little bump.. giving the look as if you plucked the flower right off the stem.
Now that you have done that, weave in all of your other ends. Now, all that is left to do- find a cute baby!!! 😉

Filed Under: Costumes, Flowers, Free Patterns, Girls, Newborn

Sweet Stitches- Teen/Adult Beanie

January 26, 2015 By stitch11 16 Comments

A sweet beanie that both adults and teens can enjoy! This pattern uses crochet clusters which makes it the perfect opportunity for newbies to add another stitch to their stash. Free pattern is below or get the ad-free printable PDF pattern here.

Sweet Stitches - TeenAdult Beanie - Free Crochet Pattern

Have you ever worked with crochet clusters? They’re not actually hard to do – you just start working a double crochet stitch but don’t complete the last step before starting the next stitch, then repeat that several times and finish them all together. 

Once you get the knack of it they’re lots of fun and they make a cool texture on patterns like this beanie that will fit a teen or adult. 

Love this easy and fast crochet pattern? So do! That is why I put together a pattern bundle with all my favorite Done In A Day Patterns! And get this…there are 90 patterns included in this collection! Check out the bundle and all the patterns here!

The hat calls for worsted weight yarn, and while the original was worked in a solid color, it’s easy to make this a stash buster by doing each cluster round in a different color. Or work the bottom of the hat in one color and another toward the top.

Sweet Stitches- Teen/Adult Beanie Pattern

Skill Level: Easy 

Materials: 

• Hook: 

– US Size H/8 (5 mm) crochet hook or size needed to obtain gauge 

• Yarn: 250 yds worsted weight yarn

• Notions: 

– Scissors 

– Yarn needle 

Size: 

Hat circumference: 20 inches  

To fit head circumference: 20-22 inches 

Gauge:  

11 dc x 6 rows = 4 inches

Special Stitches: 

Sweet Stitches Beanie Crochet Pattern 

• 5 double crochet cluster (5-dc-cl): [Yo, insert hook in indicated st or sp, draw up a loop, yo and pull through 2 loops on hook] 5 times, yo and pull through all 6 loops on hook. 

• 4 treble crochet cluster (4-tr-cl): [Yo twice, insert hook in indicated st or sp, draw up a loop,  {yo and pull through 2 loops on hook} twice] 4 times, yo and pull through all 5 loops on hook.  

Get the ad-free printable PDF pattern here

ABBREVIATIONSDESCRIPTION
chChain
rndRound
scSingle crochet
sc2togSingle crochet next 2 stitches together
skSkip
spSpace
st(s)Stitch(es)
yoYarn over

Pattern

Join rnds where indicated with a sl st in the first st of the rnd. 

Ch 55 

Rnd 1: Sc in 2nd ch from hook and in each ch across, join. (54 sc) 

Rnd 2: Ch 1, sc in each st around, join. 

Rnd 3: Ch 2, 5-dc-cl in first st, ch 1, sk next st, [5-dc-cl in next st, ch 1, sk next st] around, join. (27 5-dc-cls, 27 ch-1 sps)  

Rnd 4: Ch 1, sc in each st and in each ch-1 sp around, join. (54 sc) 

Rnd 5: Ch 1, sc in each st around, join. 

Rnd 6: Ch 3, 4-tr-cl in first st, ch 2, sk next 2 sts, [4-tr-cl in next st, ch 2, sk next 2 sts] around, join. (18 4-tr-cls, 18 ch-2 sps)  

Rnd 7: Ch 1, sc in first st, 2 sc in next ch-2 sp, [sc in next st, 2 sc in next ch-2 sp] around, join. (54 sc)

Rnd 8: Ch 1, sc in each st around, join.  

Rnds 9-14: Repeat rnds 6-8 twice 

Rnd 15: Ch 3, 4-tr-cl in first st, ch 1, sk next 2 sts, [4-tr-cl in next st, ch 1, sk next 2 sts] around, join.  (18 4-tr-cls, 18 ch-1 sps)  

Rnd 16: Ch 1, sc in first st, sk next ch-1 sp, [sc in next st, sk next ch-1 sp] around, join. (18 sc)

Rnd 17: Ch 1, sc2tog in first 2 sts, [sc2tog in next 2 sts] around, join. (9 sts) 

Fasten off, leaving a long tail for sewing.  

Sew long tail through each of the sts on rnd 30, then pull tightly to close top of hat. Weave in end.

Use starting tail to sew bottom of rnd 1 closed. Weave in end.

Get the ad-free printable PDF pattern here

Filed Under: Free Patterns, Girls, Hats

Five Free Crochet Bow Patterns

January 17, 2015 By stitch11 Leave a Comment

Five Free Crochet Bow Patterns

After making my recent- So Easy and So Perfect Bow pattern.. I decided I wanted to round up my favorite bow patterns from my own designs, and designs linked in the free crochet pattern directory, The Yarn Box.

If you didn't already know, I am an editor for The Yarn Box. My sister Miranda, from Work At Home Adventures, and I work together to share free crochet patterns and to promote traffic to other crochet designers.

If you haven't checked out the directory, hop on over and discover new favorite designs! The best way to help a designer.. is by sharing the links!

Anyways… back to the bows! 

1. Sassy Bow by Simply Collectable Crochet

2. Boutique Bow by Stitch11 (that's me! 😉 )

3. So Easy and So Perfect Bow by Stitch11 (Hey!! That's me too! 🙂 )

4. Chunky Bobble Bow by Lulu Loves

5. How To Crochet A Bow Tie by Mollie Makes

Filed Under: Boys, Free Patterns, Girls, Pattern Reviews, Round Ups

So Easy and So Perfect! – The Three Step Bow –

January 16, 2015 By stitch11 5 Comments

The Three Step Crochet Bow

Today is “Wear your Colts colors” day at my daughters school. I asked her if she wanted a bow and she quickly said yes! Due to little time to make it, I came up with a super fast and easy version of the Boutique Bow.
This bow measures about 3 inches wide and 2 inches tall.

Stitches Used 
CH – Chain
Slip Stitch
SC – Single Crochet
HDC – Half Double Crochet
DC – Double Crochet

Supplies 
Any yarn with the appropriate hook size.  – I used Red Heart with Love and a 5.5 mm crochet hook
Yarn needle

Get Started! 
Row 1: CH 21. Turn. Skip 1 CH. **DC in next 2 CH. HDC in next 2 CH. SC in next 2 CH. HDC in next 2 CH. DC in next 2 CH. Repeat from ** one more time. CH 1. Turn.
Row 2: **DC in next 2 stitches. HDC in next 2 stitches. SC in next 2 stitches. HDC in next 2 stitches. DC in next 2 stitches. Repeat from ** one more time. CH 1. Turn.
Row 3: **DC in next 2 stitches. HDC in next 2 stitches. slip stitch in next 2 stitches. HDC in next 2 stitches. DC in next 2 stitches. Repeat from ** one more time.
Finish off leaving long tail. Fold the piece. Using yarn needle, sew both ends together. The SC should line up over each other. Weave your yarn end to the center of the bow. Wrap the bow with your yarn end and secure the end using your yarn needle. Finish off.

Filed Under: Costumes, Free Patterns, Girls

Bobble Leg Warmers -Toddler, Child and Adult Sizes

December 14, 2014 By stitch11 5 Comments

Free Bobble Leg Warmer Crochet Pattern - Toddler-Child-Adult

Like usual, my daughter told me what she wanted me to make her next. She specifically wanted blue leg warmers. Luckily, I had just bought a lot of blue Red Heart with Love during the Black Friday sale at Walmart.
I didn't want to make these like my usual HDC leg warmers. I wanted to use a fun stitch! The Bobble Stitch is so much fun to work with… especially when crocheting for a young child.
Although this pattern was designed for my daughter, I went ahead and wrote out this free crochet pattern in three sizes- toddler, child, and adult.

Supplies 
Red Heart with Love (For the toddler and child size, you will need less than one skein. For the adult size, you will need a little more than one skein.)
K-6.5 mm crochet hook
Yarn needle for weaving in ends.

Stitches
FSC – Foundation Single Crochet
CH – Chain
SC – Single Crochet
4-DC-Bobble

I used the video tutorial by Kim Guzman to learn the 4 DC Bobble Stitch and I used the video tutorial by Moogly to learn the Foundation Single Crochet.

~Note~ If you need to adjust the size, all you have to do is add or subtract stitches from your starting FSC by counts of 2. 

Round 1: FSC 26 for Toddler size –– FSC 30 for Child –– FSC 36 for Adult size.  Join to first FSC.
Round 2: CH 1. Turn. SC in same stitch. 4-DC-Bobble in next stitch. **SC in next stitch. 4-DC-Bobble in next stitch. Repeat from ** around. Join to first SC.  (26, 30, 36 stitches)
Round 3: CH 1. Turn. (Do not crochet into the same stitch. Your first SC will go into the top of the bobble stitch. Your last SC of this round will go into your starting stitch) SC into each stitch around. Join to first SC.  (26, 30, 36 stitches)
Repeat rounds 2 and 3 — 11, 14, 17 more times.
Finish off and weave in your ends.

Filed Under: Free Patterns, Girls

Chevron Lace Cowl – (free) pattern review

December 7, 2014 By stitch11 2 Comments

Chevron Lace Cowl

I have been wanting to make something “Chevron” for a very long time now. When I discovered this Chevron Lace Infinity Scarf pattern by Moogly… I quickly put it at the top of my list.

I did use a thicker yarn that the pattern called for. I used Red Heart With Love and a size N crochet hook. I also made the scarf shorter before joining because I have been loving the look and ease of cowls lately more than infinity scarves.
Especially when crocheting for a blind family member, she won't have to worry about the scarf falling and tripping her. And since it's shorter, it's less likely to snag on anything while she is walking. 

My first attempt at following the pattern I was REALLY confused, but then I scrolled down a little and found Moogly's diagram. Then it ALL made since. If you have never used a diagram, this will be the perfect project… especially since you have a written pattern to help you understand it!

Thanks Moogly for sharing another great free pattern!

Get your copy of this pattern > HERE<

See more scarves I have made >HERE<

Filed Under: Free Patterns, Girls, Pattern Reviews, Scarfs

Free Crochet FOX Costume Tutorial

October 30, 2014 By stitch11 3 Comments

Free Crochet FOX Costume Tutorial

My daughter wanted to be a fox! I knew instantly this would be a fun one to put together. You can make a fox costume too!
HERE is the free Fox Hat crochet pattern.
You can get the free Fingerless Gloves pattern HERE.
HERE is the free Leg Warmer pattern.
The free Tutu Tutorial is HERE.
And HERE is the review for the free Fox Tail tutorial.

To make the belly, I just cut a piece of felt into an oval and hot glued it onto the shirt.
Happy Halloween!


Filed Under: Costumes, Free Patterns, Girls

Fluff Cuff – Child Size Leg Warmers

October 29, 2014 By stitch11 Leave a Comment

Fluff Cuff - Child Size Leg Warmers

The child size Fluff Cuff Leg Warmers were designed to look like fox legs. My daughter will be wearing a crocheted fox costume this year for Halloween. Be sure to also check out the free crochet patterns for the Fluff Cuff Fingerless Gloves, Fox Hat, Fox Tutu, and the Fox Tail. If you really love foxes, you may want to make the Baby Fox too!

Supplies
Medium weight yarn – I used “Brown” I Love This Yarn for the leg warmers.
Medium weight “Terra Cotta” I Love This Yarn. (It’s a rusty orange) and “Cranberry” I Love This Yarn. (It’s a pretty rosey color) for the fluff.
Pet Brush
Yarn needle – for weaving in ends
J-6.00 MM crochet hook

Stitches
Slip Stitch
SC – Single Crochet
HDC – Half Double Crochet
FSC – Foundation Single Crochet

*Tip* you will want to take the time to learn the FSC. Check out this fantastic tutorial by Moogly. Because of using the FSC, the legwarmer will stretch nicely over the foot for a perfect fit.

Round 1: FSC 31. Join to first FSC
Round 2-23:  Now working in continuous rounds. HDC into same stitch and each stitch around.  (31)

SC into next stitch. Slip stitch into next stitch

Round 24: CH 1, SC into same stitch and each stitch around. Join to first SC. (31)

Finish off and weave in your ends. Repeat… one for each leg 🙂

Cut pieces of yarn about 4 inches long. You will need to attach 3 strands at a time over the SC stitches of Round 28. To attach them, fold 3 strands in half. Insert your hook around a SC stitch. Put the hook through the fold of the yarn strands. Pull through stitch creating a loop. Wrap yarn ends over the hook, and pull through the loop you just made. Tug on yarn strands.
Once you have attached yarn the entire way around, trim the yarn to be about 1.5 inches long.  Brush the yarn with the pet brush until it’s fluffy. Lightly brush the entire leg warmer to make a slight fluffy look to the stitches. Repeat on other leg warmer.

Filed Under: Costumes, Free Patterns, Girls

Fox TuTu For Miss Fox – Free Tutorial

October 27, 2014 By stitch11 Leave a Comment

Fox Tutu Tutorial

Supplies
-1.5 inch button
-2 colors of your choice of medium weight yarn.  I used “Terra Cotta” I Love This Yarn. (It’s a rusty orange) and “Cranberry” I Love This Yarn. (It’s a pretty rosey color)
-J-6.00 MM crochet hook
-Yarn needle for weaving in ends and attaching the button.  
-Tulle (The amount of tulle used will vary.) I bought one roll of tulle that is already in the right width needed. But I also bought 3 yards of tulle that isn't cut at all. The amount of tulle you will need will depend on how long or fluffy you want to make the tutu. I like to buy a tad more than I expect to need.. just to be safe.
-Ribbon (The ribbon is optional. I found some pretty orange ribbon and some ribbon with foxes on it.. too cute to pass up!) 

Crochet Stitches Used 
FSC – Foundation Single Crochet
TRE – Treble Crochet Stitch
HDC – Half Double Crochet

Step 1
Holding both strands of yarn together – I started with a FSC  of 62. You will want to check the measurements for whom you are making the tutu for. I wrapped the FSC piece around my daughters hips to make sure it fit snuggly. As I have learned from the past.. they tend to stretch out a little after being worn the first time.  You do not have to use a count of 62 FSC… if you need to make it smaller or larger.. adjust the number of FSC until you have the appropriate size.

Step 2
CH 3. Turn. TRE into each FSC across.

Step 3 
CH 1. Turn. HDC into each stitch across.

Step 4
Weave in your ends and attach your button.  The entire row of step 2 can be button holes. 🙂

Step 5
All that is left for you to do it attach the tulle and ribbon. If you do not know how to do this, check out my How To Make A TuTu tutorial for a step by step photo direction on attaching the tulle.
I cut my tulle to be about 2 feet long (and 6 inches wide). I did 1 orange for every 3 red pieces. After I joined tulle around the HDC stitches of step 3, I added a 2 foot piece of ribbon to the bottom of every 4th TRE stitch from step 2.

You can add a fox tail using this FREE Fox Tail Tutorial! By using the loops at the top of your braid, ,you can attach and detach the fox tail to your button anytime!
Also check out the Fox Hat and Fluffy Cuff Fingerless Gloves!
If you really love fox's, you may want to make the baby fox too!

Filed Under: Costumes, Free Patterns, Girls, Pattern Reviews

Fluff Cuff – Child Size Fingerless Gloves

October 22, 2014 By stitch11 Leave a Comment

Fluff Cuff - Child Size Fingerless Gloves - Free Crochet Pattern

Living in Indiana, means not knowing what kind of weather Halloween will bring. Some years we have Indian Summers (or so the weather man calls them?) -while some Halloween's bring snow. To avoid the risk of my children getting cold while trick or treating door to door… I always try to make sure their costumes are warm enough to block crisp air from reaching their skin.
Last Halloween, my daughter was a cat. I made her the Fingerless Kitty Cat Mittens. This year she will be a FOX! 😀 So far I have made the Fox Tail, and the Fox hat. It's only fitting that I make her new fingerless gloves to match this years costume. And like most of what I make, here is the free pattern for these adorable Fluff Cuff – Child Size Fingerless Gloves!

[Read more…]

Filed Under: Costumes, Free Patterns, Girls

  • « Previous Page
  • 1
  • 2
  • 3
  • 4
  • …
  • 8
  • Next Page »
  • Email
  • Facebook
  • Pinterest
  • RSS

Stitch11 is a Red Heart Blogger!

unnamed

.

Grab My Button

Archives

Privacy Policy

Copyright © 2026 Stitch11.com · All Rights Reserved · Log in